8-track player turn into a Walkman

Turning 8-Track Player Into A Walkman

Following time backward, for portable music we’ve had iPods, CDs, and cassette tapes which we played using small Walkmans around the size of a cigarette box. And for a brief time before that, in the 1960s and 1970s, we had 8-track tapes. These were magnetic tapes housed in cases around the size of a large slice of bread. Car dashboards housed players, and they also came in a carry-around format like the one [Todd Harrison] recently bought at a Hamfest for $5 and made more portable by machining clips for a strap and adding a headphone jack.

But before hacking it, he wanted to try it out. Luckily his sister had hung onto her old tapes and after plugging it in and sliding in a tape, it worked! Opening it up he found that the contacts for the batteries were rusted but the mechanical components and electronics inside were very clean. Though he did add glue to a crack in the plastic read-head support, cleaned out some grease, did some lubricating, and cleaned the contacts in the volume control’s potentiometer. Check out his teardown video below for those details or if you just want to see how it all works.

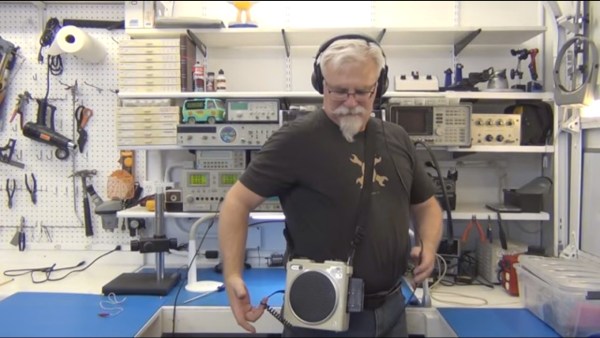
Then came making it portable so that he could embarrass his kids by carrying it around the mall. The shoulder strap didn’t come with it, so he machined some clips out of steel and snapped on a strap. It didn’t have a headphone jack and he didn’t want to embarrass his kids too much, so he added one.  You can see that hack in the second video below, including how his repurposed jack automatically disconnects the speaker when the headphone plug is inserted. Personally, we think he looks pretty spiffy carrying it around wearing his Hackaday T-shirt.

Continue reading “Turning 8-Track Player Into A Walkman”

Play Chess Against A Ghost

While chess had long been a domain where humans were superior to computers, the balance has shifted quite substantially in the computers’ favor. But the one thing that humans still have control over is the pieces themselves. That is, until now. A group has built a robot that both uses a challenging chess engine, and can move its own pieces.

The robot, from creators [Tim], [Alex S], and [Alex A], is able to manipulate pieces on a game board using a robotic arm under the table with an electromagnet. It is controlled with a Raspberry Pi, which also runs an instance of the Stockfish chess engine to play the game of chess itself. One of the obvious hurdles was how to keep the robot from crashing pieces into one another, which was solved by using small pieces on a large board, and always moving the pieces on the edges of the squares.

This is a pretty interesting project, especially considering it was built using a shoestring budget. And, if you aren’t familiar with Stockfish, it is one of the most powerful chess engines and also happens to be free and open-source. We’ve seen it used in some other chess boards before, although those couldn’t move their own pieces.

Continue reading “Play Chess Against A Ghost”

Marquee Display Uses Six Dozen Surplus VFD Tubes To Great Effect

The quest to repurpose surplus parts into new and interesting displays never ends, it seems. And the bigger the display, the better, with extra points for using some really obscure part, like these surplus Russian vacuum-fluorescent tubes turned into a marquee display.

As [tonyp7] freely admits, this is a pet project that’s just for the fun of it, made possible by the flood of surplus parts on the market these days. The VFD tubes are IV-25s, Russian tubes that can be had by the fistful for a song from the usual sources. The seven small elements in the tube were intended to make bar graph displays like VU meters, but [tonyp7] ganged up twelve side by side to make 84-pixel displays. The custom driver board for each matrix needs three of the old SN75518 driver chips, in 40-pin DIPs no less. A 3D-printed bracket holds the tubes and the board for each module; it looks like a clock is the goal, with six modules ganged together. But the marquee display shown below is great too, and we look forward to seeing the finished project.

From faux-Nixies made with LEDs to flip-segment displays driven by relay logic to giant seven-segment LEDs that can be 3D-printed, we really like the trend to unique displays. What are you dreaming up?

Continue reading “Marquee Display Uses Six Dozen Surplus VFD Tubes To Great Effect”

Arduino Revives Junkyard Laser Cutter

Some people have all the luck. [MakerMan] writes in to gloat tell us about a recent trip to the junkyard where he scored a rather serious looking laser cutter. This is no desktop-sized K40 we’re talking about here; it weighs in at just under 800 pounds (350 Kg), and took a crane to deliver the beast to his house. But his luck only took him so far, as closer inspection of the machine revealed it was missing nearly all of its internal components. Still, he had the frame, working motors, and laser optics, which is a lot more than we’ve ever found in the garbage.

After a whirlwind session with his wire cutters, [MakerMan] stripped away most of the existing wiring and the original control board inside the electronics bay. Replacing the original controller is an Arduino Nano running Grbl, likely giving this revived laser cutter better compatibility with popular open source tools than it had originally. Even though the laser cutter was missing a significant amount of hardware, he did luck out that both the motor drivers were still there (and working) as well as the dual power supplies to run everything.

After a successful motion test, [MakerMan] then goes on to install a new 90W laser tube. Supporting the tube is a rigged up water cooling system using a plastic jug and a cheap bilge pump. He also added an air assist system, complete with side mounted compressor. This pushes air over the laser aperture, helping to keep smoke and debris away from the beam. Finally, a blower was installed in the bottom of the machine with flexible ducting leading outside to vent out the smoke and fumes that are produced when the laser is in operation.

This machine is a considerable upgrade from the previous laser [MakerMan] built, and as impressive as this rebuild is so far, we’re interested in seeing where it goes from here. If you ask us, this thing is begging for an embedded LaserWeb server.

Continue reading “Arduino Revives Junkyard Laser Cutter”

Courtesy of [david.reid]

Bent PETG Fills A Nixie Gap

Have you ever thought that Nixie tubes are cool but too hard to control with modern electronics? And that they’re just too expensive? [david.reid] apparently thought so and decided to create his own version of a Nixie tube, and it doesn’t get much cheaper than this.

PETG Nixie Tube

While working on a 3D printed locomotive with his son, [david.reid] used clear PETG (Polyethylene Terephthalate Glycol) 3D printer filament to move light from LEDs to various parts of the locomotive. He found this was a success, but roughed up the outside of the filament to see what would happen. Lo and behold, a warm glow appeared on the surface of the tube! Like any good hacker, his next thought was of Nixie tubes, as you have seen in many clocks.

His basic idea is that with a little heat you can bend the filament into any shape that you like ([david.reid] uses custom molds). You then use some sandpaper to roughen up the outside wherever you’d like light to show, and add an LED at the bottom to light it up!

[david.reid] isn’t the first person to modernize Nixie Tubes. Over the years, we’ve seen them combined with Wi-Fi boards, individual LED segments, or even laser cutters & WS2812s!

Now’s a great time to get started on a project for the Hackaday Prize! If you’re looking for somewhere to start, we’d love to at least see your own take on a clock!

When 4 + 1 Equals 8: An Advanced Take On Pointers In C

In our first part on pointers, we covered the basics and common pitfalls of pointers in C. If we had to break it down into one sentence, the main principle of pointers is that they are simply data types storing a memory address, and as long as we make sure that we have enough memory allocated at that address, everything is going to be fine.

In this second part, we are going to continue with some more advanced pointer topics, including pointer arithmetic, pointers with another pointer as underlying data type, and the relationship between arrays and pointers. But first, there is one particular pointer we haven’t talked about yet.

The one proverbial exception to the rule that pointers are just memory addresses is the most (in)famous pointer of all: the NULL pointer. Commonly defined as preprocessor macro (void *) 0, we can assign NULL like any other pointer.

Continue reading “When 4 + 1 Equals 8: An Advanced Take On Pointers In C”

Completely Scratch-Built Electronic Speed Controller

Driving a brushless motor requires a particular sequence. For the best result, you need to close the loop so your circuit can apply the right sequence at the right time. You can figure out the timing using a somewhat complex circuit and monitoring the electrical behavior of the motor coils. Or you can use sensors to detect the motor’s position. Many motors have the sensors built in and [Electronoobs] shows how to drive one of these motors in a recent video that you can watch below. If you want to know about using the motor’s coils as sensors, he did a video on that topic, earlier.

The motor in question was pulled from an optical drive and has three hall effect sensors onboard. Having these sensors simplifies the drive electronics considerably.

Continue reading “Completely Scratch-Built Electronic Speed Controller”