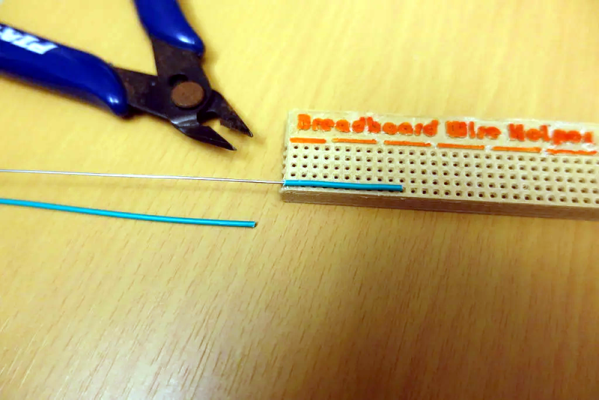
Open Source Computer Controlled Loom Weaves Pikachu For You

The origin story of software takes us back past punch card computers and Babbage’s Difference Engine to a French weaver called Joseph Marie Jacquard. Jacquard created a way to automate mechanical looms, giving weavers the ability to change a loom’s pattern by simply switching punch cards. This invention not only made it possible to produce detailed fabrics in a vastly simplified way, it was an extremely important conceptual step in the development of computer programming, influencing Babbage’s development of the Analytical Engine amongst many other things.

So, when [Kurt] saw his son’s enthusiasm for weaving on a simple loom, he started thinking about how he could pay homage to the roots of software by designing and building an open source computer controlled loom. He knew this was going to be difficult: looms are complex machines with hundreds of small parts. [Kurt] wrestled with wonky carriage movements, cam jams, hook size disasters and plenty of magic smoke from motor control boards. After a year and a half of loom hacking he succeeded in making a 60 thread computer controlled loom, driven by an iPhone app using Bluetooth.

As well as writing up the story of this build on his blog, linked above, [Kurt] has also has made all of his design files, PCB layouts, firmware and code available on GitLab.

We’ve featured a few weaving hacks over the years, including this cheap, simple 3D printable loom and a Jacquard inspired bitmap display.

Fun, informative build video after the cut.

Continue reading “Open Source Computer Controlled Loom Weaves Pikachu For You”

Digital Multimeasure Helps You Get The Job Done

In any mechanical field of work, accurate measurement is key to success. [Patrick Panikulam] knows this well, and decided to build a device that would be useful for some of the more tricky measurement tasks he was encountering.

[Patrick]’s digital multi-functional measurement tool packs a bunch of useful hardware into a pocket-sized form factor. There’s a Sharp IR distance sensor for non-contact measurements, a rotary wheel encoder for measuring distances along curved lines, and an MPU6050 IMU packing accelerometers and gyroscopes for measuring angles and surface levels. Control is via touch buttons, so measurements can be taken without disturbing the position of the device.

The use cases for such a device are many and varied. [Patrick] reports using it to verify that his 3D printer bed is leveled, as well as using it to measure curved surfaces in order to accurately cut stickers to suit. It’s got the hardware to serve as a digital protractor, too.

Combining a variety of useful hardware into a compact form factor, while also taking into account usability, has netted [Patrick] a handy tool. It’s not dissimilar from commercial measurement tools available online, and yet is completely built from off-the-shelf parts. Truly a handy device to have in any hacker’s toolbox!


Adding Bluetooth Control To A Benchtop Power Supply

In 2019, it’s possible to kit out a lab with all the essentials at an even cheaper price than it has ever been. The DPS3005 is one such example of low-cost equipment – a variable power supply available for less than $50 with a good set of features. [Markel Robregado] wanted a little more functionality, however, and got down to work.

The crux of [Markel]’s project is improved connectivity. A Texas Instruments CC2640R2F Launchpad is employed to run the show, with its Bluetooth Low Energy capability coming in handy. A custom smartphone app communicates with the Launchpad, which then communicates with the power supply over its Serial Modbus interface. Through the app, [Markel] can set the voltage and current limit on the power supply, as well as switch it on and off. This could prove useful, particularly for remote triggering in the case of working with dangerous projects. Sometimes it pays to take cover, after all.

We’ve seen power supplies modified before; this pot mod for higher precision is a particular treat. If you’ve hacked your bench hardware for better performance, let us know. Video after the break.

Continue reading “Adding Bluetooth Control To A Benchtop Power Supply”

Creating A Laser Cutter From A 3D Printer

The average FDM 3D printer is not so different from your garden variety laser cutter. They’re often both Cartesian-coordinate based machines, but with different numbers of axes and mounting different tools. As [Gosse Adema] shows, turning a 3D printer into a laser cutter can actually be a remarkably easy job.

The build starts with an Anet A8 3D printer. It’s an affordable model at the lower end of the FDM printer market, making it accessible to a broad range of makers. With the help of some 3D printed brackets, it’s possible to replace the extruder assembly with a laser instead, allowing the device to cut and engrave various materials.

[Gosse] went with a 5500 mW diode laser, which allows for the cutting and engraving of wood, some plastics and even fabrics. Unlike a dedicated laser cutter there are no safety interlocks and no enclosure, so it’s important to wear goggles when the device is operating. Some tinkering with G-Code is required to get things up and running, but it’s a small price to pay to get a laser cutter on your workbench.

We’ve seen [Gosse]’s 3D printer experiments before, with the Anet A8 serving well as a PCB milling machine.

Assembling A Lathe From Not A Lot

Most people have a piece of equipment without which they consider their workshop or bench to be incomplete. For some, it is an oscilloscope, for others a bandsaw, but for many metalworkers, it is a lathe. Lathes are expensive if you are seeking a good one, quite cheap if you don’t mind a bad one, and sometimes even free if you can deal with a good one that’s very old and needs six burly friends and a forklift truck to move.

There is another way to acquire a lathe, and it’s one that [Sek Austria] demonstrates in the video below the break: build your own. It’s a fascinating demonstration of how machine tools evolved with each successive generation made by the last at every increasing precision. He achieves good-enough construction from a welded steel frame with little more than hand tools, and though his result is by no means a perfect lathe it does allow him to achieve the next level of machining precision. Off the shelf come a set of optical guide rails and linear bearings along with a chuck and tool holder, but the rest is all his. And the washing machine motor driving it is a touch of pure class, even though he is embarrassed enough to cover it with a glove for filming. Sometimes in our community, we adopt the sledgehammer to crack a nut methodology, usingĀ  CNC or similar techniques to fabricate things that can be made more speedily with less accomplished methods. We couldn’t help wincing at his hammering in the vice to create the lead screw nut bracket, though.

As homemade lathes go, this one is surprisingly conventional. Others have been fashioned from engine parts, or concrete.

Thanks [Xavier] for the tip.

Continue reading “Assembling A Lathe From Not A Lot”

You Don’t Need That Bulky CRT Oscilloscope Anymore

While it might be nice to use a $4,000 oscilloscope in a lab at a university or well-funded corporate environment, a good portion of us won’t have access to that kind of equipment in our own home shops. There are a few ways of getting a working oscilloscope without breaking the bank, though. One option is to find old CRT-based unit for maybe $50 on craigslist which might still have 60% of its original 1970s-era equipment still operational. A more reliable, and similarly-priced, way of getting an oscilloscope is to just convert a device you already have.

The EspoTek Labrador is an open-source way of converting a Raspberry Pi, Android device, or even a regular run-of-the-mill computer into a working oscilloscope. It’s a small USB device with about a two square inch PCB footprint that includes some other features as well like a signal generator and logic analyzer. It’s based on an ATxmega which is your standard Arduino-style AVR microcontroller but geared for low power usage. It looks as though it is pretty simple to use as well, and the only requirements are that you can install the software needed for the device on whatever computing platform you decide to use.

While the Labrador is available for sale at their website, it is definitely a bonus when companies offer products like this but also release the hardware and software as open source. That’s certainly a good way to get our attention, at least. You can build your own if you’d like, but if you’d rather save the time you have pre-built options. And it doesn’t hurt that most of the reviews of this product seem to be very favorable (although we haven’t tried one out ourselves). If you’d prefer an option without a company backing it, though, we have you covered there too.

Solder SMDs With A Pan O’ Sand

For those that grew up working with through-hole components, surface mount parts can be challenging to deal with. However, there are plenty of techniques out there that are more than accessible to the DIY set. With the right gear, soldering SMD boards is a snap – just get yourself a hot pan of sand (Youtube link, embedded below)!

The process starts with a professionally manufactured PCB, and accompanying stencil. All major PCB CAD packages are capable of generating stencil files these days, and many manufacturers will throw in a laser cut stencil for minimal extra cost with a PCB order. The board is first mounted on a stable surface, and has solder paste applied, before components are placed with tweezers. Perfect placement isn’t necessary, as the surface tension of the molten solder pulls components into their correct orientations. The populated board is then placed on a bed of sand in a frying pan, which is placed on an induction cooktop. The board is then heated until the solder melts, and all the components are neatly reflowed. Once allowed to cool, the board is done!

The trick is that the sand helps evenly heat the circuit board, while keeping it a safe distance away from the heat source. Results are good, and the process is far quicker than hand soldering. It’s easy to keep an eye on the process too. Of course, the traditional method is still to use the humble toaster oven, but new techniques are always useful. We’ve seen it done with a Bunsen burner, too. Video after the break.

Continue reading “Solder SMDs With A Pan O’ Sand”