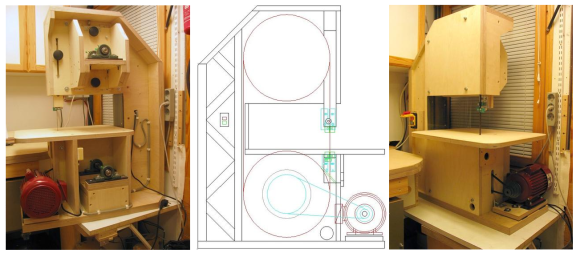
Foldscope Promises Microscopes For Everyone!

The folks over at PrakashLab at Standford University have come up with an amazingly simple microscope design called the Foldscope, which could make microscopes feasible in even the most remote areas.

The Foldscope is an optical microscope that can be made out of paper and printed components, much like a piece of origami. It can magnify up to 2,000X, costs less than a dollar to manufacture, and can provide a sub-micron resolution of 800nm. It requires no external power, fits in a pocket, and could survive being dropped off the top of a 3 story building!

It takes advantage of new technologies that make it possible to print micro-optics, micro-electronics, micro-flexures, and even micro-fluidics. Just take a look at the following bill of materials and diagram explaining the mechanism.

Continue reading “Foldscope Promises Microscopes For Everyone!”

Manual Pick And Place

picknplacePopulating a large surface mount PCB can take forever. [craftycoder] from Freeside Atlanta has built a great looking manual pick and place machine, removing the need for tweezers. No more will passives stick to your tweezers while you are trying to place them on your PCB!

We have seen a lot of pick and place machines in the past few years. What makes this one stand out is its simplicity and the no-nonsense build. This pick and place is built on an MDF platform, uses bearings from Amazon, standard 12 mm rails, and has a small camera for a close-up look at your part placement. Sure it is a manual method, but it beats painstakingly placing each part with tweezers. It would be interesting to see how much this entire build cost; we expect that it was not too expensive. See this thing in action in the video after the break.

We hope this project has inspired you to go out and make something cool! If so, let us know what you have made!
Continue reading “Manual Pick And Place”

Tiny Improvised Grinder/Saw Packs A Punch

They say necessity is the mother of invention. Sometimes the necessity is simply avoidance of unpleasant tasks such as cutting down 3500 header pins by hand. [Nixieguy] and his coworkers were faced with 50 prototype boards bearing 70 overly long pins apiece. He saved them from cutting them all down by hand by making a tiny improvised circular saw/grinder.

[Nixieguy] started by laser-cutting a combination tool holder and grinding platform. His laser failed before he could fashion a guard to keep the pin bits out of the motor or cut all the pieces he had in mind. The grinder is made from a 10A brushless RC motor, a motor driver, and a servo tester. [Nixieguy] machined an adapter to connect the disc to the shaft.

The transformer is there to hold the thing down during use since it’s so lightweight. He’s wearing two pairs of gloves because the pin cuttings were hot enough to sear skin. [Nixieguy] is planning on a complete redesign including a motor guard and the ability to adjust the depth. Maybe he can turn it into a chainsaw, maybe not.

A FPGA Based Bus Pirate Clone

XC6BP

A necessary tool for embedded development is a device that can talk common protocols such as UART, SPI, and I2C. The XC6BP is an open source device that can work with a variety of protocols.

As the name suggests, the XC6BP is a clone of the Bus Pirate, but based on a Xilinx Spartan-6 FPGA. The AltOR32 soft CPU is loaded on the FPGA. This is a fully functional processor based on the OpenRISC architecture. While the FPGA is more expensive than a microcontroller, it can be fully reprogrammed. It’s also possible to build hardware on the FPGA to perform a variety of tasks.

A simple USB stack runs on the soft CPU, creating a virtual COM port. Combined with the USB transceiver, this provides communication with a host PC. The device is even compatible with the Bus Pirate case and probe connector. While it won’t replace the Bus Pirate as a low-cost tool, it is neat to see someone using an open source core to build a useful, open hardware device.

Another Awesome Electronics Lab In A Box

541522_563430640341406_263300971_n

We called, and [Brian Zweerink] answered! Here’s another awesome example of making an electronics lab in a box!

But first off, who the heck is [Brian Zweerink]? He’s a fellow who helped us win the Redbull Creation Challenge of 2012 by building and programming the circuits for The Minotaur’s Revenge Dueling Labyrinths! We really need to do stuff like that again… What do you guys think?

Anyway, back to the hack. [Brian’s] version of the Make Your Electronics Lab in a Box, is similar, but also unique. What we like about his version is the electrical outlets inside the box for plugging in tools, the super-handy-stash-away-magnifying-lamp, and the size of his box; lots of room for storing components up on the top shelf! The only thing he’s missing is his oscilloscope, which was a bit too deep for the box, so it had to stay separate.

What do you guys think?

[via Reddit]

Building A Chainsaw Mill To Make Planks

Here’s a chainsaw hack that makes a lot more sense than the last one we shared…  It’s a setup you can build to help cut down logs into usable planks for your own projects!

Our guide on this tool hack is [BongoDrummer], who is the co-founder of a group in Wales called the Flowering Elbow, dedicated to imagining and making better futures by helping inspire people with inventions, encouraging project collaborations, and contributing to the community. We think he’s just a wee bit more knowledgeable than our previous grinder-chainsaw inventor…

[BongoDrummer] starts out with a proper note on safety, explaining accident statistics and offering up a refresher guide on proper chainsaw use. From there he gets right into the design and build of the mill. He’s chosen to use aluminum extrusion because it’s strong, light, and easy to work with—not to mention easy to assemble! Videos and more info after the jump.

Continue reading “Building A Chainsaw Mill To Make Planks”

Bench Power Supply Constant Current EZ-SET

constant_current_mod3

Here is a nice hack you may find very useful if you have a cheaper bench power supply that supports constant current limit protection (CC mode) and the only way to set or check your max current limit is to disconnect your circuit, short the power supply outputs and then check or set your limit. Yes, what a pain! [Ian Johnson] was enduring this pain with a couple of Circuit Specialist bench power supplies and decided to do something about it. After finding a download of the circuit diagram for his CSI3003X-5 supply he was able to reverse engineer a hack that lets you press a new button and dial-in the max current setting. Your first guess is that he simply added a momentary button to short the power supply outputs, but you would be wrong. [Ian’s] solution does not require you to remove the load, plus the load can continue running while you set your current limit. He does this by switching the current display readout from using 0–3 volts off an output shunt resistor to using the 0-3 volts output from a digital potentiometer which is normally used to set the power supplies’ constant current limit anyway. So simple it’s baffling why the designers didn’t include this feature.

Granted this is a simple modification anybody can implement, however [Ian] still wasn’t happy. A comment by [Gerry Sweeney] set him on the path to eliminate the tedious multi-button pressing by implementing a 555 momentary signal to switch the circuit from current load readout to current set readout. This 2nd mod means you just start pressing your up-down CC set buttons and it momentarily switches over the display to read your chosen max current and a few moments later the display switches back to reading actual load current. Brilliant! Just like the expensive big boy toys.

[Ian] doesn’t stop with a simple one-off hack job either. He designed up a proper PCB with cabling and connectors, making an easy to install kit that’s almost a plug-in conversion kit for Circuit Specialist bench power supplies (CSI3003X-5, CSI3005X5, CSI3003X3, CSI3005XIII). It is not a 100% plug-in kit because you do have to solder 3 wires to existing circuit points for signal and ground, but the video covering that task seemed trivial.

This hack could very well work with many other power supplies on the market being Circuit Specialist is just rebadging these units. For now, only the models listed after the break are known to work with this hack. If you find others please list in the comments.

After the break we will link to all three progressive mod videos incase you want to learn how to mod your own power supply or you could just order a prebuilt kit from [Ian].

Continue reading “Bench Power Supply Constant Current EZ-SET”