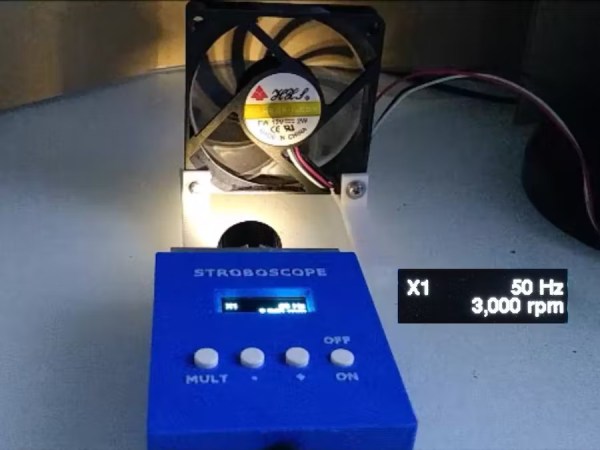
Review: Lidl Parkside Micrometer

A couple of years ago we published a look at precision measurement tools, in particular vernier calipers and micrometer screw gauges. It featured a look at how they work and how they’re used, and a comparison of good and bad quality instruments. When comparing micrometers we had three of them, a Mitutoyo and a Moore & Wright representing decent quality, and an £8 ($9.41) Daniu from Banggood from the cheaper end of the market. As you might expect, the Daniu was laughably bad, with noticeable play in its thread and jaws that were not parallel to the extent you could see light between them. You might consider it case closed for cheap micrometers then, were it not that while on my summer travels through the Benelux countries I spied a Parkside micrometer in a Lidl supermarket for €8.99 ($8.92). I had to buy it and investigate.

Some Measuring Devices With Your Groceries?

The Parkside micrometer in its boxLidl is a German supermarket chain that can be found all over Europe, and like their arch-competitor Aldi they feature the “Middle of Lidl” aisles full of all sorts of useful stuff that changes on a regular basis. Among this is a comprehensive range of tools under the Parkside brand, which is basically on par with the good stuff from Harbor Freight, and are in fact quite good for the price. Thus even though it’s about the same price as the Daniu I had higher expectations for the Parkside micrometer.

The micrometer is packaged in the usual plastic case in a small cardboard box, and comes with a large paper instruction sheet and a small spanner for zero adjustment. Taking it out of the case, it follows exactly as you’d expect from a micrometer with a solid drop-forged frame and an aluminium barrel on the micrometer head. It can measure up to 25 mm at a resolution of 0.01 mm, exactly like the others I tested in 2020. So my nine dollars or so has got me a micrometer, but is it any good? How do you evaluate a micrometer screw gauge? I re-borrowed the two comparison instruments from 2020, and set out to find out.

The Tiniest Sliver Of Light Gives It Away

The mirror finish on the Mitutoyo jaw face reflecting the "H" of the Hackaday website.
The mirror finish on the Mitutoyo jaw face reflecting the “H” of the Hackaday website.

It’s worth saying that the jaw faces are polished, but not to a mirror finish as those on the Mitutoyo and neither do they appear to have been hardened. In the first instance, comparing with the Daniu I closed the jaws against the force of the ratchet, and held it up against the light to spot any imperfections in the way they meet. Against the blue sky through my window I couldn’t see any, but a friend did the same thing against the more intense point source of an electric light and indeed there was the tiniest discernable sliver of light. Not the obvious wedge of light I caught with the Daniu back in 2020 and less than the visible sliver of light when it is measuring a human hair, but definitely enough to knock a few hundredths of a milimetre off my trust in its accuracy.

The next step in the evaluation involves opening the  jaws about half way, and feeling for any play in the thread. None discernable, at least one win over the Daniu which had the barrel flapping around with significant play. Then a zero test, after adjusting the zero position with the spanner a few repeated closings with the ratchet, to check that it always returns to the same zero point. In this case as with all micrometers it’s possible to overshoot the zero and damage the thread if you apply too much force, but just on the ratchet it would land in the same place.  A pass on a couple of tests then, so while it’s not the worst micrometer ever it’s obvious that the low price brings at least one compromise.

A Tiny Discrepancy In Measurement

Opening up the three micrometers from the 2020 piece again it’s immediately obvious in the silky feel of the thread and the lack of wobble in the ratchet just where the money goes in an expensive micrometer, and just how comedically bad the Daniu was by comparison. But it’s the Parkside in our sights today, so it’s time to make a few comparitive measurements between it and the Mitutoyo. First up were the old standbys of a piece of paper and a human hair in which the Parkside returned the same as the Mitutoyo, and then the machined shaft of the Moore & Wright which returned a difference of 0.01 mm.

Parkside Mitutoyo
Sheet of paper 0.12 mm 0.12 mm
Human hair 0.05 mm 0.05 mm
Moore & Wright shaft 6.79 mm 6.80 mm

The discrepancy in this table when measuring the shaft may be small, but it harks back to that sliver of light from imperfectly aligned jaws. As expected if the shaft meets the jaws at anything but the highest point of the jaw it will return a slightly smaller reading, thus it immediately has an error on everything it returns. Discussing it with friends there was raised the intriguing possibility of lapping the faces by drawing a sheet of exceptionally fine abrasive through the closed jaws, however I have my doubts as to whether this would do anything but make the gap worse.

What I can say about the Parkside micrometer screw gauge is that it appears reasonably well-built, but I can’t present it as the equal of the more expensive instruments when its faces are anything but parallel. I would say therefore that it would be good for basic measurements when machining or in CAD work where an error of 0.01 mm or 0.02 mm wouldn’t matter too much, but perhaps I wouldn’t quite trust it when working with extremely fine tolerances. Still, it’s not the worst among cheap micrometers and it’s on sale for a very reasonable price even if it’s not in the same precision instrument league as the Mitutoyo. If you don’t have a micrometer screw gauge yet then you could do a lot worse at this end of the market.

Printable One-Way Driver Skips Ratchet For A Clutch

Ratcheting screwdrivers can help you work faster, even if their bulk means they’re not the best option for working in tight spaces. [ukman] decided to build a similar device of his own, relying on a slightly different mechanism — an overrunning clutch.

The design is similar to a freewheel used on a bicycle, allowing free movement in one direction while resisting it in the other. As the screwdriver is turned in one direction, the shaft is wedged by a series of cylinders that lock it in place. However, the geometric shape of the clutch allows the shaft to turn in the other direction without getting wedged in place. The result is a screwdriver that can be turned, rolled back, and turned further. Thus, screws can be tightened without loosening one’s grip on the tool.

With its 3D printed construction, it’s probably not the best tool for heavy-duty, high-torque jobs, but it looks more than capable of handling simple assembly tasks. We’ve seen some other nifty screwdrivers around these parts, too.

Continue reading “Printable One-Way Driver Skips Ratchet For A Clutch”

Frequency Counter Restoration Impeded By Kittens

We think of digital displays as something you see on relatively modern gear. But some old gear had things like nixies or numitrons to get cool-looking retro digital displays. The HP 521A frequency counter, though, uses four columns of ten discrete neon bulbs to make a decidedly low-tech but effective digital display. [Usagi Electric] has been restoring one of these for some time, but there was a gap between the second and third videos as his workshop became a kitten nursery. You can see the last video below.

In previous videos, he had most of the device working, but there were still some odd behavior. This video shows the final steps to success. One thing that was interesting  is that since each of the four columns are identical, it was possible to compare readings from one decade to another.

However, in the end, it turned out that the neon bulbs were highly corroded, and replacing all the neon bulbs made things work better. However, the self-check that should read the 60 Hz line frequency was reading 72 Hz, so it needed a realignment. But that was relatively easy with a pot accessible from the back panel. If you want to see more details about the repair, be sure to check out the earlier videos.

We love this old gear and how clever designers did so much with what we consider so little. We hate to encourage your potential addiction, but we’ve given advice on how to acquire old gear before. If you want to see what was possible before WS2812 panels, you could build this neon bulb contraption.

Continue reading “Frequency Counter Restoration Impeded By Kittens”

Ryobi Battery Hack Keeps CPAP Running Quietly

When it comes to cordless power tools, color is an important brand selection criterion. There’s Milwaukee red, for the rich people, the black and yellow of DeWalt, and Makita has a sort of teal thing going on. But when you see that painful shade of fluorescent green, you know you’ve got one of the wide range of bargain tools and accessories that only Ryobi can offer.

Like many of us, Redditor [Grunthos503] had a few junked Ryobi tools lying about, and managed to cobble together this battery-powered inverter for light-duty applications. The build started with a broken Ryobi charger, whose main feature was a fairly large case once relieved of its defunct guts, plus an existing socket for 18-volt battery packs. Added to that was a small Ryobi inverter, which normally plugs into the Ryobi battery pack and converts the 18 VDC to 120 VAC. Sadly, though, the inverter fan is loud, and the battery socket is sketchy. But with a little case modding and a liberal amount of hot glue, the inverter found a new home inside the charger case, with a new, quieter fan and even an XT60 connector for non-brand batteries.

It’s a simple hack, but one that [Grunthos503] may really need someday, as it’s intended to run a CPAP machine in case of a power outage — hence the need for a fan that’s quiet enough to sleep with. And it’s a pretty good hack — we honestly had to look twice to see what was done here. Maybe it was just the green plastic dazzling us. Although maybe we’re too hard on Ryobi — after all, they are pretty hackable.

Thanks to [Risu no Kairu] for the tip on this one.

Building A Spot Welder From 500 Junk Capacitors

[Kasyan TV] over on YouTube was given a pile of spare parts in reasonably large quantities, some of which were useful and allocated to specific projects, but given the given the kind of electronics they’re interested in, they couldn’t find a use for a bag of 500 or so low specification 470uF capacitors. These were not low ESR types, nor high capacitance, so unsuitable for power supply use individually. But, what about stacking them all in parallel? (video, embedded below) After a few quick calculations [Kasyan] determined that the total capacitance of all 500 should be around 0.23 Farads with an ESR of around 0.4 to 0.5 mΩ at 16V and packing a theoretical energy total of about 30 joules. That is enough to pack a punch in the right situation.

A PCB was constructed to wire 168 of the little cans in parallel, with hefty wide traces, reinforced with multiple strands of 1.8mm diameter copper wire and a big thick layer of solder over the top. Three such PCBs were wired in parallel with the same copper wire, in order to keep the total resistance as low as possible. Such a thing has a few practical uses, since the super low measured ESR of 0.6mΩ and large capacitance makes it ideal for smoothing power supplies in many applications, but could it be used to make a spot welder? Well, yes and no. When combined with one of the those cheap Chinese ‘spot welder’ controllers, it does indeed produce some welds on a LiPo cell with a thin nickel plated battery strip, but blows straight through it with little penetration. [Kasyan] found that the capacitor bank could be used in parallel with a decent LiPo cell giving a potentially ideal combination — a huge initial punch from the capacitors to blow through the strip and get the weld started and the LiPo following through with a lower (but still huge) current for a little longer to assist with the penetration into the battery terminal, finishing off the weld.

[Kaysan] goes into some measurements of the peak current delivery and the profile thereof, showing that even a pile of pretty mundane parts can, with a little care, be turned into something useful. How does such an assembly compare with a single supercapacitor? We talked about supercaps and LiPo batteries a little while ago, which was an interesting discussion, and in case you’re still interested, graphene-based hybrid supercapacitors are a thing too!

Continue reading “Building A Spot Welder From 500 Junk Capacitors”

The Tools To Fight Against Single-Use Plastic

Imagine for a moment that you design products for a living. But you can’t design all the things, so you have to buy some of your stuff from big-box stores just to go about your everyday life. This is more or less what happened to [Eric Strebel], who recently bought a bathroom faucet from IKEA. This particular flat-pack faucet came with a single-use plastic nut driver to be used in putting the faucet together. Since there is no marking that indicates the plastic type, it can’t be easily recycled. Not even the size of the business end is indicated. So between the shoddy plastic construction and the lack of information, most people are going to just throw this thing away. And that’s terrible.

So what’s to be done? Aside from boycotting IKEA (which [Eric] may do in the future for all we know), there’s not much to do but to offer up solutions on public platform and see what happens. To that end, [Eric] came up with five different ways of making this nut driver that are arguably more sustainable than single-use mystery plastic.

Say what you will about sustainability of using metals, which have to be mined, versus plastic – many of these methods use no tooling, so that’s something. Nut drivers made by [Eric] would instead be laser-cut from flat stock and either folded up and welded, or assembled from a multi-piece cut into a single-piece tool via perpendicular members that slot together. Or as [Eric] points out, the design could stay exactly the same as the plastic original and be die-cast instead.

It’s certainly an interesting exercise in design, and it’s really cool to see a little bit into [Eric]’s thought process when it comes to improving existing things. Be sure to check it out after the break, and let us know how you’d have done it better.

Continue reading “The Tools To Fight Against Single-Use Plastic”

Angled Drill Guide Helps You With Those Tricky Holes

If you’ve ever tried to drill a hole on an angle with a power drill, you’ve probably drilled some pretty shocking holes. To do it right, you really need some mechanical assistance, and this jig from [Kartik_Nandrui] should do the trick.

The device uses a guide that sits on the surface to be drilled, with a pair of angled connectors that fit two wooden dowels. These connect the guide to a corresponding sleeve that fits around the drill body. The sleeve then slides up and down the dowels, allowing the drill to move in a straight line towards the targeted area.

It’s a useful hack, but we can see room for some improvements that would take it to the next level. Having a way to lock the angle of the guide base would be great for accuracy. As it’s 3D printed, it would also be simple to create a version with a curved guide base that could fit over pipes, or other designs to fit complex geometries like roof sheeting or other corrugated materials.

Sometimes the most interesting hacks are the ones that get us thinking about our own potential projects. If you’ve got any creative tool hacks you’ve been brewing up in the lab, be sure to let us know!