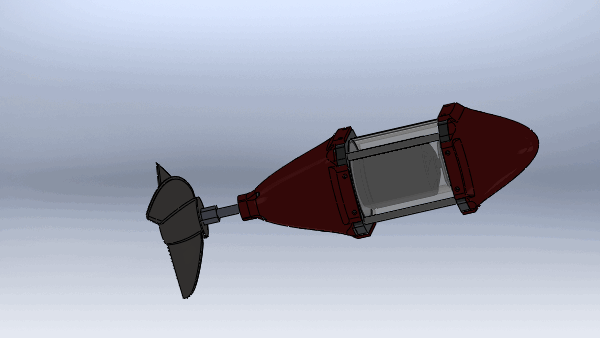
Recreate A PCB With A Scanner And Inkscape

turnsig

[John] has managed to replace a broken turn signal PCB by scanning it and converting to Gerber format. [John] purchased a Triumph Spitfire with toggle switch wired up for turn signal control. The “official” replacement part worked better than the toggle switch, but it didn’t cancel after turning. He was able to get the original switch, only to find it had a hole completely burned through the phenolic board. This isn’t completely surprising, as Triumph used a Lucas Industries electrical system. As anyone who has owned a car with a Lucas “prince of darkness” electrical system will tell you, Lucas systems were not known for quality. A quick Google search brings up plenty of pages attesting to this.

Phenolic resin/paper was a common early PCB material.  The FR-4 fiberglass boards most commonly used today could be considered descendants of FR-1 and FR-2 phenolic. (The FR in this case stands for Fiber Reinforced). The standardization worked in [John’s] favor, as his burned board was 31 mils thick, which is still a standard PCB thickness. Re-creating an odd sized board such as this isn’t a hard job. It would however mean spending quite a bit of time with a ruler and a caliper. Rather than spend all that time measuring and re-drawing, [John] scanned his PCB on a flatbed scanner. He used graph paper as a background to verify the image wasn’t being stretched or skewed.

[John] brought his scan into inkscape, and traced both the outline and copper areas. The outline and copper had to be exported as two separate files, so he added corner marks outside the board outline as fiducials.  He then used pstoedit to convert inkscape’s eps output files to gEDA pcb format. The two files were rejoined in gEDA. From there [John] exported a Gerber, and ran it on his home PCB milling machine.  The results look good. [John] plans to make another revision of the board from a professional PCB house with vias to hold the copper to the substrate.

Fail Of The Week: CAN-Bus Attached HUD For Ford Mustang

This edition of Fail of the Week is nothing short of remarkable, and your help could really get the failed project back on track. [Snipor Bob] wanted to replace all of the dashboard readouts on his Mustang and got the idea of making the hacked hardware into a Heads-Up Display. What you see above is simply the early hardware proof of concept for tapping into the vehicle’s data system. But there’s also an interesting test rig for getting the windshield glass working as a reflector for the readout.

Continue reading “Fail Of The Week: CAN-Bus Attached HUD For Ford Mustang”

Compass Guided Kayak Autopilot

logo

Last July, [Louis] bought a kayak off of Craigslist. It was a pedal-powered device with a hand-operated rudder, and he ended up enjoying his time on the water. [Louis] fishes, though, and it was a bit of a challenge to manage hands free fishing while maintaining a steady course. His solution was an Arduino-powered autopilot that allows him to troll for salmon and Arduino haters with just the push of a button.

In [Louis]’ system, a motor is attached to the steering lever along with a few limit switches. This motor is powered by an Arduino controlled with an LSM303 compass module from Sparkfun.

When the autopilot module is started up, it first checks to see if the compass module is enabled. If not, the system relies on two tact switches to change the position of the rudder. Enabling the compass requires a short calibration of spinning the kayak around in a circle, but after that the steering is dead on.

There are a few things [Louis] would like to add such as a heading display and a bluetooth module for remote control. This setup already landed him a 13 lb salmon, so we’re going to say it’s good enough to catch some dinner.

[Charles’s] Epic “Total-Recap” GoKart Post

charlesEVPost

If you’ve built an electric vehicle in the past few years, you probably owe [Charles] a couple of beers. Now you can feel more indebted to him after you read his 17,500-word, 10-part post covering everything you need to know about electric go-kart design. You’ll want to grab a sandwich to keep you company.

You probably recall the Chibikart from posts earlier this summer, which is one of an endless list of EV projects [Charles] has up his sleeve. He’s been teaching MIT students how to build EV karts for a while now, and this total-recap “2.00gokart” novel is [Charles’s] way of sharing the wealth. This is more than a simple how-to guide, though. Instead, it reads like a teacher’s edition of GoKarting 101, with a few brief and important histories, walk-throughs of how the class evolved, exhaustive links to vendors, graphs, videos, and plenty of reference and documentation.

If you have even the slightest interest in electric vehicles, do yourself a favor and give it a browse. There are a couple of videos after the break, and if you need some more motivation, check out the EV skateboard that uses a lot of the same parts.

Continue reading “[Charles’s] Epic “Total-Recap” GoKart Post”

A Jeep-Mounted FLIR Camera

jeep

[Eddie Zarick] is at it again, modding his Jeep Wrangler into something that makes us all properly jealous. This time, he managed to acquire and mount the FLIR camera from an old Cadillac. It truly is an FLIR thermal imaging camera, and not just a near-infrared hack. Cadillac used this technology with a HUD, but [Eddie] decided to connect it to his in-dash screen. He also didn’t settle for simply facing it forward, but mounted it to a Golight searchlight base. He mounted the joysticks under the screen, giving him directional control.

[Eddie] spent about $500 on the project, which seems like a lot, but not when you consider the cost of a new FLIR camera. We would love to know where he found such a great deal! Maybe he hit up a local salvage yard? If you know of a good source for parts like this, let us know in the comments!

Previously we covered [Eddie’s] pressurized water tap, weatherproof keypad entry, and other assorted hacks. We look forward to seeing what he adds to his Jeep next.

Continue reading “A Jeep-Mounted FLIR Camera”

Backseat USB Charger

backseatCharger

Whether you’re relegated to the backseat of your ride or just strapped for access to power, you may benefit from adding your own backseat USB charger. While this is a fairly straightforward hack, we’re surprised at how clean it turned out and at the convenience it provides.

[wongman2001] started by grabbing a socket wrench and unbolting his seat from the rails in the floor. He then disconnected the electrical plugs for the chair’s heating and power seat adjustment. With the chair disconnected and removed from the car, [wongman2001] further dissected its components, removing its back panel and test fitting a female cigarette adapter. Though this seat had plenty of room near the headrest, you may need to carve out some foam for a snug fit in your vehicle. To source the needed 12V, [wongman2001] tapped into the wiring for the seat’s motor, then soldered and insulated the connections to the cigarette lighter jack.

Check out some other clean-looking car hacks like the hidden MP3/USB Aux hack or the Nexus 7 double-DIN dashboard hack.

Hovercraft Plane?

[Rudy Heeman] has been working in his garage on what we may consider a new class of vehicle. It’s a hovercraft —  but it also has wings.

That’s right, you drive it on ground, water, and you can even take flight with it! However, it’s far from a new idea. After doing some digging it appears the first type of this vehicle was actually tested back in 1996 by Universal Hovercraft — a quick peruse of their site reveals you can even buy your own kits to make one! Regardless of where it came from, or who made one first, it’s a brilliantly fun concept, and would be a blast to fly. Oh and you don’t even need a pilot’s license, it’s considered a boat and follows the same rules and regulations for boating.

Stick around after the break to see one in action! Now all we need to do is figure out how to combine one of these with a Delorean Hovercraft!

Continue reading “Hovercraft Plane?”