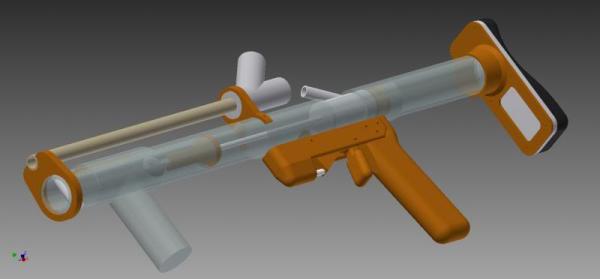
Paintball Gun From Scratch

Making A Paintball Gun From Scratch

[Ben’s] big brother [Brian] has been slowly building up a respectable mini-machine shop in his garage over the past few years, collecting odds and ends off of Craigslist for cheap. Looking for a fun project to do together, they decided to try their hand at building a paintball gun — completely from scratch.

They have a Spyder paintball gun that they have taken apart many times — but it uses a stacked tube configuration for the firing mechanism — a bit too complex for a first project. After discovering ZDSPB.com (which is an awesome site that has animations of all the different styles of paintball guns) they settled on making a Tippman clone.

Trying to keep the budget as small as possible, [Brian] found a free 3D CAD program from the makers of Pro/E — it’s called Creo Elements/Direct Modeling Express 6.0, and with that they began designing the gun…

Once they had the mechanism down pat they just had to start machining. Here’s the highly anticipated first test fire — can you hear the joy in the success?

Continue reading “Making A Paintball Gun From Scratch”

A Staple Gun, Caulking Gun, And Four-Barrel Shotgun

In its native form, [Clint]’s K-441 is a caulking gun, able to apply silicones, resins, and liquid rubber from a reservoir with compressed air. It’s accurate, powerful, has a huge capacity, and looks strangely steampunk, even for caulking gun standards. This isn’t any normal caulking gun; this device was made from a staple gun. Oh, it also fires shotgun shells with the help of four rifled barrels.

This device that shoots lead, steel, and glue started off its life as an ordinary staple gun, with the usual 23lb pull you’ll find on these guns. By adding a few plates, hand-winding a spring, and milling a few parts, [Clint Westwood] turned this staple gun into a device that would shoot a single .410 bore shell. A practice round as far as shotguns go, but still a serious amount of punch.

Continue reading “A Staple Gun, Caulking Gun, And Four-Barrel Shotgun”

Mehdi wth his homemade taser

[Mehdi’s] Shocking Stun Gun Tutorial

[Mehdi Sadaghdar] never lets little things like fire, shocks, or singed fingers get in the way of his projects.  His latest is a tutorial on making a simple electroshock device. A stun weapon creates a very high voltage, and is used in law enforcement to temporarily disable a person. [Mehdi] stresses repeatedly to not use this on anyone. If you do, he won’t like you anymore. Of course, if you’ve seen any of his previous videos, you know he’ll shock himself and set something on fire before the project is complete.

To create his stunner, [Mehdi] used a car ignition to produce a high voltage. The igniton coil, which is a specialized transformer, allowed him to generate the >10000V output needed for the stunner. The coil has a 60:1 ratio and is powered by a 12V DC supply. Since a coil is a short at DC, the system only creates a high voltage pulse when power is disconnected. However, the pulse was too short to create a satisfying arc. [Mehdi] added a capacitor, creating an LC circuit that oscillates as the charge decays, creating a nicer spark. He then used an RC circuit and a relay to create a simple oscillating switch. For the finishing touch, he created a spark gap on the secondary of the transformer with two nails. In typical [Mehdi] fashion, he nearly fried his digital caliper in the process.

The end result is a nice spark that warms the cockles of [Mehdi’s] fibrillating heart. We commend him for being such a brave masochist in the name of science.  Check out his tutorial after the break!

Continue reading “[Mehdi’s] Shocking Stun Gun Tutorial”

Stun Baton

Shocking Idea: Prank Stun Baton

[Christopher] has put together a Prank Stun Baton to annoy his friends. It delivers a slight shock to the person on the business end of the device. Oddly, it’s powered solely by static electricity, there is no battery here and the resulting injury is no worse than touching a door knob after scooting your socks around on some shag carpet.

The design is super simple and is effectively just a rudimentary capacitor. The main housing is a PVC pipe that acts as a dielectric in the ‘cap’ system. Two separate pieces of tin foil are wrapped around the inside and outside of the PVC pipe. These layers of tin foil provide a conductive path up to the a couple of screws stuck in the end of the baton. A ping-pong ball and some foam act as an insulator between the PVC and the screws.

To charge the baton it only has to be brought close to a source of static electricity, a tube TV will do the trick. Rubbing it with a piece of wool will also work. When this is done an electrostatic field is stored in the PVC between the two pieces of tin foil, one side takes on a positive charge and the other a negative charge creating an electric potential between the two screws at the end of the baton. When something (with a low-enough resistance) shorts the screws, the stored energy on the positive screw tries to go to the negative screw, shocking the unsuspecting victim.

Need something a little more powerful? You may want to check out this other stun baton.

Halo-style Paintball

paintball buggy

It seems as though [Nathan] has taken some serious inspiration from the Warthog. The iconic armored buggy from Halo video games has a turret mounted to the roof. Although [Nathan]’s buggy only shoots paintballs from its turret.

Mounting paintball markers (guns) to various objects such as vehicles, robots, or other machines isn’t quite as straightforward as it seems. Vibrations from anything can transfer through a clamping system and cause paintballs to break. This, of course, inhibits the functionality of the marker and is a messy cleanup to boot. Then there has to be a way to fire the paintballs, which is usually handled by soldering to the electrical connections in the marker. And the entire rig has to stand up to the normal jostling and sudden turns from the buggy.

[Nathan] has solved these problems first by creating a custom fast-change mount that allows any malfunctioning markers to be changed rapidly. The electronic firing mechanism is handled by an ATtiny microcontroller and there is a custom electrical connection that is automatically made when the marker is bolted to the mount.

The new system allows markers to be changed in about 30 seconds, much better than any other system. Maybe in the future [Nathan] can upgrade the buggy’s turret to accommodate a paintball minigun.

Supersonic NERF Dart Speedometer

ATtiny Chronograph

[John] was faced with an interesting problem: after he built his own air cannon, how could he tell exactly how fast his NERF darts were moving? Luckily he had some spare parts on hand and hacked together a fully functional projectile speedometer for less than the cost of an Arduino.

A device is essentially two detectors spaced a precise distance apart from one another. When something passes the first detector, a timer is activated which measures how long it takes the object to reach the second detector. From this, the device calculates the speed. [John] used infrared emitter/detector pairs spaced exactly three inches apart and wired them to an ATtiny2313. After a little bit of coding, he now knows just how fast he can fire those squishy ballistic missiles.

The infrared emitter/detector pairs are mounted to a PVC pipe through which the projectile travels. [John] notes that in theory this could be used to measure almost anything that could fit through the pipe, although this particular device might be damaged by muzzle flash or a pressure wave from an actual gun.

We’ve seen other NERF dart air cannons before, and we wonder if maybe there should be some sort of competition to see who can shoot a NERF dart the fastest now that there’s an easy way to measure speed?


Homemade Bazooka Has Earned Its Stripes

Many of us dream of launching rockets from our shoulders, but [John] here actually did something about it.

This bazooka build started with a 6″ diameter PVC pipe. He mounted a length of 80/20 T-slotted aluminum extrusion to the pipe through a couple of wood blocks. [John] installed rail buttons on some Estes Alpha rockets which slide along nicely inside the T-slot. He welded a PVC cleanout fitting and plug to one end for easy access and gave her a nice paint job.

The ignition is simple: an irresistible red push button is wired to a 9V battery and a pair of alligator clips. [John] loads up a rocket, puts the gators on the wires of an igniter, pushes said button, and Bob’s your uncle. All he needs now is a pair of gun boats. Video of the build and some demonstrations we don’t necessarily recommend are after the jump.

Continue reading “Homemade Bazooka Has Earned Its Stripes”