To a ham radio operator used to “short”-wave antennas with lengths listed in tens of meters, the tiny antennas used in the gigahertz bands barely even register. But if your goal is making radio electronics that’s small enough to swallow, an antenna of a few centimeters is too big. Physics determines plausible antenna sizes, and there’s no way around that, but a large group of researchers and engineers have found a way of side-stepping the problem: resonating a nano-antenna acoustically instead of electromagnetically.
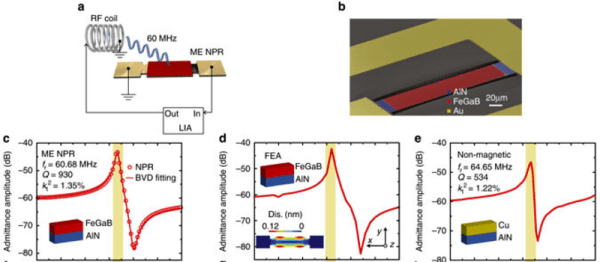
Normal antennas are tuned to some extent to the frequency that you want to pick up. Since the wavelength of a 2.5 GHz electromagnetic wave in free space is 120 cm mm, most practical antennas need a wire in the 12-60 cm mm range to bounce signals back and forth. The trick in the paper is to use a special piezomagnetic material as the antenna. Incoming radio waves get quickly turned into acoustic waves — physical movement in the nano-crystals. Since these sound waves travel a lot slower than the speed of light, they resonate off the walls of the crystal over a much shorter distance. A piezoelectric film layer turns these vibrations back into electrical signals.
Ceramic chip antennas use a similar trick. There, electromagnetic waves are slowed down inside the high-permittivity ceramic. But chip antennas are just slowing down EM waves, whereas the research demonstrated here is converting the EM to sound waves, which travel many orders of magnitude slower. Nice trick.
Granted, significant material science derring-do makes this possible, and you’re not going to be fabricating your own nanoscale piezomagnetic antennas any time soon, but with everything but the antenna getting nano-ified, it’s exciting to think of a future where the antennas can be baked directly into the IC.
Thanks [Ostracus] for the tip in the comments of this post on antenna basics. Via [Science Magazine].