Somehow, walking robots at our level never really seem to deliver on the promise that should be delivered by all those legs. Articulation using hobby servos is simple enough to achieve, but cumbersome, slow, and not very powerful. [Paul Gould] has a plan to make a better, 3D-printed articulated robot actuator.
His solution is both novel and elegant, a fairly conventional arm geometry that has at its joints a set of brushless motors similar to but a little larger than the kind you might be more familiar with on multirotors, paired with 3D-printed cycloidal gearboxes. Magnetic encoders provide the necessary positional feedback, and the result is a unit that is both compact and powerful.
With such a range of small brushless motor controllers on the market, it’s at first sight unexpected that he’s designed his own controller board. But this gives him complete control over his software, plus the CAN bus that ties everything together. He’s given us a video which we’ve placed below the break, showing the build process, the impressive capabilities of his system, and a selection of builds including a robot dog complete with tail. This is definitely a project to watch.
The Hackaday Prize is all about empowering you with the tools you need to create the next great hardware device. To that end, we’ve set up seed funding for your projects, we’ve given you a project hosting site, and most importantly, Hackaday gives you the opportunity to connect with tens of thousands of like-minded hardware hackers across the globe.
Not all hackers are out tinkering in their garage after work. Some are pulling the night shift in their dorm rooms, balancing classes, homework, hacking, and life. Student hackers, we salute you with the Ender’s Achievement!
This robotic gripper is the solution to robotic gripping
The Modular Universal Jamming Gripper by [cole b.] and a group of students at the Arizona Makers Collective is something every robot needs. It’s a device that allows a robot to pick up just about anything. The old way of doing this is by fancy robotic fingers, maybe an Armatron, or if you’re of a sufficient vintage or radioactive, a Waldo. This is not anything like that. Instead of robotic fingers, this is basically a balloon filled with grains of sand. To use it, the robot jams this squishy ball over an object and sucks the air out of the balloon. The result is an end effector that latches onto any small object.
Devices like this have been built before. Coincidentally, the earliest projects like this we’ve seen are also from students at engineering schools. However, [cole] and his team are really improving this sort of device, making it 3D printable and cheaper to make. It’s an amazing project, and you’re doing yourself a disservice if you don’t check out the project page.
If you want more evidence that students are our future and that we should teach them well and let them lead the way, take a look at this 3D printer project.
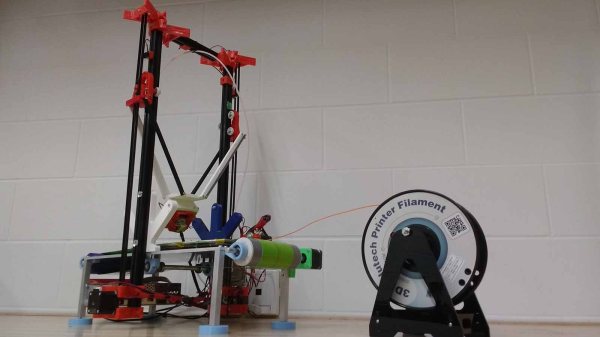
Most 3D printers only print one object at a time. Sure, you can load up your build platform with a bunch of objects, but the fact remains that 3D printing is a batch process. [Swaleh]’s WorkHorse 3D changes all of that. It’s a 3D printer with a conveyor belt. Sure, it violates the MakerBot patent, but that’s not the point. This is a printer that can produce an infinite amount of objects with just a little bit of G-code hacking. When one print is done, it rolls off the end of the bed, and another print is started without any downtime in between. It’s a factory on a desktop, and it’s amazing. And [Swaleh] is a mechanical engineering student, which means that he’s building this even though he has more homework than the rest of us.
Like all of the projects entered by students in The Hackaday Prize, these projects won an achievement. Yes, we’re doing achievements for projects this year, and these two are getting the Ender’s Achievement for incredible student entries. No, it’s not an extra prize or points or anything like that; it’s just recognition of the amazing projects done by students. These are some of the best, and if you’re a student who entered a project into the Hackaday Prize, we’d be more than happy to bestow the Ender’s Achievement on your project.
When it comes to robots, we usually see some aluminum extrusion, laser-cut parts, maybe some 3D printed parts, and possibly a few Erector sets confabulated into a robot arm. This entry for the Hackaday Prize is anything but. It’s a robot chassis, a 3D printer, and the structural frame for any sort of moving project that’s made out of a special composite material.
[Marc]’s project for the Hackaday Prize is all about articulated mechanisms. Instead of the usual structural components, he’s using Hylite, a special material that’s basically a polypropylene core clad in a sheet of aluminum on both sides. By carefully milling away the aluminum on both sides, [Marc] is creating a living hinge that can be used to build a 3D printer, robot, or really anything else.
This really isn’t a finished project; it’s more of a technology demonstrator. That said, [Marc] has a lot of examples where he can bend these Hylite aluminum plates over on themselves, can create boxes and space frames, and has the ability to create just about any shape he wants. It’s really a highly precise means of bending aluminum with a mill, and has the added benefit of looking really, really good.
Already, [Marc] has a few interesting robots that are built around this construction technology. The first is a remote control focus for a telescope that simply connects an eyepiece to the scope. Actuation is provided pneumatically, and all reports say this example works well. The other example is a flat-pack phone stand. It’s a bit simpler than a focus mechanism, but it is a small and inexpensive way to show off the technology. Great work, and an excellent project in The Hackaday Prize.
A simple photo-resistor and a bit of tinkering allows him to easily send credentials — or any data really — to his ESP8266, through the power of LiFi. Short for Light Fidelity, LiFi transmits data using light with on and off states representing digital values. It can use visible light, or reach into either the ultraviolet or infra-red radiation if need be. For the nitty-gritty details on the subject, check out our primer on LiFi.
A flashing LCD screen and a photo-resistor barely make the cut for a one-way LiFi system, but [Eduardo Zola] makes it work. The approach is to build a resitor divider and watch an input pin on the ESP for changes.
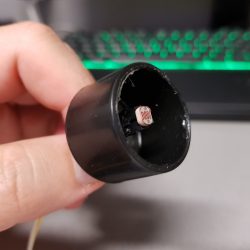
The trick is to keep ambient light out of the mix. The test sensor shown here places the LDR in a black cap, but [Eduardo] 3D-Printed a slick little enclosure for his reverse flashlight so it fits flush with the phone screen. One click and about half a minute of a flashing screen later, and the Wi-Fi credentials are transferred. This circuit could really be added onto any project, for short data transfers. With a bit more work on the sensor circuit, speed could be improved with the limiting factor being the timing on the phone screen itself.
Since the ESP8266 has its own WiFi connection, it’s likely you’ll use that for data transfer once the LiFi gets it onto the network. But any situation where you don’t have a full user input or a network connection could benefit from this. Pull out that old scrolling LED matrix project and add this as a way to push new messages to the device! Continue reading “ESP8266 Uses LiFi To Get On WiFi”→
Right now we’re neck deep in the Hackaday Prize. What’s the Hackaday Prize? It’s the Academy Awards of hardware creation, or at least that’s what we’re calling it until we get a cease and desist from the Academy of Motion Picture Arts and Sciences.
Already we’ve seen over eight hundred entries in the Hackaday Prize, and there are still months to go. We’re already through the Open Hardware Design Challenge, and twenty fantastic projects from that are moving onto the final round. Yesterday, we announced the winners of the Robotics Module challenge, and again we were blown away. These are the greatest bits of hardware anywhere, and we couldn’t have imagined anything more awesome.
For this week’s Hack Chat, we’re going to be talking all about The Hackaday Prize. This is your chance to be a hardware hero and finally get some recognition for what you’ve been working on. Right now, we’re in the Power Harvesting Challenge in this year’s Hackaday Prize, and we want to see what you can come up with that will get energy from solar, thermal, wind, or random electromagnetic energy. This is your time to shine, and we can’t wait to see what you come up with.
Of course, you might have a few questions on what it takes to make a successful Hackaday Prize entry. For this week’s Hack Chat, we’re going to sit down with [Stephen Tranovich], the person coordinating this year’s Prize, to see what makes a successful entry. This is your chance to find out what it takes to become the next great hardware hacker, and it’s all going down this Friday in the Hack Chat.
Some of the things we’ll be talking about in this week’s Hack Chat:
What makes a winning entry?
How can you get publicity for your project?
Want to bounce your project ideas off the community?
What’s the story behind the seed funding confusion from this year?
You are, of course, encouraged to add your own questions to the discussion. You can do that by leaving a comment on the Hack Chat Event Page and we’ll put that in the queue for the Hack Chat discussion.
Right now, we’re running the greatest hardware competition on the planet. The Hackaday Prize is the Academy Awards of Open Hardware, and we’re opening the gates to thousands of hardware hackers, makers, and artist to create the next big thing.
Last week, we wrapped up the second challenge in The Hackaday Prize, the Robotics Module challenge. Now we’re happy to announce twenty of those projects have been selected to move onto the final round and have been awarded a $1000 cash prize. Congratulations to the winners of the Robotics Module Challenge portion of the Hackaday Prize. Here are the winners, in no particular order:
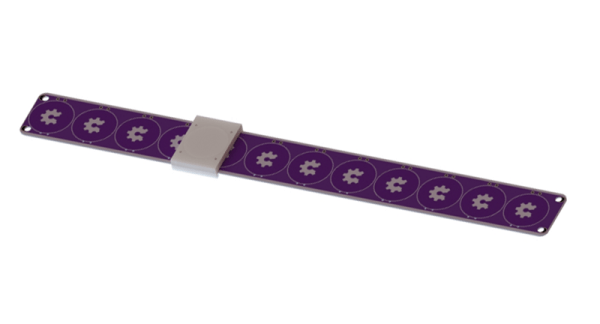
PCBs are exceptionally cheap now, and that means everyone gets to experiment with the careful application of copper traces on a fiberglass substrate. For his Hackaday Prize entry, [Carl] is putting coils on a PCB. What can you do with that? Build a motor, obviously. This isn’t any motor, though: it’s a linear motor. If you’ve ever wanted a maglev train on a PCB, this is the project for you.
This project is a slight extension of [Carl]’s other PCB motor project, the aptly named PCB Motor. For this project, [Carl] whipped up a small, circular PCB with a few very small coils embedded inside. With the addition of a bearing, a few 3D printed parts, and a few magnets, [Carl] was able to create a brushless motor that’s also a PCB. Is it powerful enough to use in a quadcopter? Probably not quite yet.
Like [Carl]’s earlier PCB motor, this linear PCB motor follows the same basic idea. The ‘track’, if you will, is simply a rectangular PCB loaded up with twelve coils, each of them using 5 mil space and trace, adding up to 140 turns. This is bigger than the coils used for the (circular) PCB motor, but that only means it can handle a bit more power.
As for the moving part of this motor, [Carl] is using a 3D printed slider with an N52 neodymium magnet embedded inside. All in all, it’s a simple device, but that’s not getting to the complexity of the drive circuit. We’re looking forward to the updates that will make this motor move, turning this into a great entry for The Hackaday Prize.


 A flashing LCD screen and a photo-resistor barely make the cut for a one-way LiFi system, but [Eduardo Zola] makes it work. The approach is to build a resitor divider and watch an input pin on the ESP for changes.