A surprising use of 3D printing has been in creating life-like models of human body parts using MRI or CT scans. Surgeons and other medical professionals can use models to plan procedures or assist in research. However, there has been a problem. The body is a messy complex thing and there is a lot of data that comes out of a typical scan. Historically, someone had to manually identify structures on each slice — a very time-consuming process — or set a threshold value and hope for the best. A recent paper by a number of researchers around the globe shows how dithering scans can vastly improve results while also allowing for much faster processing times.
As an example, a traditional workflow to create a 3D printed foot model from scan data took over 30 hours to complete including a great deal of manual intervention. The new method produced a great model in less than an hour.
When you saw the picture for this article, did you think of a peacock’s feather? These fibers are not harvested from birds, and in fact, the colors come from transparent rubber. As with peacock feathers, they come from the way light reflects off layers of differing materials, this is known as optical interference, and it is the same effect seen on oil slicks. The benefit to using transparent rubber is that the final product is flexible and when drawn, the interference shifts. In short, they change color when stretched.
Most of the sensors we see and feature are electromechanical, which has the drawback that we cannot read them without some form of interface. Something like a microcontroller, gauge, or a slew of 555 timers. Reading a single strain gauge on a torque wrench is not too tricky, but simultaneously reading a dozen gauges spread across a more complex machine such as a quadcopter will probably require graphing software to generate a heat map. With this innovation it could now be done with an on-board camera in real-time. Couple that with machine learning and perhaps you could launch Skynet. Or build a better copter.
The current proof-of-concept weaves the fibers into next-generation bandages to give an intuitive sense of how tightly a dressing should be applied. For the average first-aid responder, the rule is being able to slide a finger between the fabric and skin. That’s an easy indicator, but it only works after the fact whereas saying that the dressing should be orange while wrapping gives constant feedback.
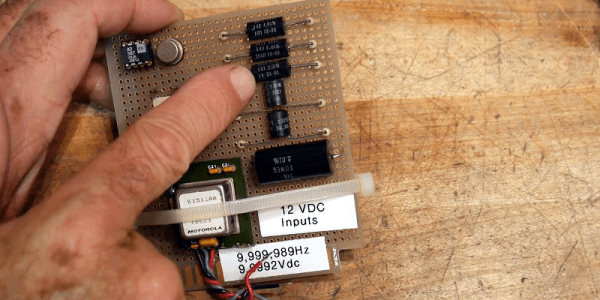
If you work for a large company, you probably have test equipment that is routinely calibrated. Some companies have their own metrology labs and others send out to an external lab. In a garage lab, you are less likely to do calibrations and — in our experience — that isn’t usually a problem. Still, it is nice to be able to do at least a sanity check on your gear. Also, if you buy old test gear and repair it, it would be nice to be able to check it, as well. [IMSAI guy] built his own little calibration setup, adding to it over the years, and he shares the details in a recent video, which you can see below.
The board started out simply as one voltage regulator and some 0.01% resistors. Over time, though, he added a few more bells and whistles. The setup isn’t going to rival a NIST-traceable lab setup, but for your garage it is perfectly fine.
As reported by the BBC, the United States is set to impose a 25% tariff on over 800 categories of Chinese goods. The tariffs are due to come into effect in three weeks, on July 6th. Thousands of different products are covered under this new tariff, and by every account, electronic designers will be hit hard. Your BOM cost just increased by 25%.
The reason for this tariff is laid out in a report (PDF) from the Office of the United States Trade Representative. In short, this tariff is retaliation for the Chinese government subsidizing businesses to steal market share and as punishment for stealing IP. As for what products will now receive the 25% tariff, a partial list is available here (PDF). The most interesting product, by far, is nuclear reactors. This is a very specific list; one line item is, ‘multiphase AC motors, with an output exceeding 746 Watts but not exceeding 750 Watts’.
Of importance to Hackaday readers is the list of electronic components covered by the new tariff. Tantalum capacitors are covered, as are ceramic caps. Metal oxide resistors are covered. LEDs, integrated circuits including processors, controllers, and memories, and printed circuit assemblies are covered under this tariff. In short, nearly every bit that goes into anything electronic is covered.
This will hurt all electronics manufacturers in the United States. For a quick example, I’m working on a project using half a million LEDs. I bought these LEDs (120 reels) two months ago for a few thousand dollars. This was a fantastic buy; half a million of the cheapest LEDs I could find on Mouser would cost seventeen thousand dollars. Sourcing from China saved thousands, and if I were to do this again, I may be hit with a 25% tariff. Of course; the price on the parts from Mouser will also go up — Kingbright LEDs are also made in China. Right now, I have $3000 worth of ESP-12e modules sitting on my desk. If I bought these three weeks from now, these reels of WiFi modules would cost $3750.
There are stories of a few low-volume manufacturers based in the United States getting around customs and import duties. One of these stories involves the inexplicable use of the boxes Beats headphones come in. But (proper) electronics manufacturing isn’t usually done by simply throwing money at random people in China or committing customs fraud. These tariffs will hit US-based electronics manufacturers hard, and the margins on electronics may not be high enough to absorb a 25% increase in the cost of materials.
Electronics made in America just got 25% more expensive to produce.
The Hackaday Prize is all about empowering you with the tools you need to create the next great hardware device. To that end, we’ve set up seed funding for your projects, we’ve given you a project hosting site, and most importantly, Hackaday gives you the opportunity to connect with tens of thousands of like-minded hardware hackers across the globe.
Not all hackers are out tinkering in their garage after work. Some are pulling the night shift in their dorm rooms, balancing classes, homework, hacking, and life. Student hackers, we salute you with the Ender’s Achievement!
This robotic gripper is the solution to robotic gripping
The Modular Universal Jamming Gripper by [cole b.] and a group of students at the Arizona Makers Collective is something every robot needs. It’s a device that allows a robot to pick up just about anything. The old way of doing this is by fancy robotic fingers, maybe an Armatron, or if you’re of a sufficient vintage or radioactive, a Waldo. This is not anything like that. Instead of robotic fingers, this is basically a balloon filled with grains of sand. To use it, the robot jams this squishy ball over an object and sucks the air out of the balloon. The result is an end effector that latches onto any small object.
Devices like this have been built before. Coincidentally, the earliest projects like this we’ve seen are also from students at engineering schools. However, [cole] and his team are really improving this sort of device, making it 3D printable and cheaper to make. It’s an amazing project, and you’re doing yourself a disservice if you don’t check out the project page.
If you want more evidence that students are our future and that we should teach them well and let them lead the way, take a look at this 3D printer project.
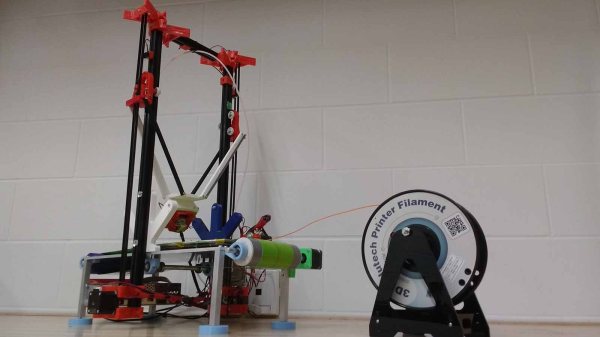
Most 3D printers only print one object at a time. Sure, you can load up your build platform with a bunch of objects, but the fact remains that 3D printing is a batch process. [Swaleh]’s WorkHorse 3D changes all of that. It’s a 3D printer with a conveyor belt. Sure, it violates the MakerBot patent, but that’s not the point. This is a printer that can produce an infinite amount of objects with just a little bit of G-code hacking. When one print is done, it rolls off the end of the bed, and another print is started without any downtime in between. It’s a factory on a desktop, and it’s amazing. And [Swaleh] is a mechanical engineering student, which means that he’s building this even though he has more homework than the rest of us.
Like all of the projects entered by students in The Hackaday Prize, these projects won an achievement. Yes, we’re doing achievements for projects this year, and these two are getting the Ender’s Achievement for incredible student entries. No, it’s not an extra prize or points or anything like that; it’s just recognition of the amazing projects done by students. These are some of the best, and if you’re a student who entered a project into the Hackaday Prize, we’d be more than happy to bestow the Ender’s Achievement on your project.
The most computationally intense part of an Apollo mission was the moon landing itself, requiring both real-time control and navigation of the Lunar Module (LM) through a sequence of programs known as the P60’s. Data from radar, inertial navigation, and optical data sighted-off by the LM commander himself were fed into the computer in what we’d call today ‘data fusion.’
The guy who wrote that code is Don Eyles and the next best thing to actually hanging out with Don is to read his book. Don’s book reads as if you are at a bar sitting across the table listening to his incredible life story. Its personal, hilarious, stressful, fascinating, and more importantly for those of us who are fans of Hackaday, it’s relatable.
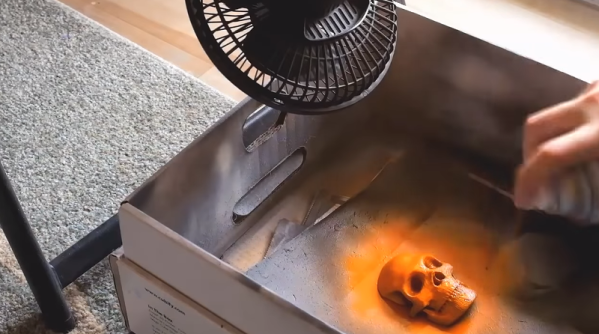
There was a time when most 3D printers used ABS plastic. It stinks, is probably bad for you, and tends to warp unless printed in a heated enclosure. So most people have gone to something else, mostly PLA. But ABS also dissolves in a readily-available solvent, acetone, and this is useful for smoothing the layer artifacts from a 3D print. [3DSage] has a technique that works for PLA or — he says — probably any filament. You can see what he’s doing in the video below.
The video starts out with a recap of things most Hackaday readers will already know. But hang in there because at about 1:20, he reveals his method.