Arduboy In A Dreamcast VMU

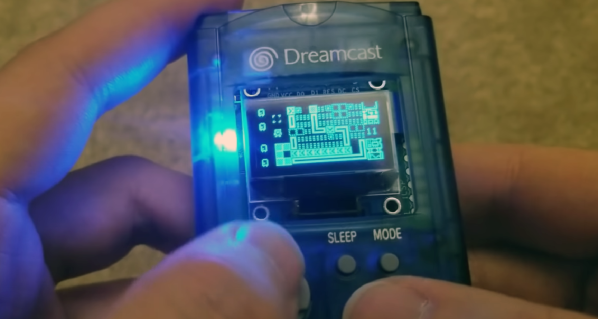
The Arduboy is a tiny, credit-card sized sized video game console that you can build yourself. The Dreamcast VMU was also a tiny, pocketable video game system, but really that’s just where we stored our saves for Crazy Taxi. What do you get when you combine the two? [sjm] did just that, giving us an Arduboy tucked into a Dreamcast VMU.

The guts of the Arduboy is simply an ATMega32u4, the same chip found in many Arduinos, an I2C OLED, and a few other various electronics for USB, power, and battery protection. In short, it’s an easy circuit, and something just about anyone with the skills can build themselves. Since just anyone can get a PCB fabbed, and the Dreamcast already has nice silicone buttons built into the enclosure, it was a simple matter for [sjm] to create a Dreamcast VMU-shaped PCB with all the guts of an Arduboy. The only real difference is the size of the OLED — this one uses a 0.96″ 128×64 OLED, where the original used one with the same resolution but with a significantly larger size.

Yes, we’ve seen this same project before, but now thanks to the magic of the Hackaday Prize, it’s now in the running for the greatest hardware competition on the planet. You can check out the entire build video and a short demo after the break. Of course, this isn’t the first repurposing of the Arduboy circuit, we’ve seen a flex circuit version, and a version with a crank like the Playdate developed by Teenage Engineering and Panic.

Continue reading “Arduboy In A Dreamcast VMU”

The Proof Is In The Box

Making bread dough is simple — it’s just flour and water, with some salt and yeast if you want to make things easy on yourself. Turning that dough into bread is another matter entirely. You need to punch that dough down, you need to let it rise, and you need to knead it again. At home, you’re probably content with letting the dough rise on the kitchen counter, but there’s a reason your home loaf doesn’t taste like what you would get at a good bakery. A bakery has a proofer, or a box that lets dough rise at a temperature that would be uncomfortable for humans, but perfect for yeast.

The leavening cell is a DIY proofing box that keeps dough at a steady 26° C to 28° C, the perfect temperature for making bread, pizza dough, and even yogurts. [vittorio] made this and the results look great.

The design of this build is simple enough and made out of 20×20 aluminum profiles shaped into a cubic frame. The outside of this box is 6mm thick wooden panels coated on the inside with a heat-reflective insulating mesh. Inside of that is a frame of metal mesh to which a six-meter long cable heating element is attached. This heating element is controlled via a thermostat with a probe temperature sensor on a timer. No, it’s not very complicated but the entire idea of a proofer is to have a slightly warm box.

You can check out the promo video for the Leavening Cell below.

Continue reading “The Proof Is In The Box”

LEGO-Based Robot Arm With Motion Planning

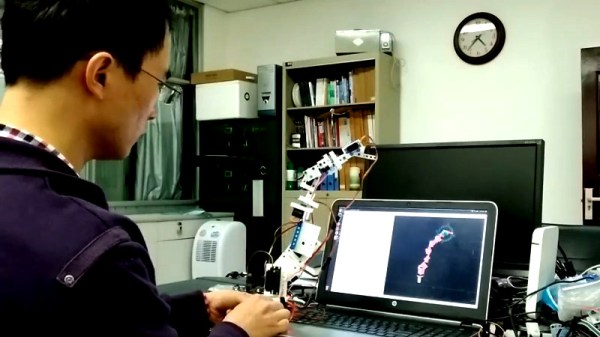
Robotic arms have found all manner of applications in industry. Whether its welding cars, painting cars, or installing dashboards in cars, robotic arms can definitely do the job. However, you don’t need to be a major automaker to experiment with the technology. You can build your own, complete with proper motion planning, thanks to Arduino and ROS.

Motion planning is important, as it makes working with the robotic arm much easier. Rather than having to manually specify the rotation of each and every joint for every desired movement, instead mathematics is used to figure everything out. End effectors can be moved, and software will figure out the necessary motions required to achieve the end results. This functionality is baked into Robot Operating System (ROS) and proves useful to this project.

The construction of this particular arm is impressive in its simplicity, too. It has 7 degrees of freedom, which is plenty to play with. The arm is built out of LEGO Technic components, which are attached to the servos with the addition of some 3D printed components. It’s a smart and simple way to integrate the servos into the LEGO world, and we’re surprised we don’t see this more often.

Robotic arms remain an area of active research; there are even efforts to allow them to self-correct in the event of damage. Video after the break.

Continue reading “LEGO-Based Robot Arm With Motion Planning”

A PDP Laptop, For Various Definitions Of A Laptop

Digital Equipment Corp.’s PDP-11 is one of the most important computers in history. It’s the home of Unix, although that’s arguable, and it’s still being used in every application, from handling nuclear control rods to selling Ed Sheeran tickets on Ticketmaster. As the timeline of PDP-11 machines progressed, the hardware did as well, and by the time the PDP was eclipsed by the VAXxen, there were PDP-11s on a single chip. The Eastern Bloc took notice and produced their own PDP-11 on a chip. This is the 1801-series CPU, and like most soviet electronics from the Cold War, they’re readily available on eBay.

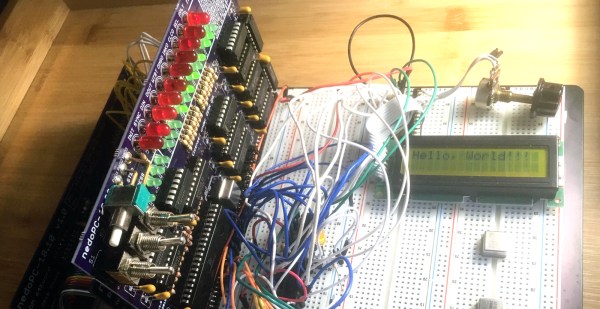
[SHAOS] has an interesting project in mind for this PDP-on-a-chip. It’s a standalone computer built around the Soviet re-implementation of the PDP-11, built into a form factor that could be described as a single board computer.

This project is the outgrowth of [SHAOS]’ project for last year’s Hackaday Prize, the PDPii. This was a computer built around a backplane that replicated the PDP-11 using a KR1801VM2 CPU, the Soviet not-a-clone clone of the PDP-11. This project is basically a PDP-11/03 system, except it was made in this century, and you can put it in any computer case, with bonus points awarded for RGB lighting and liquid cooling.

This year’s project, the PDPjr, eschews standardization to something that is far more unique. This build is more or less a single board computer with a character LCD display and a real keyboard. Think of this as the PDP-11 equivalent of the TRS-80 Model 100, a machine widely regarded as being the first laptop.

There’s still a lot of work to go, but [SHAOS] has written a ‘Hello World’ for this chip, and is getting those words to display on the character LCD. That’s a great first step and we can’t wait to see where this project ends up.

Handheld Game Console Puts Processing Power In The Cartridge

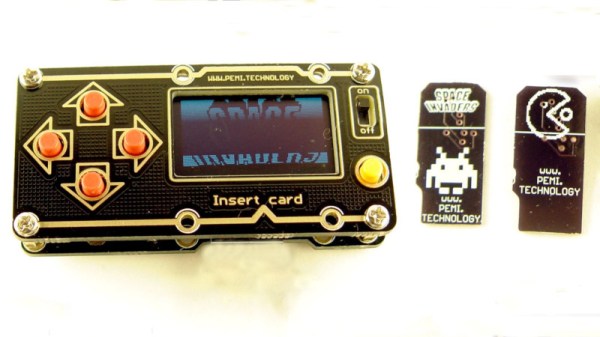
With the proliferation of cheap screens for use with microcontrollers, we’ve seen a matching proliferation in small handheld gaming projects. Pick your favourite chip, grab a screen off the usual suspects, add some buttons and you’re ready to go. [bobricius] has put a unique spin on this, with an unconventional cartridge-based build.

The main body of the handheld is constructed from attractive black and gold PCBs, and features a screen, some controls and an on/off switch. There’s also a microSD socket is on the board, which interfaces with cartridges which carry the microcontroller. Change the cart, and you can change the game.

[bobricius] has developed carts for a variety of common microcontroller platforms, from the Attiny85 to the venerable ATmega328. As the microSD slot is doing little more then sharing pins for the screen and controls, it’s possible to hook up almost any platform to the handheld. There’s even a design for a Raspberry Pi cart, just for fun.

It’s an entertaining take on the microcontroller handheld concept, and we can’t wait to see where it goes next. It reminds us of the Arduboy, which can even do 3D graphics if you really push it. Video after the break.

Continue reading “Handheld Game Console Puts Processing Power In The Cartridge”

Adding LoRa Long Range Radio To Smartphones And Connected Devices

Would you add another radio to your smartphone? No, not another WiFi or cellular radio; a smartphone already has that. I’m talking about something that provides connectivity through ISM bands, either 433 or 915 MHz. This can be used where you don’t have cell phone coverage, and it has a longer range than WiFi. This is the idea behind Skrypt, a messaging system that allows you to send off-the-grid messages.

Skrypt is an ESP32-based hardware modem that can communicate with a smartphone, or any other device for that matter, over Bluetooth or USB. Inside, there are two modules, an ESP32 WROOM module that provides the Bluetooth, WiFi, USB connectivity, and all of the important software configuration and web-based GUI. The LoRa module is the ubiquitous RFM95W that’s ready to drop into any circuit. Other than that, the entire circuit is just a battery and some power management ICs.

While LoRa is certinaly not the protocol you would use for forwarding pics up to Instagram, it is a remarkable protocol for short messages carried over a long range. That’s exactly what you want when you’re out of range of cell phone towers — those pics can wait, but you might really want to send a few words to your friends. That’s invaluable, and LoRa makes a lot of sense in that case.

Four Chips To Retro Perfection

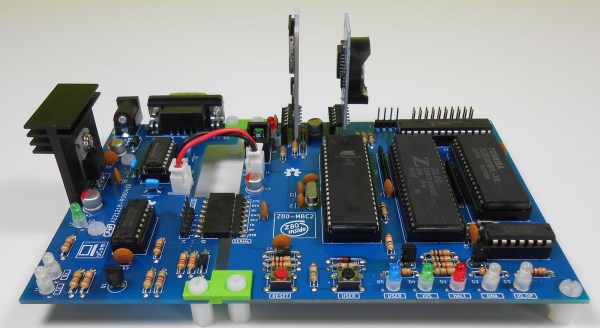
Over the years, we’ve seen many people build a computer from the ground up. It’s always great, but this one takes the cake. I’m not just saying that because there’s a cute little ‘Z80 Inside’ logo on the silk screen, either. It’s a four IC Z80 computer, a tiny board, and [Just4Fun]’s entry into this year’s Hackaday Prize.

This single board computer is only four chips, the most important being the CMOS Z80 CPU. This is the same CPU as was found in the TRS-80 and the ZX Spectrum, both classics from the early days of computing. In addition to the PCU, there’s a Toshiba SRAM with 128 whole kilobytes of random access memories. A 74HC00 is thrown into the mix for glue logic, and everything else happens through a specially-programmed ATMega32A. This last chip provides a universal I/O subsystem, the EEPROM, and the 4/8MHz clock for the CPU.

Those four chips are really all you need for a fully functional computer, but you can do so much more with this little board. There’s a uCom board, or basically a ‘transparent’ USB-to-serial emulator that will allow you to upload a hex file to the board. Of course this means you can also connect it to a terminal, and with FuzixOS, there’s Unix for the Z80. It’s a wonderment of retrocomputing, and one of the best ways to build an old computer today.

Continue reading “Four Chips To Retro Perfection”