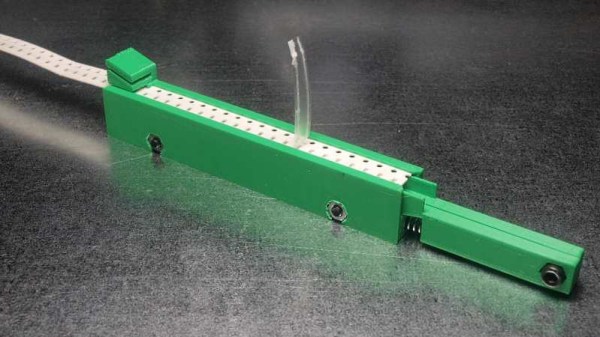
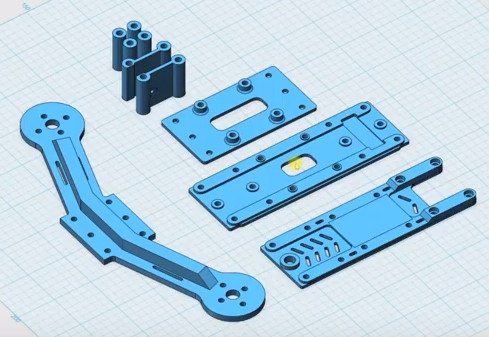
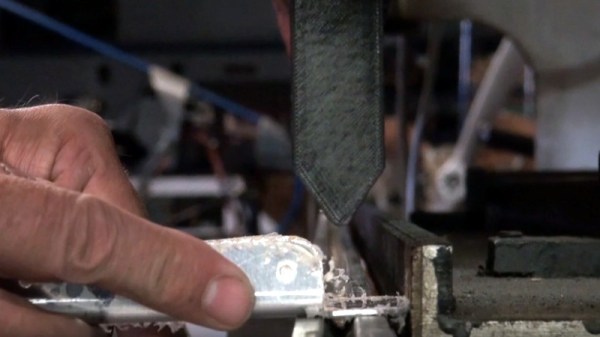
A 3D printed peristaltic pump with tubing

A 3D Printed Peristaltic Pump

After getting access to a Lulzbot 3D printer, [Tim] designed a 3D printable peristaltic pump. The design was done in OpenSCAD, which makes it parametric and easy to modify.

Peristaltic pumps work by squeezing a length of tubing to push fluids. This mechanism is similar to how your intestines work. The pump provides an isolated fluid path, which is why they’re commonly used in medical and food grade applications. Like many products in the medical space, these pumps tend to be rather expensive. Being able to print one for your own projects could save quite a bit of cost.

The pump is based on [emmett]’s gear bearing design. One nice thing about this design is that it is printed preassembled. Pop it out of the printer, add some tubing, and you’re ready to pump fluids.

On top of the isolated fluid path, this pump gives accurate volume measurement. For that reason, we can imagine it moving booze for a robotic bartender build. After the break, a video of the pump moving some fluid.

Continue reading “A 3D Printed Peristaltic Pump”

Concrete Castle

Update: 3D Printed Concrete Castle Completed

After two years of dreaming, designing, and doing, [Andrey Rudenko] has finally finished 3D printing his concrete castle. We’re sure a few readers will race to the comments to criticize the use of “castle” as an acceptable descriptor, but they’d be missing the point. It’s been only three months since he was testing the thing out in his garage, and now there’s a beautiful, freestanding structure in his yard, custom-printed.

There are no action shots of the printer setup as it lays down fat beads of concrete, only close-ups of the nozzle, but the castle was printed on-site outdoors. It wasn’t, however, printed in one piece. [Andrey] churned out the turrets separately and attached them later. He won’t be doing that again, though, because moving them in place was quite the burden. On his webpage, [Andrey] shares some insight in a wrap-up of the construction process. After much experimentation, he settled on a layer height of 10mm with a 30mm width for best results. He also discovered that he could print much more than his original estimation of 50cm of vertical height a day (fearing the lower layers would buckle).

With the castle a success, [Andrey] plans to expand his website to include a “posting wall for new ideas and findings.” We’re not sure whether that statement suggests that he would provide open-source access to everything or just feature updates of his future projects.

Wooden supports for concrete bridging.
[Andrey] used wooden supports to print concrete bridges.
We hope the former. You can check out its current format as the Architecture Forum, where he explains some of the construction capabilities and tricks used to build the castle.

His next project, a full-scale livable structure, will attempt to print 24/7 (weather permitting) rather than the stop-start routine used for the castle, which turned out to be the culprit behind imperfections in the print. He’ll have to hurry, though. [Andrey] lives in Minnesota, and the climate will soon cause construction to take a 6-month hiatus until warm weather returns. Be sure to check out his website for more photos and a retrospective on the castle project, as well as contact information—[Andrey] is reaching out to interested parties with the appropriate skills (and investors) who may want to help with the new project.

[via 3ders.org]

[Thanks Brian]

Arduino-based LED Wedding Lights

Light (1 of 3)Light (2 of 3)

[Rob] created these amazing Bluetooth controlled LED lights for his daughter’s wedding adding a colorful ambient glow to the ceremony. Each item held a Neopixel ring and an Arduino microprocessor with a wireless module that could be individually addressed over a ‘mini-network.’ The main master station would receive commands from a Windows Phone. Usually we see Arduino-based projects being run with Android apps, so it’s nice to see that Microsoft is still present in the maker community.

The enclosures and translucent vases that sit atop the devices were 3D printed. All eight of the matrimonial units synchronized with each other, and the colors could be changed by sliding the settings bar on the app.  [Rob] says that it was a lot of fun to build, and jokingly stated that it kept him “out of all the less important aspects of the ceremony. (food choice, decor, venue, who to marry etc etc).” The outcome was a beautiful arrangement of tabletop lighting for the wedding. A demo of [Rob]’s setup can be seen in the video below.

Continue reading “Arduino-based LED Wedding Lights”

3D Printed Bump Keys

Getting past a locked door is easy if you have the right tools. It’s just a matter of knowing how to adjust the pins inside to an even level while turning the mechanism at the same time when everything is perfectly in place. That’s the beauty of a bump key. You never have to see the actual key or what it looks like. And with a simple hit to the back of the key, and bumping it just enough, the lock can magically be opened.

Lock picking items like this can be ordered online for a couple of dollars, or as [Jos Weyers] and [Christian Holler] showed in a recent Wired article, alternatively you can print your own at home. The video of these 3D printed keys (which can be viewed below) attempts to prove that a person can unlock a door with plastic, which was a little bit surprising to us because it seems like the edges would break off right away. But as it turns out, a thin plastic bump key can be made and does function. Not sure how long these keys can last though, but sometimes all you really need is a one time use when trying to open a specific, tricky lock.

As the article states, “Weyers and Holler aren’t trying to teach thieves and spies a new trick for breaking into high-security facilities; instead, they want to warn lockmakers about the possibility of 3-D printable bump keys so they might defend against it.” Although this information is geared towards lockmakers, we see our Hackaday readers finding this data useful as well. Organizers of hackerspaces who hold regular lock-picking events might want to print their own keys and teach classes centered around security. The uses for this are boundless in regards to educating the public about how locks truly work.

Continue reading “3D Printed Bump Keys”

Teaching The Word Clock Some New Tricks

wordclock2014

[Joakim] has built a clock that spells out the time in words. Wait a second – word clock, what is this, 2009? Word clocks are one of those projects that have become timeless. When we see a build that stands out, we make sure to write it up. [Joakim’s] clock is special for a number of reasons. The time is spelled out in Norwegian, and since the clock is a birthday gift for [Daniel], [Joakim] added the his full name to the clock’s repertoire.

One of the hard parts of word clock design is controlling light spill. [Joakim] used a simple 3D printed frame to box each LED in. This keeps the spill under control and makes everything easier to read. The RGB LED’s [Joakim] used are also a bit different from the norm. Rather than the WS2812 Neopixel, [Joakim] used LPD8806 LED strips. On the controller side [Joakim] may have gone a bit overboard in his choice of an Arduino Yun, but he does put the ATmega328 and Embedded Linux machine to good use.

The real magic happens at boot. [Daniel’s] name lights up in red, with various letters going green as each step completes. A green ‘D’ indicates an IP address was obtained from the router’s DHCP server. ‘N’ switches to green when four NTP servers have been contacted, and the Linux processor is reasonably sure it has the correct time. The last letter to change will be the ‘E’, which reports ambient light.

[Joakim] added a web interface to trigger his new features, such as a rainbow color palette, or the ability to show minutes by changing the color of the letters K,L,O,K. The final result is a slick package, which definitely brings a 2009 era design up to 2014 standards!

Koch Lamp Is 3D Printed With A Twist

Koch Lamp

[repkid] didn’t set out to build a lamp, but that’s what he ended up with, and what a lamp he built. If the above-pictured shapes look familiar, it’s because you can’t visit Thingiverse without tripping over one of several designs, all based on a fractal better known as the Koch snowflake. Typically, however, these models are intended as vases, but [repkid] saw an opportunity to bring a couple of them together as a housing for his lighting fixture.

Tinkering with an old IKEA dioder wasn’t enough of a challenge, so [repkid] fired up his 3D printer and churned out three smaller Koch vases to serve as “bulbs” for the lamp. Inside, he affixed each LED strip to a laser-cut acrylic housing with clear tape. The three bulbs attach around a wooden base, which also holds a larger, central Koch print at its center. The base also contains a PICAXE 14M2 controller to run the dioder while collecting input from an attached wireless receiver. The final component is a custom control box—comprised of both 3D-printed and laser-cut parts—to provide a 3-dial remote. A simple spin communicates the red, green, and blue values through another PICAXE controller to the transmitter. Swing by his site for a detailed build log and an assortment of progress pictures.


Koenigsegg 3D-Printing For Production Vehicles

Koenigsegg with Printed Parts

We’re not surprised to see a car manufacturer using 3D-printing technology, but we think this may be the first time we’ve heard of 3D-prints going into production vehicles. You’ve likely heard of Christian von Koenigsegg’s cars if you’re a fan of BBC’s Top Gear, where the hypercar screams its way into the leading lap times.

Now it seems the Swedish car manufacturer has integrated 3D printing and scanning into the design process. Christian himself explains the benefits of both for iterative design: they roughed out a chair, adjusting it as they went until it was about the right shape and was comfortable. They then used a laser scanner to bring it into a CAD file, which significantly accelerated the production process. He’s also got some examples of brake pedals printed from ABS—they normally machine them out of aluminum—to test the fits and the feeling. They make adjustments as necessary to the prints, sometimes carving them up by hand, then break out the laser scanner again to capture any modifications, bring it back to CAD, and reprint the model.

Interestingly, they’ve been printing some bits and pieces for production cars out of ABS for a few years. Considering the low volume they are working with, it makes sense. Videos and more info after the jump.

Continue reading “Koenigsegg 3D-Printing For Production Vehicles”