How To Print PETG As Transparently As Possible

PETG filament can be had in a variety of colors, just like any other. You can even get translucent or transparent forms if you want to print something vaguely see-through. But if you’re looking for a bit more visually impressive, you might like to pick up a few tips from [Tej Grewal] on making sure your prints come out as clear as possible.

Standard print settings aren’t great for transparency.

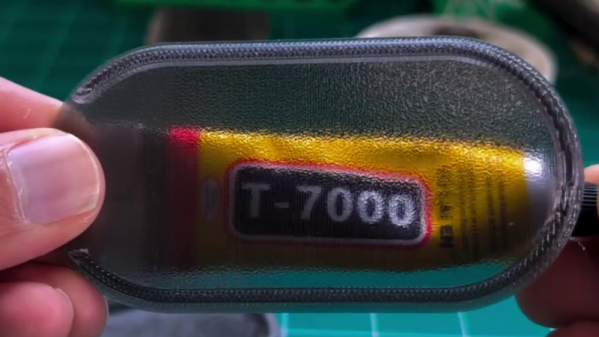
It all comes down to pathing of the 3D printer’s hot end. If it’s zigzagging back and forth, laying down hot plastic in all different orientations from layer to layer, you’re going to get a hazy, ugly, result that probably doesn’t look very see-through at all.

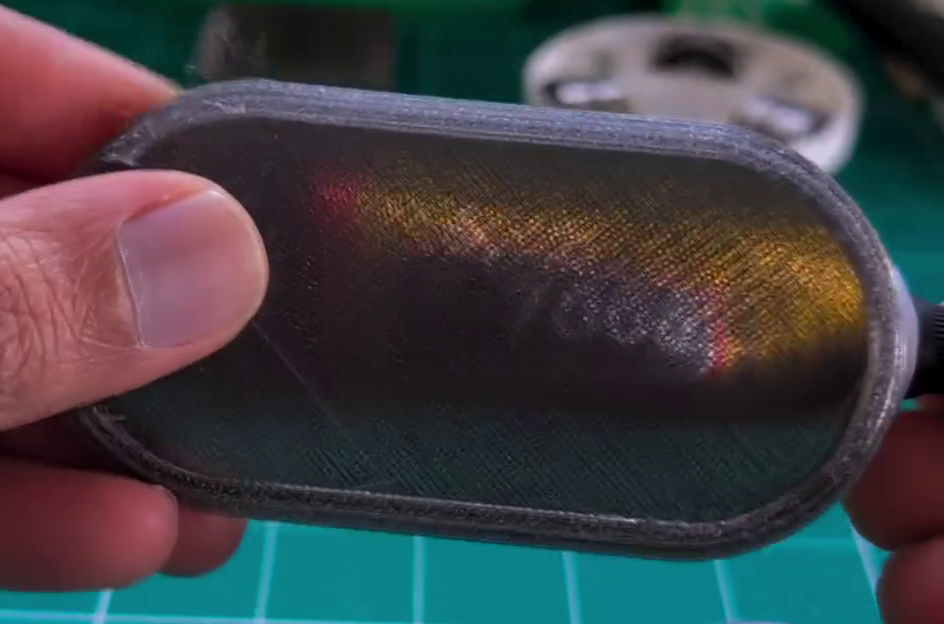
However, you can work around this by choosing slicer settings that make the tool pathing more suitable for producing a clearer part. [Tej] recommends going slow — as little as 20 mm/s during printing. He also states that removing top and bottom shells and setting wall loops to 1 can help to produce a part that’s entirely infill. Then, you’ll want to set infill to 100% and the direction to 0 or 90 degrees. This will ensure your hot end is just making long, straight strokes for layer after layer that will best allow light to pass through. You’ll also want to maximize nozzle flow to avoid any unsightly gaps or bubbles in your print.

[Tej] demonstrates the technique by creating a cover for a display. By using the settings in question, he creates a far more transparent plate, compared to the original part that has an ugly zig-zagging haze effect. You’re not going to get something optically clear this way; the final results are more lightly frosted, but still good.

Transparency will never be something 3D printers are great at. However, we have seen some interesting post-processing techniques that will blow your mind in this regard.

Two geared plastic disks can be seen on a platform. One disk rotates around a central column, while the other is mounted on a platform that extends from the edge of the first disk. The second disk holds a print bed, and a print head mounted on the column is positioned just above a half-finished 3D print.

A Toolchanging Inverse SCARA 3D Printer

There are some times when a picture, or better yet a video, really is worth a thousand words, and [heinz]’s dual-disk polar 3D printer is one of those projects. Perhaps the best way to describe it is as an inverted SCARA system that moves the print bed around the hot end, producing strange and mesmerizing motion paths.

The Z-axis runs on a column through the center of the printer, while the print bed is a geared disk that can independently rotate both around its own center and around the central column. This gives the printer a simple way to use multiple extruders: simply mount the extruders at different angles around the central pillar, then rotate the bed around to whichever extruder is currently in use. (See the video demo below.) Since the extruder only moves in the Z direction, there’s also no need to make it as light as possible. In one test, it worked perfectly well with a five-filament direct-drive extruder assembly weighing two kilograms, though it proved a bit unwieldy.

[heinz] 3D printed the rotating disks and a few other parts of the printer, and used two GT2 timing pulleys and the bearings from a Lazy Susan to drive the disks and let them rotate. The print bed’s surface is made out of fiberglass, and since it’s unheated, it has a pattern of small holes drilled into it to let molten plastic seep in and adhere. One nice side effect of the rotating print bed is that it can produce a turntable effect on time-lapse videos.

We’ve covered this project once before when it was a bit earlier in development, and somehow we missed when it got upgraded to its current status. Let’s just say we’re impressed!

Polar 3D printers may make it a bit harder to visualize paths, but they can do unique things like print with four heads at a time or print in non-planar paths.

Continue reading “A Toolchanging Inverse SCARA 3D Printer”

3D Printing A New Kind Of Skateboard That Is Ultimately Unsafe

Skateboards were organically developed in the 1940s and 1950s; 30 years would then pass before the ollie was developed, unlocking new realms for skaters dedicated to the artform. The advent of powerful batteries and motors would later make the electric skateboard a practical and (un?)fashionable method of transport in more recent years. Now, [Ivan Miranda] is pushing the cutting edge of skateboarding even further, with an entirely weird build of his own design.

The build was inspired by one-wheels, which [Ivan] considers fun but ultimately too dangerous. Most specifically, he fears crashing when the one-wheel is tilted beyond a critical angle at which the motor can restore it to a level  heading. His concept was to thus create a two-wheeled board that is nonetheless controlled with the leaning interface of a one-wheel.

The frame is assembled from a combination of 3D-printed brackets and aluminium extrusion. The rider stands on a platform which rides on rollers on top of the frame, tilting it to control the drive direction of the board. Detecting the angle is handled by an Arduino Due with an MPU6050 IMU onboard. The microcontroller is then responsible for commanding the speed controller to move the board. Drive is from a brushless DC motor, hooked up to one of the wheels via a toothed belt. Power is courtesy of three power tool batteries.

Early testing showed the design to be a bit of a death trap. However, with refinement to the control system code and an improved battery setup, it became slightly more graceful to ride. [Ivan] notes that more tuning and refinement is needed to make the thing safer than a one-wheel, which was the original goal. We’ve seen some other great builds from [Ivan] before, too. Video after the break.

Continue reading “3D Printing A New Kind Of Skateboard That Is Ultimately Unsafe”

Improved 3D Printer Cannibalizes Two Older Printers

In the late 2010s, the Ender 3 printers were arguably the most popular line of 3D printers worldwide, and for good reason. They combined simplicity and reliability in a package that was much less expensive than competitors, giving a much wider range of people access to their first printers. Of course there are much better printers on the market today, leaving many of these printers sitting unused. [Irbis3D] had an idea that with so many of these obsolete, inexpensive printers on the secondhand market, he could build something better with their parts.

The printer he eventually pieces together takes parts from two donor Ender printers and creates a printer with a CoreXY design instead of the bedslinger (Cartesian) design of the originals. CoreXY has an advantage over other printer topologies in that the print head moves in X and Y directions, allowing for much faster print times at the expense of increased complexity. There are some challenges to the design that [Irbis3D] had to contend with, such as heating problems with the extruder head that needed some modifications, as well as a resonance problem common with many printer designs which can generally be solved by replacing parts one-by-one until satisfactory prints are achieved.

Of course, not all of the parts for the new printer come from the old Ender printers. The longer belts driving the print head needed to be ordered, as well as a few other miscellaneous bits. But almost everything else is taken from these printers, which can be found fairly cheaply on the secondhand market nowadays. In theory it’s possible to build this version for much less cost than an equivalent printer as a result. If you’re looking for something even more complicated to build, we’d recommend this delta printer with a built-in tool changer.

Thanks to [BusterCasey] for the tip!

Continue reading “Improved 3D Printer Cannibalizes Two Older Printers”

This Device Is A Real Page Turner

You can read e-books on just about anything—your tablet, your smartphone, or even your PC. However, the interface can be lacking somewhat compared to a traditional book—on a computer, you have to use the keyboard or mouse to flip the pages. Alternatively, you could do what [NovemberKou] did, and build a dedicated page-turning device.

The device was specifically designed for use with the Kindle for Mac or Kindle for PC reader apps, allowing the user to peruse their chosen literature without using the keyboard to change pages. It consists of a thumb wheel, rotary encoder, and an Arduino Pro Micro mounted in a 3D printed shell. The Pro Micro is set up to emulate a USB keyboard, sending “Page Up” or “Page Down” key presses as you turn the thum bwheel in either direction.

Is it a frivolous device with a very specific purpose? Yes, and that’s why we love it. There’s something charming about building a bespoke interface device just to increase your reading pleasure, and we wholeheartedly support it.

Continue reading “This Device Is A Real Page Turner”

Smooth! Non-Planar 3D Ironing

Is 2025 finally the year of non-planar 3D printing? Maybe it won’t have to be if [Ten Tech] gets his way!

Ironing is the act of going over the top surface of your print again with the nozzle, re-melting it flat. Usually, this is limited to working on boring horizontal surfaces, but no more! This post-processing script from [Tenger Technologies], coupled with a heated, ball-shaped attachment, lets you iron the top of arbitrary surfaces.

At first, [Ten Tech] tried out non-planar ironing with a normal nozzle. Indeed, we’ve seen exactly this approach taken last year.  But that approach fails at moderate angles because the edge on the nozzle digs in, and the surrounding hot-end parts drag.

[Ten Tech]’s special sauce is taking inspiration from the ball-end mill finishing step in subtractive CNC work: he affixed the round tip of a rivet on the end of a nozzle, and insulating that new tool turned it into an iron that could smooth arbitrary curvy top layers.

One post-processing script later, and the proof of concept is working. Check out the video below to see it in action. As it stands, this requires a toolhead swap and the calibration of a whole bunch of new parameters, but it’s a very promising new idea for the community to iterate on. We love the idea of a dedicated tool and post-processing smoother script working together in concert.

Will 2025 be the year of non-planar 3DP? We’ve seen not one but two superb multi-axis non-planar printer designs so far this year: one from [Joshua Bird] and the other from [Daniel] of [Fractal Robotics]. In both cases, they are not just new machines, but are also supported with novel open-source slicers to make them work. Now [Ten Tech]’s ironer throws its hat in the ring. What will we see next?

Thanks to [Gustav Persson] for the tip!

Continue reading “Smooth! Non-Planar 3D Ironing”

The Saga Of Hacking A Bambu X1 Carbon

Bambu Labs make indisputably excellent printers. However, that excellence comes at the cost of freedom. After a firmware release earlier this year, Bambu printers could only work with Bambu’s own slicer. For [Proper Printing], this was unacceptable, so printer modification was in order. 

First on the plate was the pesky Bambu Labs nozzle. They are a pain to replace, and specialty sizes like 1.8mm are nonexistent. To remedy this flaw, a Bambu Labs compatible heat sink, an E3D V6 ring heater, and a heat break assembly are required. The ring heater was needed for clearance with the stock Bambu shroud. With the help of a 3D-printed jig, fresh holes were cut and tapped into the heat sink to make room for the E3D heat break. Some crimping to salvaged connectors and a bit of filing on the heat sink for wire routing, and Bob’s your uncle!

Continue reading “The Saga Of Hacking A Bambu X1 Carbon”