A 6502 Overlay Debugger

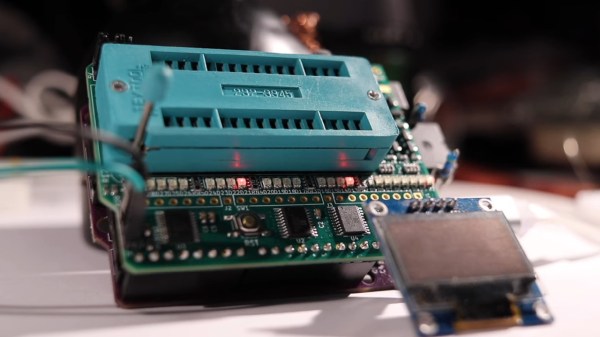
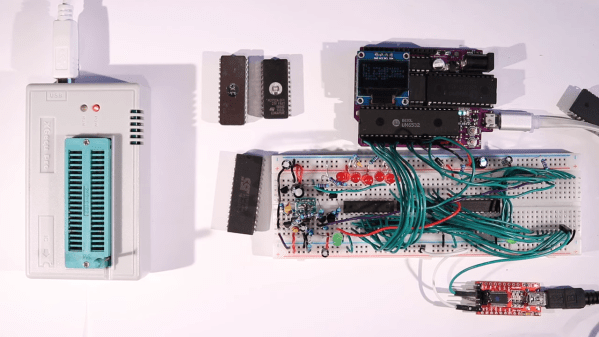
Retired hardware engineer [Plasmode] recently took on the challenge of building a debugger for the 6502 designed to sit atop the microprocessor while seated in a solder less breadboard. The result is the Diagnostic Overlay for W65C02 Breadboard, consisting of 128 kB SRAM and a 1250-gate CPLD. Except being 0.8 in wide, the overlay debugger is otherwise the same size as the 6502’s 40-pin DIP package, so it doesn’t overhang other portions of your circuit.

Being an initial concept prototype, [Plasmode] mounted the chips dead-bug style on perf board — a process he himself found tiring. If he builds additional debuggers, presumably he will consider making a PCB.

The prototype was constructed using point-to-point soldering with 30-ga wire wrap wire.  It was all done under the inspection microscope.  There are not many connections, but they are rather tedious so I can only do a dozen or so wires per session.  It took me 2 days and several hours total to finish the prototype board.

This design is based on the CRC65 Frugal 6502 Single Board Computer, of course omitting the 6502 itself. Instead of a physical ROM memory chip, he implemented a 64-byte boot loader inside the CPLD and a serial port. This lets him to bootstrap the system over the serial port. He plans on expanding this to include other DIP-packaged retro microprocessors in the future. Check out his Hackaday.io project page ( above ). If you want to dig deeper, he posted the schematics here.

Apple III Slows Down To Smell The Roses

The most collectible items in the realm of vintage computers often weren’t the most popular of their era. Quite the opposite, in fact. Generally the more desireable systems were market failures when they first launched, and are now sought out because of a newly-appreciated quirk or simply because the fact that they weren’t widely accepted means there’s fewer of them. One of the retro computers falling into this category is the Apple III, which had fundamental hardware issues upon launch leading to a large recall and its overall commercial failure. [Ted] is trying to bring one of these devices back to life, though, by slowing its clock speed down to a crawl.

The CPU in these machines was a Synertek 6502 running at 1.8 MHz. With a machine that wouldn’t boot, though, [Ted] replaced it with his own MCL65+, a purpose-built accelerator card based on the 600 MHz Teensy 4.1 microcontroller in order to debug the motherboard. The first problem was found in a ROM chip which prevented the computer loading anything from memory, but his solution wouldn’t work at the system’s higher clock speeds. To solve that problem [Ted] disabled the higher clock speed in hardware, restricting the system to 1 MHz and allowing it to finally boot.

So far there haven’t been any issues running the computer at the slower speed, and it also helps keep the computer cooler and hopefully running longer as well, since the system won’t get as hot or unstable. This isn’t [Ted]’s first retrocomputing rodeo, either. His MCL chips have been featured in plenty of other computers like this Apple II which can run at a much faster rate than the original hardware thanks to the help of the modern microcontroller.

Kim-1: Memory Problem Resolved

At the very start of the personal computer revolution, there were relatively inexpensive boards with little more than a CPU, some memory, a display, and switches or a keypad. Some of these had expansion ports meant to allow you to build up, and some were just “trainers” to learn about computers. While you could argue that the Altair fell into this category, it had a case and a proper bus. The computers we are thinking about were usually just on a single board and — with luck — had an edge connector for expansion. Perhaps the most famous of these was the KIM-1 and [Old VCR] shows us how he brought one back to life.

These were highly popular mainly because of the low price of $245 back in 1976. For that price you got a calculator-style keyboard and LED display, 1K of RAM, and 2K of ROM. [Old VCR] has several and noticed that one was developing memory problems.

Continue reading “Kim-1: Memory Problem Resolved”

Clock Runs Computer In Slow-Motion

At the heart of all computers is a clock, a dedicated timepiece ensuring that all of the parts of the computer are synchronized and can work together to execute the instructions that the computer receives. Clock speeds for most modern off-the-shelf computers and smartphones operate around a billion cycles per second, and even clocks that tick at a human-dizzying speed of a million times per second have been around since at least the 1970s. But there’s no reason a computer can’t run at a much slower speed, as [Greg] demonstrates in this video where he slows down a 6502 processor to a single clock cycle per second.

To reduce the clock speed from the megahertz range down to a single hertz or single clock cycle per second, [Greg] is using the pendulum from an actual clock. He attaches a small magnet to the bottom of the pendulum which is counted by a sensor as it swings past. Feeding that pulse into a monostable conditioner yields a clock signal which is usable for one of his 6502-based computers, and at this extremely slow rate, it’s possible to see the operation of a lot of the computers’ inner workings a step at a time. In fact, he optimized the computer’s operation as this slow speed let him see some inefficiencies in the program he was running.

It helps if your processor is static, of course. Older CPUs with dynamic storage for registers and some with limited-range PLLs would not work with this technique. The 8080A, for example, required a clock of at least 500 kHz.

Not only can this computer use a pendulum clock as the basis for its internal clock, but [Greg] also rigged up a mechanism to use a heartbeat. Getting in a little bit of exercise to increase his heart rate first will noticeably increase the computer’s speed. And, if you’re looking to get a deeper glimpse into the inner workings of a computer, we’d recommend looking at one which forgoes transistors in favor of relays.

Continue reading “Clock Runs Computer In Slow-Motion”

A Simple Guide To Bit Banged I2C On The 6502

We covered [Anders Nielsen]’s 65duino project a short while ago, and now he’s back with an update video showing some more details of bit-banging I2C using plain old 6502 assembly language.

Obviously, with such a simple system, there is no dedicated I2C interface hardware, so the programmer must take care of all the details of the I2C protocol in software, bit-banging it out to the peripheral and reading back the response one bit at a time.

The first detail to concern us will be the I2C addresses of the devices being connected to the bus and how low-level bit manipulation is used to turn the 7-bit I2C address into the byte being bit-banged. As [Anders] shows, setting a bit is simply a logical-OR operation, and resetting a bit is a simple logical-AND operation using the inversion (or one’s complement) bit to reset to form a bitmask. As many will already know, this process is necessary to code for a read or a write I2C operation. A further detail is that I2C uses an open-collector connection scheme, which means that no device on the bus may drive the bus to logical high; instead, they must release the drive by going to the high impedance state, and an external pull-up resistor will pull the bus high. The 6532 RIOT chip (used for I/O on the 65unio) does not have tristate control but instead uses a data direction register (DDR) to allow a pin to be an input. This will do the job just fine, albeit with slightly odd-looking code, until you know what’s going on.

From there, it’s a straightforward matter to write subroutines that generate the I2C start, stop, and NACK conditions that are required to write to the SSD1306-based OLED to get it to do something we can observe. From these basic roots, through higher-level subroutines, a complete OLED library in assembly can be constructed. We shall sit tight and await where [Anders] goes next with this!

We see I2C-connected things all the time, like this neat ATtiny85-based I2C peripheral, and whilst we’re talking about the SSD1306 OLED display controller, here’s a hack that shows just how much you can push your luck with the I2C spec and get some crazy frame rates.

Continue reading “A Simple Guide To Bit Banged I2C On The 6502”

BBC Master 128 Revealed

[Adrian] comments that the BBC Master 128 is a rare 8-bit computer, and we agree — we couldn’t remember hearing about that particular machine, although the BBC series is quite familiar. The machine has a whopping 128 K of RAM, quite a bit for those days. It also had a 6502 variant known as the 65C12, which has an extra pin compared to a 6502 and doesn’t use the same clock arrangement. A viewer sent him one of these machines, which apparently was used in the BBC studios. You can see this rare beauty in the video below.

The computer has a very nice-looking keyboard that includes a number pad. There are also expansion ports for printers and floppy disk drives. It has some similarities to a standard BBC computer but has a number of differences externally and internally.

Of course, we were waiting for the teardown about 15 minutes in. There were some corroded batteries but luckily, they didn’t do much damage. The power supply had a burned smell. Cracking it open for inspection was a good time to convert the power supply to run on 120 V, too.

After some power supply repair, it was time to power the machine up. The results were not half bad. It started up with a cryptic error message: “This is not a language.” Better than a dead screen. The keyboard wasn’t totally working, though. A bit of internet searching found that the error happens when the battery dies and the machine loses its configuration.

More walkthroughs will take a bit more work on the keyboard. But we were impressed it came up as far as it did, and we look forward to a future installment where the machine fully starts up.

[Adrian] mentioned the co-processor slot accepting a Raspberry Pi, something we’ve talked about before. Or, add an FPGA and make the plucky computer think it is a PDP/11.

Continue reading “BBC Master 128 Revealed”

Commodore 64 Upgrade In Modern Package

While the Commodore 64 was an immensely popular computer for its time, and still remains a strong favorite within the retrocomputing community, there’s a reason we’re not using modern Commodore-branded computers today. Intense competition, company mismanagement, and advancing beyond 8-bit computers too late in the game all led to the company’s eventual downfall. But if you’re still a Commodore enthusiast and always wished you were able to get an upgraded C64, you might want to take a look at the Commander X16, a modern take on this classic computer.

We’ve actually seen the Commander X16 before, but this was back in its early days of prototyping and design. This video from [Adrian’s Digital Basement], also linked below the break, takes a look at how it’s come in the four years since [David Murray] started this project. At its core, it’s an 8-bit 6502-based computer like you’d find in the 1980s but built with new components. There are some more modern updates as well such as the ability to use an SD card as well as built-in SNES controller ports, but the real magic here is the VERA module. Built around an FPGA, this module handles graphics, some of the audio, and the storage capabilities and does all of these things much better than the original Commodore, while still being faithful to what made these computer great.

While the inclusion of the FPGA might offend some of the most staunch 8-bit purists, it turns out to be necessary due to the lack of off-the-shelf video chips and really makes this build shine in the end. It’s also capable of running 6502-based software from other machines too, including the original NES. The VERA module makes it possible to run other software too, including a sample of Sonic the Hedgehog from the Sega Genesis which [Adrian] demonstrates in his video. 6502-based computers are quite versatile as the Commander X16 demonstrates, and it’s even possible to build a rudimentary 6502 on a breadboard with just a few parts.

Continue reading “Commodore 64 Upgrade In Modern Package”