CPU Made From 74HC Chips Is A Glorious Mess

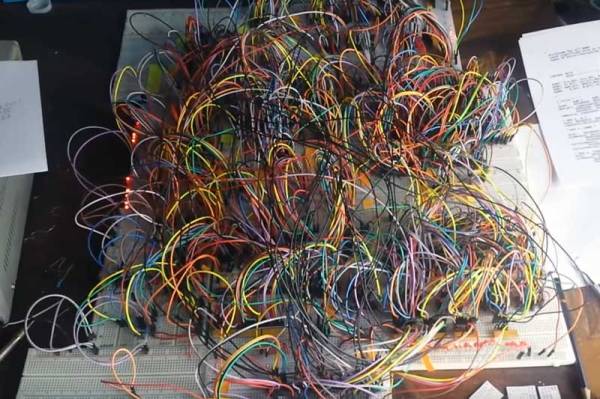
Did you ever start a project that you felt gained a life of its own? This project by [Paulo Constantino] is an entire CPU named dreamcatcher on breadboards, and is a beautiful jungle of digital. On top of that, it works to connect to an analog VGA display. How cool is that!

Designing an ALU and then a CPU is a typical exercise for students of digital design and is done using VerilogHDL or VHDL. It involves creating an ALU that can add, subtract etc while a control unit manages data moves and the like. There is also a memory fetch and instruction decode made up of de-mulitiplexers and a bunch of flip-flops that make up registers and flags. They are as complex as they sound if not more.

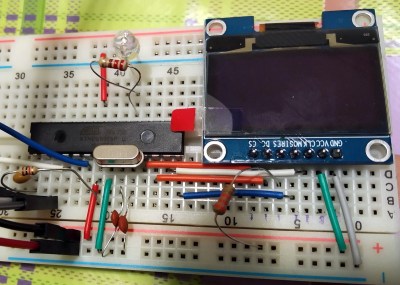
[Paulo Constantino] went ahead and designed the whole thing in Eagle as a schematic using 74HC logic chips. To build it though instead of a PCB he used breadboards. Everything from bus decoders to controlling an external VGA display is done using jumper wires. We did cover a video on the project a while back, but this update adds a video card interface to the build.

The CPU updates the display buffer on the VGA card, and in the video below shows the slow and steady update. The fact that the jungle of wires can drive a display is awesome. He has since started working on a 16-bit version of the processor and we’d love to see someone take it up a notch.

For those more accustomed to the PCB, the Z80 membership card project is a great build for 8-bit computer fans.

Thanks to [analog engineer] for the tip.

Continue reading “CPU Made From 74HC Chips Is A Glorious Mess”

Home Made 8-Bit CPU Is A Wiry Blinky Build

It might look like a random pile of wires to some, but it is far from random: [Paulo Constantino] built this 8-bit CPU himself from scratch. He built his remarkable creation using wires and 74HC shift register chips, plus a selection of LEDs to show the various registers.

Running at a maximum of 5MHz, it has an 8-bit data and address bus, although the latter can be expanded to 16 bits. It’s not mining Bitcoin (yet), but it can do things like play the Mario theme. His latest addition is the addition of the ability to write data out to flash memory, and he is looking to add a keyboard to make programming easier.

At the moment, he has to program the CPU by setting DIP jumpers. It’s an impressive, if somewhat frightening build that [Paulo] says took him a couple of days to design and a week or so to build. We’ve seen a few breadboard CPU builds, (some of which were tidier) and builds with similar shift register chips, but this one scores big in the blinky light and mad genius stakes.

Thanks to [AnalogMind] for the tip!

Continue reading “Home Made 8-Bit CPU Is A Wiry Blinky Build”

The 1980s Called – Asking For The Z80 Membership Card

The ’80’s and early ’90’s saw a huge proliferation of “personal” computers, spawning an army of hacker kids who would go on to hone their computing chops on 8-bit and 16-bit computers from brands such as Sinclair, Commodore, Acorn, Apple, Atari, Tandy/RadioShack and Texas Instruments. Fast forward to 2017, and Raspberry-Pi, BeagleBone and micro:bit computers reign supreme. But the old 8-bit and 16-bit computer systems can still teach us a lot.

[Lee Hart] has built the amazing Z80 Membership Card — a Z80 computer that fits in an Altoids tin. His design uses generic through hole parts mounted on a PCB with large pads, thick tracks and lots of track clearances, making assembly easy. Add to this his detailed documentation, where he weaves some amazing story telling, and it makes for a really enjoyable, nostalgic build. It makes you want to get under the hood and learn about computers all over again. The Z80 Membership Card features a Zilog Z80 microprocessor running at 4 MHz with 32k RAM and 32K EPROM, loaded with BASIC interpreter and monitor programs. A pair of 30-pin headers provide connections to power, I/O pins, data, address and control signals.

To accompany this board, he’s built a couple of companion “shield” boards. The Front Panel Card has a 16-key hex pad, 7-digit 7-segment LED display and Serial port. [Lee] has packed in a ton of features on the custom monitor ROM for the front panel card making it a versatile, two board, 8-bit system. Recently, he finished testing a third board in this series — a Serial/SD-Card/RAM shield which adds bank-switchable RAM and SD-card interface to provide “disk” storage. He’s managed to run a full CP/M-80 operating system on it using 64k of RAM. The two-board stack fits nicely in a regular Altoids tin. A fellow hacker who built the three-board sandwich found it too tall for the Altoids tin, and shared the design for a 3D printable enclosure.

[Lee] provides detailed documentation about the project on his blog with schematics, assembly instructions and code. He’s happy to answer questions from anyone who wants help building this computer. Do check out all of his other projects, a couple of which we’ve covered in the past. Check out Lee Hart’s Membership Card — a similar Altoids tin sized tribute to the 1802 CMOS chip and how he’s Anthropomorphizing Microprocessors.

Finally, we have to stress this once again — check out his Assembly Manuals [PDF, exhibit #1] — they are amazingly entertaining.

Thanks to [Matthew Kelley] who grabbed one of [Lee]’s kits and then tipped us off.

This 6502 Computer Project Is A Work Of Art

If you were a home constructor in the 8-bit era, the chances are that if you built a microcomputer system you would have ended up with a bare printed circuit board and a terminal. If you were on a budget you might have had a piece of stripboard as well, or maybe even wire-wrap. Beautiful cases were out of reach, they came with expensive commercial computers that were not the preserve of impoverished hobbyists.

Constructing an 8-bit machine in 2017 is a much easier process, there are many more options at your disposal. There is no need to make a bare PCB when you have a 3D printer, and this is demonstrated perfectly by [Dirk Grappendorf]’s 6502 computer project. He’s built from scratch an entire 6502 system, with a text LCD display, and housed it in a case with a keyboard that would put to shame all but the most expensive commercial machines from back in the day.

But this is more than just a hobby project thrown together that just happens to have a nice case, he’s gone the extra mile to the extent that this is professional enough that it could have been a product. If you’d been offered [Dirk]’s machine in 1980 alongside the competitors from Apple and Commodore, you’d certainly have given it some consideration.

We’ve seen retrocomputers too numerous to mention on these pages over the years, so if they are your thing perhaps it’s time to draw your attention to our VCF West reports, and to our reviews of computer museums in Germany, and Cambridge or Bletchley, UK.

Thanks [Colin] for the tip.

The BASIC Issue With Retro Computers

If you are interested in how a computer works at the hardware grass-roots level, past all the hardware and software abstractions intended to make them easier to use, you can sometimes find yourself frustrated in your investigations. Desktop and laptop computers are black boxes both physically and figuratively, and microcontrollers have retreated into their packages behind all the built-in peripherals that make them into systems-on-chips.
Continue reading “The BASIC Issue With Retro Computers”

An Atari 600XL Talks Composite Video

When we write about the 8-bit era of home computers there is a list of manufacturers whose names are frequently mentioned. Apple, Commodore, Texas Instruments, maybe Acorn and Sinclair if you are British, and of course Atari. But when we mention the last of those names it is invariably in reference to their iconic 2600 games console, it almost passes unnoticed that they also produced a line of 8-bit home computers based upon that success.

[ModPurist] was lucky enough to secure one of the Atari 8-bit computers through bartering with a local game store, an Atari 600XL from around 1983 or 1984, complete with its original box, manuals, cartridges, and a data cassette recorder. But on powering the system up and connecting to a TV a problem emerged. There was something there, but through a lot of noise and very blurry indeed. The solution after a bit of investigation turned out to be quite simple, to bypass the Astec video modulator and apply a composite video modification. Further investigation revealed that the original problem had in part been caused by the unit’s 5V power supply falling short of its voltage, so a further modification was to make a USB lead to allow it to be powered from a modern 5V charger.

This is a relatively simple piece of work, so you might be asking “Where’s the hack?”. The answer lies not in the mod itself, but in the detailed look [ModPurist] gives us at the inner workings of the 600XL, since it’s not a machine we see very often. Having the benefit of 30 years of hindsight and knowing the Atari’s competition quite well, we’d say that compared to some other machines of the era it’s a surprisingly well-designed computer both aesthetically and mechanically.

If your appetite for old Ataris has been whetted by this mod, can we draw your attention to this Atari 800 laptop? Or how about this 800 whose 6502 has been replaced with a 6809?

Hack An 8085 Like It’s 1985

If you have been building electronic hardware for several decades, do you still have any projects from your distant past? Do they work? An audio amplifier perhaps, or a bench power supply.

[Just4Fun] made a rather special computer in the 1980s, and it definitely still works. Describing it as “An 8085 single board computer with an EPROM emulator” though, does not convey just how special it is. This is not the modern sense of a single board computer with an SoC and a few support components. Instead it is a full system in the manner of the day in which processor, memory and peripherals are all separate components surrounded by 74 series glue logic. The whole system is wire-wrapped on a piece of perfboard and mounted very neatly in a rack. The EPROM emulator is a separate unit in a console case with hexadecimal keyboard and 7-segment display.

As the video below the break of an LED flashing demo shows, the EPROM emulator allows 8085 machine code to be entered byte by byte instead of having to be burned into a real EPROM.

[Just4Fun] leaves us with plans to replace the period EPROM emulator with a modern alternative, an EEPROM on a PCB designed to fit in the original bank of EPROM sockets. In this he suggests he might fit a bootloader and a BASIC interpreter, something entirely possible back in the day with conventional EPROMs, but probably not as cheaply.

Continue reading “Hack An 8085 Like It’s 1985”