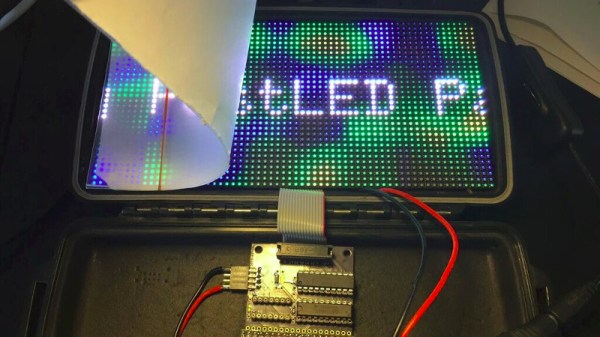
A Robot That Can Still Keep Its Balance After A Night In The Pub

One of the star attractions at the recent bring-a-hack prior to our London unconference was [Dan]’s two-wheeled self-balancing robot. As the assorted masses of the Hackaday readership consumed much fine ale and oohed and ahhed over each others work, there it stood on a pub table, defying all attempts to topple it.

In a way a successful self-balancer can look surprisingly unexciting because it achieves the seemingly unimpressive task of just standing there and not doing much except trundling about, but to take such a superficial view belies the significant feat of engineering that gives the self-balancer its party trick. And it’s no mean achievement to create one from fairly basic hardware, so how has he done it?

The 3D-printed frame holds a pair of stepper motors to do the hard work, while a piece of stripboard acts as carrier for boards containing the MPU6050 accelerometer and DRV8825 stepper motor drivers. Meanwhile the brains of the whole show started as an Espruino Pico but has since been moved to an ESP32.

There is a linked GitHub repository with all the code, and if our description of seeing it in a London pub isn’t good enough for you then you can see it in action in the video below.

Continue reading “A Robot That Can Still Keep Its Balance After A Night In The Pub”

Datalogger Uses ESP32 And ESP8266 Low Power Modes

[G6EJD] wanted to design a low power datalogger and decided to look at the power consumption of an ESP32 versus an ESP8266. You can see the video results below.

Of course, anytime someone does a power test, you have to wonder if there were any tricks or changes that would have made a big difference. However, the relative data is interesting (even though you could posit situations where even those results would be misleading). You should watch the videos, but the bottom line was a 3000 mAh battery provided 315 days of run time for the ESP8266 and 213 days with the ESP32.

Continue reading “Datalogger Uses ESP32 And ESP8266 Low Power Modes”

The ESP32… On A Chip

The new hotness in microcontrollers is the ESP32. This chip, developed by Espressif, is the follow-on to the very popular ESP8266, the cheap, low-power, very capable WiFi-enabled microcontroller that came on the scene a few years ago. The ESP32 is another beast entirely with two powerful cores, WiFi and Bluetooth, and peripherals galore. You can even put an NES emulator in there.

While the ESP32 is significantly more powerful, it has for now been contained in modules. What would really be cool is a single chip loaded up with integrated flash, filter caps, a clock, all on a 7x7mm QFN package. Meet the ESP32-Pico-D4 (PDF). It is, effectively, an ESP32 on a chip. It’s just the ticket if you’re trying to cram wireless, fast microcontroller wizardry into a small package.

At its heart, the ESP32-Pico is your normal ESP32 module with a Tensilica dual-core LX6 microcoprocessor, 448 kB of ROM, 520 kB of SRAM,  4 MB of Flash (it can support up to 16 MB), Wireless with 802.11 b/g/n and Bluetooth 4.2, and a cornucopia of peripherals that include an SD card, UART, SPI, SDIO, LED and motor PWM, I2S, I2C, cap touch sensors, and a Hall effect sensor. It’s quite literally everything you could ever want in a microcontroller.

Disregarding the just barely hand-solderable package and the need for a PCB antenna, the ESP32-Pico requires very few support components. Really, the only thing going on in the reference schematic is a bunch of bypass caps. This is, by far, the easiest and smallest method to put WiFi, Bluetooth, and a powerful microcontroller in a project. It will surely be a very, very popular chip for hobbyist electronics for years to come. Of course, it will be even more popular if Espressif also manages to put this chip in a QFP package in addition to the QFN.

Unfortunately, apart from the PDF released by Espressif, the details on the EPS32-on-a-chip are sparse. We don’t know when we’ll be able to get our grubby hands on a tray, tube, or reel of these chips. That said, there’s enough information here to start designing a breakout board. Have at it — we’d love to see what the community comes up with.

Shout out to [Dave] for the tip.

Secret Serial Port For Arduino/ESP32

If you use the Arduino IDE to program the ESP32, you might be interested in [Andreas Spiess’] latest video (see below). In it, he shows an example of using all three ESP32 UARTs from an Arduino program. He calls the third port “secret” although that’s really a misnomer. However, it does require a quick patch to the Arduino library to make it work.

Just gaining access to the additional UARTs isn’t hard. You simply use one of the additional serial port objects available. However, enabling UART 1 causes the ESP32 to crash! The reason is that by default, UART 1 uses the same pins as the ESP32 flash memory.

Luckily, the chip has a matrix switch that can put nearly any logical I/O pin on any physical I/O pin. [Andreas] shows how to modify the code, so that UART 1 maps to unused pins, which makes everything work. it is a simple change, replacing two parameters to a call that — among other things — maps the I/O pins. You could use the technique to relocate the UARTs to other places if you choose.

If you want to learn more about the ESP32, we covered a good set of tutorials for you to check out. Or if you just want a quick overview, you can start here.

Alexa In A Bunny Rabbit

The Raspberry Pi is the perfect candidate for Google’s AIY where you can talk to a cardboard box with some electronics in it. [BuddyCasino] took on the challenge of squeezing an Alexa Client in an ESP32 and to make things interesting, a bunny rabbit was chosen as the host of the virtual assistant.

A few months ago, we did a teardown of the Google AIY Kit where [BuddyCasino] commented that he managed to port the Echo Dot client into and ESP32. Sure enough, the video below shows a demonstration of the build in action. The project uses the MAX98357A which is the same I2S DAC used in the Google AIY Voice Hat. For the microphone, the device is again an I2S component however unlike the Google AIY kit which uses the SPH0645LM4H, [BuddyCasino] opted for the ICS-43434.

Two NeoPixels are employed as visual indicators for various purposes. This project is an excellent example of how simple and cheap modern-day designs have become. We are hoping to see the author add more features to the design and who knows maybe we will see a Google Assistant port on the ESP32 in the future. Check out the original teardown for more inspiration. Continue reading “Alexa In A Bunny Rabbit”

Low-Cost Rain Gauge Looks For Floods

We’ve seen a lot of uses for the now-ubiquitous ESP chip, including a numerous wilderness-monitoring devices.

Pluvi.on stands out with some attractive solutions and a simple design.

A lot of outdoor projects involve some sort of stock weather-resistance enclosure, but this project has a custom-designed acrylic box. About 4 inches across, the gauge uses a seesaw-like bucket to measure rain—a funnel, built into the enclosure, sends water into the gauge which records each time the bucket mechanism tilts, thereby recording the intensity of the rain. A NodeMCU packing an ESP8266 WiFi SoC sends the data to the cloud, helping predict the possibility of a flood in the area.

[Diogo Tolezano] and [Pedro Godoy] developed Pluvi.on as part of a Red Bull Basement hacker residency in São Paolo, Brazil. Interested in building your own Pluvi.on? They have building steps up on Instructables.

More ESP projects abound on Hackday, including this ESP mini robot, a data-logging hamster wheel, and an ESP32 information display. Continue reading “Low-Cost Rain Gauge Looks For Floods”

Hackaday Links: July 9, 2017

Doom is now running on the ESP32. This is some work from [Sprite_tm], and the last we heard about Doom on the ESP32 is that there was a silicon bug or something. Now we’re knee deep in the dead on a tiny WiFi and Bluetooth-enabled microcontroller.

Loading animations have a long and storied history. What originally began as an hourglass quickly turned into a hand counting to five and progress bars. There were clocks, the Great Beach Ball of Death, and now loading animations are everywhere. However, the loading animation has still not been perfected — until now, that is. This is a fidget spinner loading animation. It’s beautiful.

Just a quick reminder that a Minecraft scholarship exists. Yeah, I know what you’re thinking, but there is a scholarship from the Klingon Language Institute for studying any language, and last year’s winner built a redstone computer from scratch,

[8bit generation] recently released a documentary, about the rise of Atari. Easy to Learn, Hard to Master is about the rise of Atari under [Nolan Bushnell]. Now [8bit generation] is working on a new documentary: Firing Steve Jobs. The [Steve Jobs] story is fascinating, and no matter what you think of him, he probably knew what he was doing.

Want to build and sell some hardware? Over on Tindie, we’re taking a look at some of the most successful designers of custom crafted hardware. This time it’s [Albertas Mickėnas] of Catnip Electronics who has sold five thousand soil moisture sensors.

You can just go out and buy a CNC machine, but that doesn’t quite underscore the difficulty in getting a CNC machine running. Our ‘ol pal [Jeremy] recently picked up a Romaxx CNC machine and put together a video of its commissioning. There’s a lot of work here, from building a shelf/stand for a rather beefy machine to cutting into the bed for t-tracks, and figuring out how dust collection is going to happen.

Before there was KiCad and Eagle and a ton of web-based PCB design tools, there was Autotrax. Want to know what PCB design and GUIs look like in DOS? I did a walkthrough for designing a small PCB in the DOS version of Autotrax late last year. There are thousands of designs locked up in discontinued EDA suites, and [Erich] has a way to revive them. He’s developed an Autotrax/Easytrax layout import/export plugin for pcb-nd. Now legacy Protel designs can be imported into software released in this century. This is really cool, and you can check out some screenshots here.