Translating And Broadcasting Spoken Morse Code

When the first radios and telegraph lines were put into service, essentially the only way to communicate was to use Morse code. The first transmitters had extremely inefficient designs by today’s standards, so this was more a practical limitation than a choice. As the technology evolved there became less and less reason to use Morse to communicate, but plenty of amateur radio operators still use this mode including [Kevin] aka [KB9RLW] who has built a circuit which can translate spoken Morse code into a broadcasted Morse radio signal.

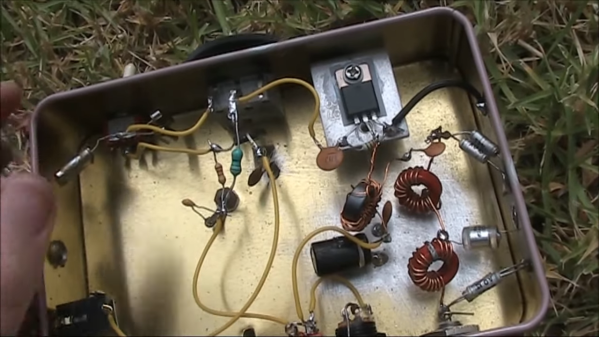
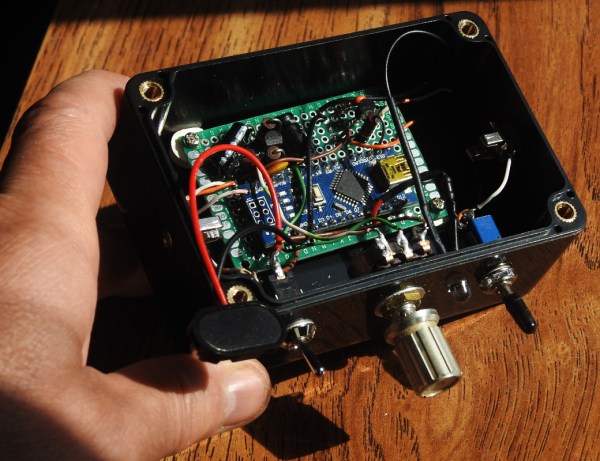
The circuit works by feeding the signal from a microphone into an Arduino. The Arduino listens for a certain threshold and keys the radio when it detects a word being spoken. Radio operators use the words “dit” and “dah” for dots and dashes respectively, and the Arduino isn’t really translating the words so much as it is sending a signal for the duration of however long each word takes to say. The software for the Arduino is provided on the project’s GitHub page as well, and uses a number of approaches to make sure the keyed signal is as clean as possible.

[Kevin] mentions that this device could be used by anyone who wishes to operate a radio in this mode who might have difficulty using a traditional Morse key and who doesn’t want to retrain their brain to use other available equipment like a puff straw or a foot key. The circuit is remarkably straightforward for what it does, and in the video below it seems [Kevin] is having a blast using it. If you’re still looking to learn to “speak” Morse code, though, take a look at this guide which goes into detail about it.

Thanks to [Dragan] for the tip!

Continue reading “Translating And Broadcasting Spoken Morse Code”

Add Mycelium To Your Mesh Networks

In many parts of the world, days after a good rainfall, it’s fairly common to see various species of mushrooms popping up out of the ground. These mysterious organisms aren’t the whole story, though. The living being is a vast network of hidden fibers, called mycelium, spreading through the ground and into any other organic material it can colonize. Its air of mystery and its vast reach are the inspiration for entire Star Trek shows and, of course, projects like this LoRa-based mesh network called Mycelium.

Mycelium is the invention of [Catamine] and includes many novel features compared to more typical mesh networks. For one, it is intended to be used in low power applications to give users the ability to send messages over a distributed network rather than a centralized network like a cell phone service provider. For another, the messages are able to be encrypted and authenticated, which is not currently possible with other mesh networks such as APRS. The idea is that a large network of people with nothing more complicated than an ESP32, an antenna, and this software would be able to communicate securely in situations where a centralized network is not available, whether that is from something like a natural disaster or from a governmental organization disabling the Internet during a political upheval.

The mesh network is currently in active development, and while messages can not yet be sent, the network is able to recognize nodes and maintain a keybase. There are certainly plenty of instances where something like this would be useful as we’ve seen before from other (non-encrypted) LoRa-based network solutions which are built around similar principles.

Thanks to [dearuserhron] for the tip!

Getting On The Air With A 10-Minute-ish Ham Transmitter

Artificially constrained designs can be among the most challenging projects to build, and the most interesting to consider. The amateur radio world is no stranger to this, with homebrew radio designs that set some sort of line in the sand. Such designs usually end up being delightfully minimalist and deeply instructive of first principles, which is one reason we like them so much.

For a perfect example of this design philosophy, take a look at [VK3YE]’s twist on the classic “10-Minute Transmitter”. (Video, embedded below.)

The design dates back to at least the 1980s, when [G4RAW] laid down the challenge to whip up a working transmitter from junk bin parts and make a contact within 15 minutes — ten for the build and five for working the bands. [VK3YE] used the “oner” — one-transistor — design for his 10-minute transmitter, but invested some additional time into adding a low-pass filter to keep his signal clean, and a power amplifier to boost the output a bit.

Even with the elaborations, the design is very simple and easy to understand. Construction is the standard “ugly style” that hams favor for quick builds like this. There are no parts that would be terribly hard to find, and everything fits into a small metal box. The video below shows the design and build, along with some experiments with WebSDR receivers to check out range both with and without the power amplifier.

Seeing these kinds of builds really puts us in the mood for some low-power action. Could something like this pop up in “The $50 Ham” series? Quite possibly yes.

Continue reading “Getting On The Air With A 10-Minute-ish Ham Transmitter”

Monitor SpaceX Rocket Launches With Software-Defined Radio

The amateur radio community has exploded with activity lately especially in the software-defined radio (SDR) area since it was found that a small inexpensive TV tuner could be wrangled to do what only expensive equipment was able to do before. One common build with these cards is monitoring air traffic, which send data about their flights out in packets over the radio and can easily be received and decoded now. It turns out another type of vehicle, SpaceX’s Falcon 9 spacecraft, reports data via radio as well and with some slightly upgraded hardware it’s possible to “listen in” to these flights in a similar way.

Reddit users [derekcz] and [Xerbot] used a HackRF module to listen in to the Falcon 9’s data transmissions during its latest launch. While the HackRF is a much more expensive piece of equipment compared to the RTL-SDR dongles used to listen in on aircraft, it is much more capable as well, with a range from 1 MHz to 6 GHz. Using this SDR peripheral as well as a 1.2 m repurposed satellite dish, the duo were able to intercept the radio transmissions from the in-flight rocket. From there, they were recorded with GNU Radio, converted into binary data, and then translated into text.

It seems as though the data feed included a number of different elements including time, location information, and other real-time data about the rocket’s flight. It’s a great build that demonstrates the wide appeal of software-defined radio, and if you want to get started it’s pretty easy to grab a much cheaper dongle and use it for all kinds of applications like this. Go check out [Tom Nardi]’s piece on the last seven years of RTL-SDR to get caught up to speed.

Thanks to [Adrian] for the tip!

A One-Transistor Ham Transmitter Anyone Can Build

What attracts a lot of people to amateur radio is that it gives you the ability to make your own gear. Scratch-building hams usually start by making their own antennas, but eventually, the itch to build one’s own radio must be scratched. And building this one-transistor transmitter is just about the simplest way to dive into the world of DIY radio.

Of course, limiting yourself to eight components in total entails making some sacrifices, and [Kostas (SV3ORA)]’s transmitter is clearly a study in compromise. For starters, it’s only a transmitter, so you’ll need to make other arrangements to have a meaningful conversation. You’ll also have to learn Morse code because the minimalist build only supports continuous-wave (CW) mode, although it can be modified for amplitude modulation (AM) voice work.

The circuit is flexible enough that almost any part can be substituted and the transmitter will still work. Most of the parts are junk-bin items, although the main transformer is something you’ll have to wind by hand. As described, the transformer not only provides feedback to the transistor oscillator, but also has a winding that powers an incandescent pilot lamp, and provides taps for attaching antennas of different impedances — no external tuner needed. [SV3ORA] provides detailed transformer-winding instructions and shows the final build, which looks very professional and tidy. The video below shows the rig in action with a separate receiver providing sidetone; there’s also the option of using one of the WebSDR receivers sprinkled around the globe to verify you’re getting out.

This little transmitter looks like a ton of fun to build, and we may just try it for our $50 Ham series if we can find all the parts. Honestly, the hardest to come by might be the variable capacitor, but there are ways around that too.

Continue reading “A One-Transistor Ham Transmitter Anyone Can Build”

The $50 Ham: Going Mobile

So far in this series, everything we’ve covered has been geared around the cheapest and easiest possible means of getting on the air: getting your Technician license, buying your first low-end portable transceiver, and checking in on the local repeater nets. That’s all good stuff, and chances are you can actually take all three of those steps and still have change left over from your $50 bill. Like I said, amateur radio doesn’t have to be expensive to be fun.

But at some point, every new ham is going to yearn for that first “real” rig, something with a little more oomph in terms of power, and perhaps with a few more features. For many Technicians, the obvious choice is a mobile rig, something that can be used to chat with fellow hams on the way to work, or to pass the time while on long road trips. Whatever your motivation is, once you buy a radio, you have to install it, and therein lie challenges galore, both electrical and mechanical.

I recently took the plunge on a mobile rig, and while the radio and antenna were an order of magnitude more expensive than $50, the process of installing it was pretty cheap. But it’s not the price of the thing that’s important in this series; rather, it’s to show that ham radio is all about doing it yourself, even when that means tearing your car apart from the inside out and rebuilding it around a radio.

Continue reading “The $50 Ham: Going Mobile”

The RFI Hunter: Looking For Noise In All The Wrong Places

Next time you get a new device and excitedly unwrap its little poly-wrapped power supply, remember this: for every switch-mode power supply you plug in, an amateur radio operator sheds a tear. A noisy, broadband, harmonic-laden tear.

The degree to which this fact disturbs you very much depends upon which side of the mic you’re on, but radio-frequency interference, or RFI, is something we should all at least be aware of. [Josh (KI6NAZ)] is keenly aware of RFI in his ham shack, but rather than curse the ever-rising noise floor he’s come up with some helpful tips for hunting down and eliminating it – or at least reducing its impact.

Attacking the problem begins with locating the sources of RFI, for which [Josh] used the classic “one-circuit-at-a-time” approach – kill every breaker in the panel and monitor the noise floor while flipping each breaker back on. This should at least give you a rough idea of where the offending devices are in your house. From there, [Josh] used a small shortwave receiver to locate problem areas, like the refrigerator, the clothes dryer, and his shack PC. The family flat-screen TV proved to be quite noisy too. Remediation techniques include wrapping every power cord and cable around toroids or clamping ferrite cores around them, both on the offending devices and in the shack. He even went so far as to add a line filter to the dryer to clamp down on its unwanted interference.

Judging by his waterfall displays, [Josh]’s efforts paid off, bringing his noise floor down from S5 to S1 or so. It’s too bad he had to take matters into his own hands – it’s not like the FCC and other spectrum watchdogs don’t know there’s a problem, after all.

Continue reading “The RFI Hunter: Looking For Noise In All The Wrong Places”