Building The Unreleased Lemmings Arcade Cabinet From 1991

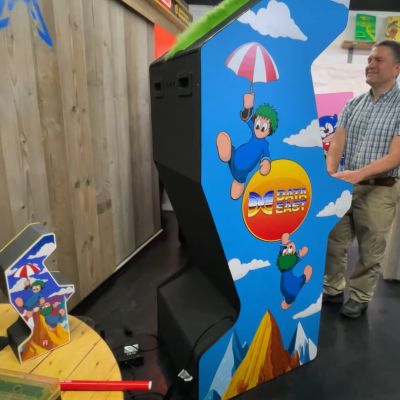
Back in the early 90s the world was almost graced with an arcade version of Lemmings, but after a few board revisions it was abandoned in 1991. Now the folk over at UK-based [RMC – The Cave] on YouTube have managed to not only get their mitts on a nearly finished prototype board, but have also designed and built a period-appropriate cabinet to go with it. This involved looking at a range of arcade cabinets created by Data East and picking a design that would allow both for the two-player mode of the game, and fit the overall style.

The finished Lemmings arcade cabinet. (Credit: RMC – The Cave, YouTube)

Arcade cabinets came in a wide range of cabinet styles and control layouts, largely defined by the game’s requirements, but sometimes with flourishes to distinguish the cabinet from the hundred others in the same arcade.

In this particular case the typical zig-zag (Z-back) style was found to be a good fit as on the Data East Night Slashers 1993-era cabinet, which then mostly left the controls (with two trackballs) and cabinet art to figure out. Fortunately there is plenty of inspiration when it comes to Lemmings art, leading to the finished cabinet with the original mainboard, the JAMMA wiring harness with MultiPi JAMMA controller, a 19″ CRT monitor and other components including the 3D printed controls panel.

With more and more new arcades popping up in the US and elsewhere, perhaps we’ll see these Lemmings arcade cabinets appear there too, especially since the ROMs on the prototype board were dumped for convenient MAME-ing.

Continue reading “Building The Unreleased Lemmings Arcade Cabinet From 1991″

Gather ‘Round This Unique 4-Player Arcade Cabinet

Usually when we see arcade cabinet builds, they’re your standard single-player stand up variety. Even one of them takes up quite a bit of room, so as appealing as it might be to link up two or more cabinets together for the occasional multiplayer session, the space required makes it a non-starter for most of us.

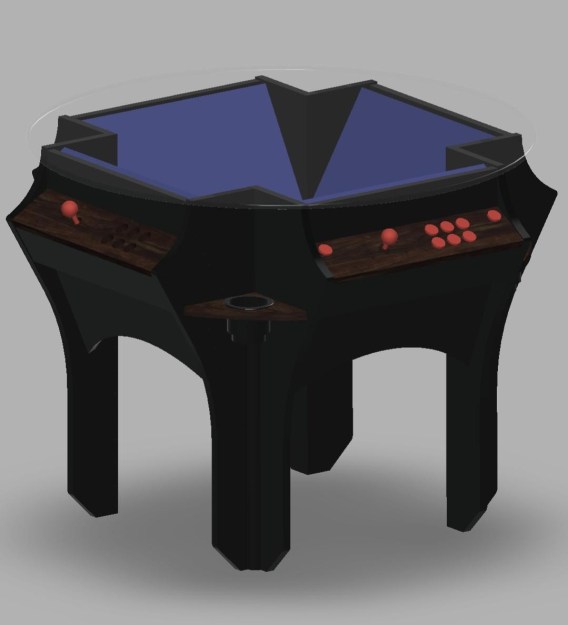
But this cleverly designed 4-player cocktail cabinet from [OgrishGadgeteer] goes a long way towards solving that problem. The circular design of the cabinet gives each player a clear view of their respective display in a much smaller footprint than would otherwise be possible, and the glass top allows the whole thing to double as an actual cocktail table when it’s not game time.

The cabinet was modelled in 3D before construction.

According to a post on r/cade, it took [OgrishGadgeteer] three months to go from paper sketches of the cabinet’s basic shape to the final product. Most of the components were picked up on the second hand market, which brought the total cost of the build to around $350. That wouldn’t have been a surprising price for a traditional full-size cabinet build, so for this, it seems like an absolute steal.

A Dell OptiPlex 7060 small form factor PC provides the power for this build, with the video output passing through a 4-way VGA distribution amplifier into 20 inch monitors. At $75, the four player control kit ended up being the single most expensive component of the build, though you could make do with some parts bin buttons and a Pi Pico if you wanted to really bring this one in on a budget.

Perhaps the most surprising element of the whole build is that, despite the cabinet’s complex design, [OgrishGadgeteer] pulled it off without a CNC to cut the plywood panels. Instead, a vinyl cutter was used to make full-size templates of the cuts and holes that needed to be made, which were attached directly to the wood. After that, it was just a matter of following the lines with a jigsaw. Not the fastest or most convenient solution, but it’s hard to argue with the final results.

We’ve seen other cocktail cabinet builds in the past, but this is the first that managed to cram four players in. Well, unless you count Dungeons & Dragons, anyway.

3D Printing Computer Space

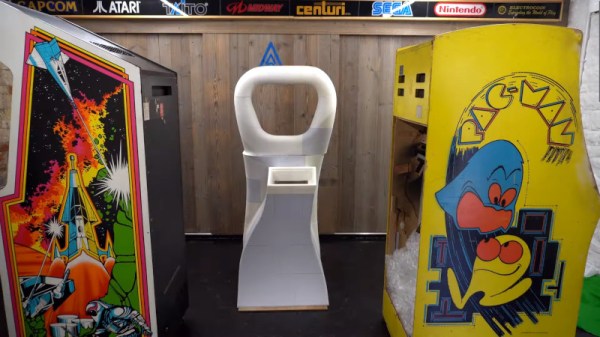
The first computer game available as a commercial arcade cabinet is unsurprisingly, a rare sight here in 2024. Nolan Bushnel and Ted Dabney’s 1971 Computer Space was a flowing fiberglass cabinet containing a version of the minicomputer game Spacewar! running on dedicated game hardware. The pair would of course go on to found the wildly successful Atari, leaving their first outing with its meager 1500 units almost a footnote in their history.

Unsurprisingly with so relatively few produced, few made it out of the United States, so in the UK there are none to be found. [Arcade Archive] report on a fresh build of a Computer Space cabinet, this time not in fiberglass but via 3D printed plastic.

The build itself is the work of [Richard Horne], and in the video he takes us through the design process before printing the parts and then sticking them all together to make the cabinet. Without a real machine to scan or measure he’s working from photographs of real machines, working out dimensions by reference to other cabinets such as PONG that appear alongside them. The result is about as faithful a model of the cabinet as could be made, and it’s cut into the many pieces required for 3D printing before careful assembly.

This is the first in a series, so keep following them to see a complete and working Computer Space take shape.

Continue reading “3D Printing Computer Space

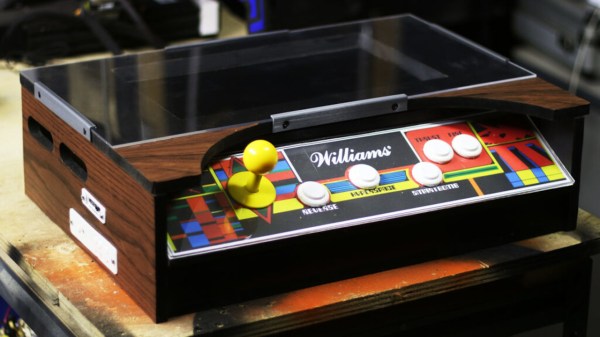
Showing the end result - a Defender machine copy in all its glory, with a colourful front panel with joysticks.

Defender Arcade Rebuilt To Settle A Childhood Memory

[Jason Winfield] had a nemesis: the Defender arcade machine. Having put quite a number of coins into one during his childhood, he’s since found himself as a seasoned maker, and decided to hold a rematch on his own terms. For this, he’s recreated the machine from scratch, building it around the guts of a Dell laptop, and he tells us the story what it took to build a new Defender in this day and age.

Defender was a peculiar machine — it was in cocktail table format, unlike many other arcade machines of that period. From pictures, he’s redesigned the whole thing in Fusion 360, in a way more desk-friendly format, but just as fancy looking as before.

As for the laptop, gutting it for its mainboard, screen, and speakers was a surprisingly painless procedure — everything booted up first try. A few board-fitted brackets and a swap from a HDD to a USB flashdrive for the OS later, the electronics were ready. As he was redesigning the entire arcade machine anyway, the new design control panel was also trimmed down for ease of use, while preserving the original colorful look.

All in all, an impressive build from [Jason]. After all was set and done, we don’t doubt that he went on to, let’s say, settle some old scores. It’s not the first time we see a desktop-sized arcade cabinet, and you gotta admire the skills making such a machine smaller while sticking to the old-timey aesthetic! Or, perhaps, would you like a cabinet that’s more subtle?

Continue reading Defender Arcade Rebuilt To Settle A Childhood Memory”

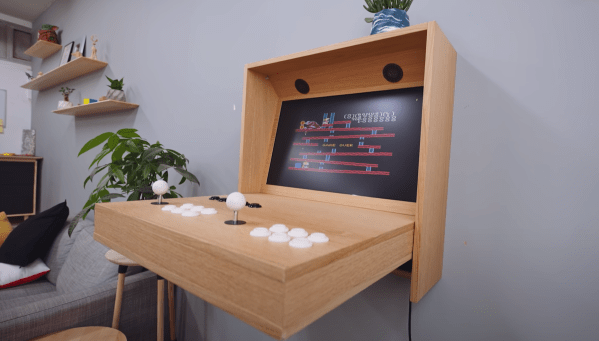
a money shot of the hidden arcade

Arcade Machine Pack And Play

There’s something about the large imposing wooden box of an arcade machine that lends a confident presence to a room. The problem with a tall and heavy box is that it takes up quite a bit of space and readily draws the eye. So [Alexandre Chappel] set out to avoid that and build an arcade machine that could hide in plain sight.

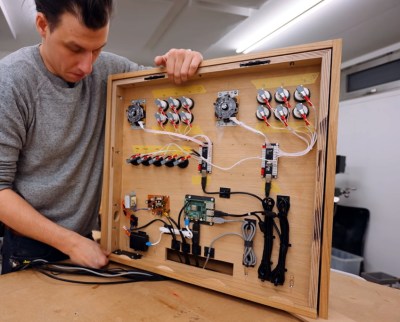
Extra points awarded for neat wiring on the inside.

The idea is a wooden box hung on the wall that folds up when not in use. [Alex] starts with Baltic birch plywood cut into the panels. Next, he applies edge banding (a thin veneer with some glue on the backside) so that all the exposed edges look like natural wood. Next, a screen hole is routed into the face frame, allowing an LCD monitor to sit snuggly in. A combination of pocket holes and biscuits allows [Alex] to assemble everything with no visible screws or fasteners.

With the help of a 3D printer, he quickly fabricated a locking mechanism to keep the front panel attached when it folds up. The hinge is also 3D printed. The typical Raspberry Pi 4 powers this particular machine. Two french cleats hold the box onto the wall, and once the system is on the wall, we have to say it looks incredible.

If you’re looking for a smaller but more traditional arcade cabinet, why not take a look at this arcade cabinet for toddlers? Or, if you loved the solid wood look of the hidden arcade, this full-sized solid oak cabinet would be something you would enjoy. Video after the break.

Continue reading “Arcade Machine Pack And Play”

A troublesome Triple-Z80 arcade board requires negative voltage for audio output

Vintage Arcade Used Negative Voltage To Turn Volume Up To 11

When [Nicole Express] got her hands on the logic board for the 1986 SNK arcade game Athena, she ran into a rather thorny problem: The board expected to be fed negative five volts! [Nicole]’s analysis of the problem and a brilliant solution are outlined in her well written blog post.

[Nicole]’s first task was to find out which devices need negative voltage. She found that the negative five volts was being fed through a capacitor to the ground pins on the Mitsubishi M151516L, an obscure 12 W audio amplifier. After finding the data sheet, she realized something strange: the amp didn’t call for negative voltage at all! A mystery was afoot.

To fully understand the problem, she considered a mid-1980’s arcade and its cacophony of sounds. How would a manufacturer make their arcade game stand out? By making it louder, obviously! And how did they make their game louder than the rest?

The answer lays in the requirement for negative five volts. The amplifier is still powered with a standard 12 V supply on its VCC pin. But with ground put at -5 V, the voltage potential is increased from 12 V to 17 V without overpowering the chip. The result is a louder game to draw more players and their fresh stacks of quarters.

How was [Nicole Express] to solve the problem? ATX PSU’s stopped providing -5 V after the ISA slot disappeared from PC’s, so that wouldn’t work. She could have purchased an expensive arcade style PSU, but that’s not her style. Instead, she employed a wonderful little hack: a charge pump circuit. A charge pump works by applying positive voltage to a capacitor. Then the capacitor is quickly disconnected from power, and the input and ground are flipped, an equal but negative voltage is found on its opposite plate. If this is done with a high enough frequency, a steady -5 V voltage can be had from a +5 V input. [Nicole Express] found a voltage inverter IC (ICL7660) made just for the purpose and put it to work.

The IC doesn’t supply enough power to get 12 W out of the amplifier, and so the resulting signal is fed into an external amplifier. Now [Nicole]’s arcade game has sound and she can play Athena from the original arcade board, 1986 style!

Arcades are few and far between these days, but that doesn’t mean you can’t introduce your young ones to the joys of dropping a quarter or two, or build a gorgeous oak Super Mario Bros cabinet complete with pixel art inlays. Do you have a favorite hack to share? Be sure let us know via the Tip Line!

Miniature Star Wars Arcade Lets You Blow Up The Death Star On The Go

If you have fond childhood memories of afternoons spent at the local arcade, then you’ve had the occasional daydream about tracking down one of those old cabinets and putting it in the living room. But the size, cost, and rarity of these machines makes actually owning one impractical for most people.

While this fully functional 1/4th scale replica of the classic Star Wars arcade game created by [Jamie McShan] might not be a perfect replacement for the original, there’s no denying it would be easier to fit through your front door. Nearly every aspect of the iconic 1983 machine has been carefully recreated, right down to a working coin slot that accepts miniature quarters. Frankly, the build would have been impressive enough had he only put in half the detail work, but we certainly aren’t complaining that he went the extra mile.

[Jamie] leaned heavily on resin 3D printed parts for this build, and for good reason. It’s hard to imagine how he could have produced some of the tiny working parts for his cabinet using traditional manufacturing techniques. The game’s signature control yoke and the coin acceptor mechanism are really incredible feats of miniaturization, and a testament to what’s possible at the DIY level with relatively affordable tools.

The cabinet itself is cut from MDF, using plans appropriately scaled down from the real thing. Inside you’ll find a Raspberry Pi 3 Model A+ running RetroPie attached directly to the back of a 4.3 inch LCD with integrated amplified speakers. [Jamie] is using an Arduino to handle interfacing with the optical coin detector and controls, which communicates with the Pi over USB HID. He’s even added in a pair of 3,000 mAh LiPo battery packs and a dedicated charge controller so you can blow up the Death Star on the go.

Still don’t think you can fit one in your apartment? Not to worry, back in 2012 we actually saw somebody recreate this same cabinet in just 1/6th scale.

Continue reading “Miniature Star Wars Arcade Lets You Blow Up The Death Star On The Go”