New Raspberry Pi Zero 2 Upgrades To Quad-Core Processor

Over the years, we’ve seen a steady stream of updates for the Raspberry Pi Foundation’s flagship single-board computer (SBC), with each new release representing a significant boost in processing power and capability. But the slim Raspberry Pi Zero, released all the way back in 2015, hasn’t been quite so fortunate. Beyond the “W” revision that added WiFi and Bluetooth in 2017, the specs of the diminutive board have remained unchanged since its release.

That is, until now. With the introduction of the $15 USD Raspberry Pi Zero 2 W, the ultra-compact Linux board gets a much-needed performance bump thanks to the new RP3A0 system-in-package, which combines a Broadcom BCM2710A1 die with 512 MB of LPDDR2 SDRAM and a quad-core 64-bit ARM Cortex-A53 CPU clocked at 1 GHz. In practical terms, the Raspberry Pi Foundation says the new Zero 2 is five times as fast as its predecessor with multi-threaded workloads, and offers a healthy 40% improvement in single-threaded performance. That puts it about on par with the Raspberry Pi 3, though with only half the RAM.
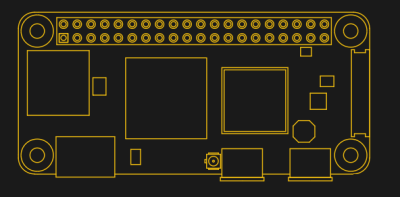
Otherwise, the new Zero 2 isn’t much different from the original. It’s the same size and shape, meaning existing cases or mounts should work fine. You’ll also find the micro SD slot, CSI camera connector, dual micro USB ports, and mini HDMI port in the same places they were in 2015.

Frankly we’re a little surprised they didn’t switch over to USB-C (at least for the power port) and micro HDMI to bring it in line with the Pi 4, but of course, they presumably didn’t want to break compatibility with existing Zero projects. At least we won’t have to wait for a second edition to add wireless, as the Zero 2 W offers 2.4 GHz 802.11 b/g/n WiFi and Bluetooth 4.2 out of the box.

We’ll have samples of the new Zero 2 W in hand shortly, so keep an eye out for a detailed overview of this highly anticipated new member of the Pi family. In the meantime, let us know what you think about the new hardware in the comments. Is it a worthy successor to the original $5 Pi Zero?

Halloween-Themed Talking Clock Relies On Pi Pico

Many of us learn to read clocks at a young age, however, talking clocks eliminate the need to do that entirely. [Alberto] whipped up one of his own, in this case designed with some Halloween holiday spookiness.

A basic clock movement is used to display the time in the typical fashion. However, the movement also features a built-in trigger signal, which it sends to an attached microcontroller on the hour, every hour. The build relies on the Raspberry Pi Pico for sound, chosen for its USB programming interface and its 2 MB of onboard flash storage. Sound is stored in simple 16-bit WAV files, and played out to a speaker via a PWM output. Alternatively, a CircuitPython version of the code is available that uses MP3s instead. A light sensor is used to avoid triggering any sounds at night time that could disturb one’s sleep. The entire circuit can be built on a single-sided board. [Alberto] etched one at home in the old-fashioned way, though one could also order one online, too.

Halloween is an excellent time for hacks, and this year we have the Halloween Hackfest contest to show them off. It’s ending soon though, you have until the stroke of midnight Pacific time on Friday (that’s the moment Thursday night ends) to enter your Halloween-themed hacks.

Talking clocks have been around for some time, but are nevertheless a fun and educational project to build. We’ve seen some other great Halloween hacks lately, too. If you’ve been busy with projects this fall holiday, don’t hesitate to drop us a line!

A Tidy Clamshell Keyboard For The Pinephone

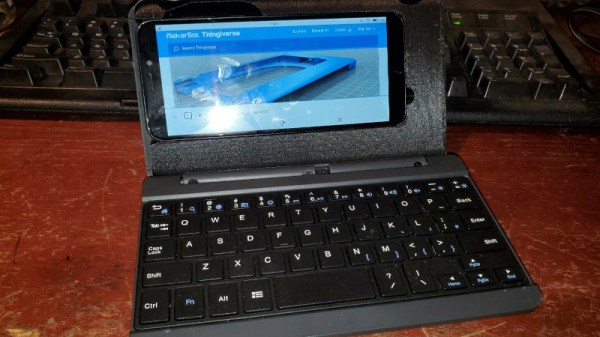
Something a lot of people don’t realise about modern smartphones is that many of them have fully-featured USB interfaces. Perhaps the best of all is the Pinephone, which is a fully open-source smartphone that gives end users total control over their phone experience. [silver] has such a phone, and set about building himself a neat keyboard setup for the platform.

The build is based around an RCA RKT773P tablet keyboard case, which uses USB to interface with a tablet via pogo pins. [silver] modified this by soldering on a USB cable to the pins, paired with a USB-C host adapter on the Pinephone. Paired with a few 3D printed parts to hold everything in place, it almost turns the assembly into a cute little Pinephone laptop.

It’s a neat build that would likely save a lot of frustration when hacking away at a terminal window on the Pinephone. Parts are available on Thingiverse for those interested in replicating the hack. Those eager to dive into the Pinephone platform may relish the new Pro model that has just dropped, too. Video after the break.

Continue reading “A Tidy Clamshell Keyboard For The Pinephone”

Ethernet Cable Turned Into Antenna To Exploit Air-Gapped Computers

Good news, everyone! Security researcher [Mordechai Guri] has given us yet another reason to look askance at our computers and wonder who might be sniffing in our private doings.

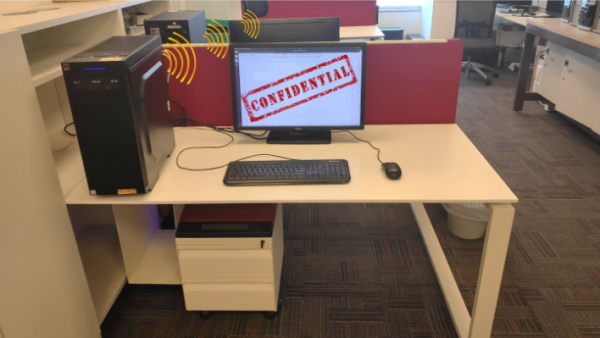
This time, your suspicious gaze will settle on the lowly Ethernet cable, which he has used to exfiltrate data across an air gap. The exploit requires almost nothing in the way of fancy hardware — he used both an RTL-SDR dongle and a HackRF to receive the exfiltrated data, and didn’t exactly splurge on the receiving antenna, which was just a random chunk of wire. The attack, dubbed “LANtenna”, does require some software running on the target machine, which modulates the desired data and transmits it over the Ethernet cable using one of two methods: by toggling the speed of the network connection, or by sending raw UDP packets. Either way, an RF signal is radiated by the Ethernet cable, which was easily received and decoded over a distance of at least two meters. The bit rate is low — only a few bits per second — but that may be all a malicious actor needs to achieve their goal.

To be sure, this exploit is quite contrived, and fairly optimized for demonstration purposes. But it’s a pretty effective demonstration, but along with the previously demonstrated hard drive activity lights, power supply fans, and even networked security cameras, it adds another seemingly innocuous element to the list of potential vectors for side-channel attacks.

[via The Register]

Big homemade lathe

Heavy Metal Lathe Build Doesn’t Spare The Steel

It’s common wisdom that the lathe is the essential machine tool, and the only one that can make copies of itself. While we won’t argue the primacy of the lathe in the machine shop, this scratch-built, heavy-duty lathe gives the lie to the latter argument — almost.

We’re used to seeing homebrew lathes, of course, and we’ve featured more than a few of them before. But two things make [Jornt]’s build stand out: how few specialized tools were needed to build it, and the sheer size and bulk of the finished product. Where most homebrew lathes tend to be the bench top variety and feature cast aluminum parts, [Jornt] went with steel for his build, and a lot of it. The base and bed of the machine are welded from scrap steel I-beams, and the ways are made from angle iron that has been ground flat with a clever jig to hold an angle grinder. The angle grinder plays a prominent role in the build, as do simple tools like a hand drill, files, and a welder — and yes, the unfinished lathe itself, which was used to bore out the bearing blocks for the headstock.

The completed lathe, powered by a treadmill motor in a way that [Jeremy Fielding] would no doubt endorse, comes in at a beefy 450 kg. It honestly looks like something you could buy from a catalog, and has most of the features of commercial machines. One thing we’d love to see on this lathe is the electronic lead screw that [James Clough] developed for his off-the-shelf lathe.

Continue reading “Heavy Metal Lathe Build Doesn’t Spare The Steel”

VCF East 2021: Preserving Heathkit’s 8-Bit Computers

To say the Heathkit name is well known among Hackaday readers would be something of an understatement. Their legendary kits launched an untold number of electronics hobbies, and ultimately, plenty of careers. From relatively simple radio receivers to oscilloscopes and televisions, the company offered kits for every skill level from the post-war era all the way up to the 1990s.

So it’s hardly a surprise that in 1977, seeing the success of early home computers like the Altair 8800 and IMSAI 8080, Heathkit decided to join the fray with a computer kit of their own. But by that point the home computing market had started to shift from a hobbyist’s pursuit to something the whole family could enjoy. Compared to the Apple II and TRS-80, both of which also launched in 1977, Heathkit’s machine seemed like the product of a bygone era.

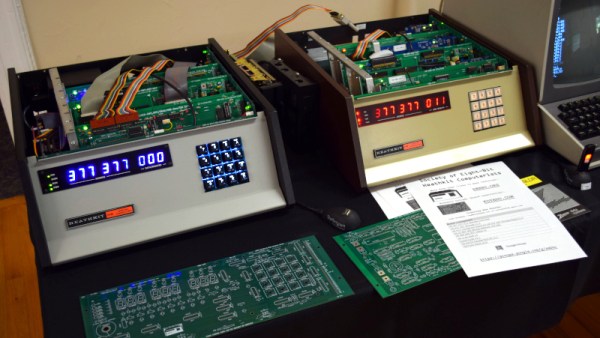
While it might not have gained the notoriety of the microcomputers it was designed to compete with, the Heathkit H8 is certainly not forgotten. Tucked away in a corner at the 2021 Vintage Computer Festival East was an impressive exhibit dedicated to the Society of Eight-Bit Heath Computerists (SEBHC) called Heathkit: Keeping the Legacy Alive. Presented by Glenn Roberts, this collection of original and modern hardware demonstrated the incredible lengths to which this group of passionate Heathkit owners have gone to not just preserve the memory of these often overlooked computers, but to continue to improve upon the kit’s unique design.

Continue reading “VCF East 2021: Preserving Heathkit’s 8-Bit Computers”

3D Printed Printing Plates Made Using Modern Tools

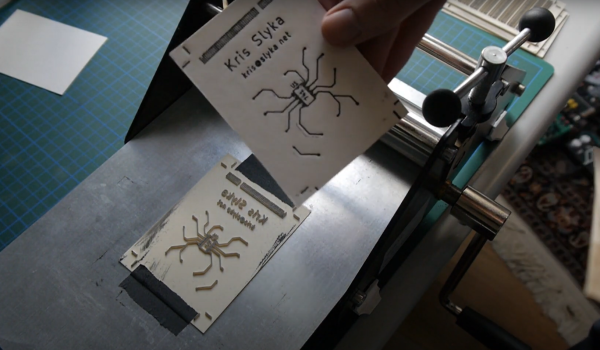
It’s widely accepted that the invention of the printing press by Gutenberg in the 15th Century was the event that essentially enabled the development of the modern world, allowing access to knowledge beyond anything that came before, even if the Chinese got in on the bookmaking act some 500 years previously. Fast-forward a few centuries more and we’ve got the ability to design electronics from our arm chairs, we can print 3D objects from a machine on the coffee table, and 3D modeling can be done by your kids on a tablet computer. What a time to be alive! So we think it’s perfectly fine that [Kris Slyka] has gone full circle and used all these tools to make printing plates for a small press, in order to produce cards for her Etsy business.

Now before you scoff, yes she admits quite quickly that KiCAD wasn’t the best choice for designing the images to print, since she needed to do a lot of post-processing in Inkscape, she could have just dropped the first step and started in Inkscape anyway. You live and learn. Once the desired image was fully vectorised, it was popped into OpenSCAD in order to extrude it into 3D, thickening the contact to the base to improve the strength a little.

[Kris] demonstrates using the registration marks to align the front and rear side plates, and even (mostly) manages adding a second colour infill for a bit more pizzazz. The results look a little bit wonky and imperfect, exactly what you want for something supposed to be handmade. We think it’s a nice result, even if designing it in KiCAD was a bit bonkers.

For those interested in the OpenSCAD code, have a butchers at this gist. This project is not the first 3D-printed printing press we’ve covered, checkout the Hi-Bred for an example, and here’s the Open Press Project if you’re still interested.

Continue reading “3D Printed Printing Plates Made Using Modern Tools”