3D Printing Computer Space

The first computer game available as a commercial arcade cabinet is unsurprisingly, a rare sight here in 2024. Nolan Bushnel and Ted Dabney’s 1971 Computer Space was a flowing fiberglass cabinet containing a version of the minicomputer game Spacewar! running on dedicated game hardware. The pair would of course go on to found the wildly successful Atari, leaving their first outing with its meager 1500 units almost a footnote in their history.

Unsurprisingly with so relatively few produced, few made it out of the United States, so in the UK there are none to be found. [Arcade Archive] report on a fresh build of a Computer Space cabinet, this time not in fiberglass but via 3D printed plastic.

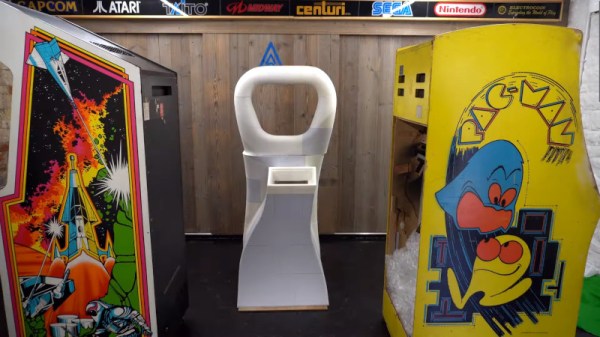
The build itself is the work of [Richard Horne], and in the video he takes us through the design process before printing the parts and then sticking them all together to make the cabinet. Without a real machine to scan or measure he’s working from photographs of real machines, working out dimensions by reference to other cabinets such as PONG that appear alongside them. The result is about as faithful a model of the cabinet as could be made, and it’s cut into the many pieces required for 3D printing before careful assembly.

This is the first in a series, so keep following them to see a complete and working Computer Space take shape.

Continue reading “3D Printing Computer Space

Exploit The Stressed-out Package Maintainer, Exploit The Software Package

A recent security vulnerability — a potential ssh backdoor via the liblzma library in the xz package — is having a lot of analysis done on how the vulnerability was introduced, and [Rob Mensching] felt that it was important to highlight what he saw as step number zero of the whole process: exploit the fact that a stressed package maintainer has burned out. Apply pressure from multiple sources while the attacker is the only one stepping forward to help, then inherit the trust built up by the original maintainer. Sadly, [Rob] sees in these interactions a microcosm of what happens far too frequently in open source.

Maintaining open source projects can be a high stress activity. The pressure and expectations to continually provide timely interaction, support, and updates can easily end up being unhealthy. As [Rob] points out (and other developers have observed in different ways), this kind of behavior just seems more or less normal for some projects.

The xz/liblzma vulnerability itself is a developing story, read about it and find links to the relevant analyses in our earlier coverage here.

Hackaday Links Column Banner

Hackaday Links: March 31, 2024

Battlelines are being drawn in Canada over the lowly Flipper Zero, a device seen by some as an existential threat to motor vehicle owners across the Great White North. The story started a month or so ago, when someone in the government floated the idea of banning devices that could be “used to steal vehicles by copying the wireless signals for remote keyless entry.” The Flipper Zero was singled out as an example of such a nefarious device, even though relatively few vehicles on the road today can be boosted using the simple replay attack that a Flipper is capable of, and the ones that are vulnerable to this attack aren’t all that desirable — apologies to the 1993 Camry, of course. With that threat hanging in the air, the folks over at Flipper Devices started a Change.org petition to educate people about the misperceptions surrounding the Flipper Zero’s capabilities, and to urge the Canadian government to reconsider their position on devices intended to explore the RF spectrum. That last bit is important, since transmit-capable SDR devices like the HackRF could fall afoul of a broad interpretation of the proposed ban; heck, even a receive-only SDR dongle might be construed as a restricted device. We’re generally not much for petitions, but this case might represent an exception. “First they came for the Flipper Zero, but I did nothing because I don’t have a Flipper Zero…”

Continue reading “Hackaday Links: March 31, 2024”

The board in question, with a Pi Pico soldered on, with old PCBs for macropads being used as captouch electrodes

Give Your Pi Pico Captouch Inputs For All Your Music Needs

Unlike many modern microcontrollers, RP2040 doesn’t come with a native capacitive touch peripheral. This doesn’t mean you can’t do it – the usual software-driven way works wonderfully, and only requires an external pullup resistor! In case you wanted a demonstration or you have a capacitive touch project in mind, this lighthearted video by [Jeremy Cook] is a must watch, and he’s got a healthy amount of resources for you in store, too!

In this video, [Jeremy] presents you with a KiCad schematic and an PCB design you can use to quickly add whole 23 capacitive touch sensing inputs to a Pi Pico! The board is flexible mechanically, easy to assemble as [Jeremy] demonstrates, and all the pins involved can still be used as regular GPIOs if you’d like. Plus, it’s fully open-source, can easily be assembled on your own, and available on Tindie too!

Of course, such a board doesn’t get created for no reason – [Jeremy] has a healthy amount of musical creations and nifty ideas to show off. We quite liked the trick of using old PCBs as capacitive touch sensing, using copper fills as electrodes – which has helped create an amusing “macropad of macropads”, and, there’s quite a bit more to see.

If capacitive touch projects ever struck a chord with you and you enjoy music-related hacking, [Jeremy]’s got a whole YouTube channel you ought to check out. Oh, and if one of the musical projects in the video caught your eye, it might just be the one we’ve featured previously! Continue reading “Give Your Pi Pico Captouch Inputs For All Your Music Needs”

ESP-Drone: Building An ESP32-Based Quadcopter For Not Much Cash

What’s the cheapest quadcopter you can build? As [Circuit Digest] demonstrates with their variant of the ESP-Drone project by Espressif, you only need a minimum of parts: an ESP32 MCU, an inertial measurement unit (IMU) such as the MPU6050, and four MOSFETs to drive the brushless DC motors. As the PCB also forms the structural frame and landing struts for the quadcopter, not even a 3D printer is needed. All told, [Circuit Digest] figures the total BOM comes in at around 1,000 Indian Rupees, or about $12 USD.

The fully assembled ESP-Drone flying around. (Credit: Circuit Digest)

While this [Circuit Digest] project provides basic IMU functionality, the Espressif project also has a few expansion boards detailed on its hardware page, depending on the base model of the mainboard you pick. The [Circuit Digest] project follows the ESPlane-V2-S2 version with no expansion boards, but the ESP32-S2-Drone V1.2 mainboard can be extended with position-hold, pressure and compass modules, as well as custom boards.

As a derivative of the Bitcraze Crazyflie project, the ESP-Drone firmware also supports the rather nifty cfclient software for remote monitoring, logging and control. This may also be in the [Circuit Digest] firmware, but wasn’t listed among the features.

Continue reading “ESP-Drone: Building An ESP32-Based Quadcopter For Not Much Cash”

Drop-In Switch Mode Regulators

Perhaps the simplest way to regulate a DC voltage is using a voltage divider and/or an active device like a Zener diode. Besides simplicity, they have the additional advantage of not being particularly noisy, but with a major caveat: they are terribly inefficient. To solve this problem a switching regulator can be used instead, but that generally increases complexity and noise. With careful design, though, a switching regulator can be constructed to almost completely replicate a linear regulator like this drop-in TO3 replacement. (Google Translate from German)

While the replacement regulator was built by [Mr. Floppy], the units are being put to the test in the linked video below by [root42]. The major problem these solve compared to other switching regulators is the suppression of ripple, which is a high-frequency artifact that appears on the DC voltage. Reducing ripple in this situation involved designing low-inductance circuit traces on the PCB as well as implementing a number of EMI filters on both input and output. The final result is an efficient voltage supply for retrocomputers which has a ripple lower than their oscilloscopes can measure without special tools.

[root42] is not only testing these, but the linked video also has him using the modules to repair a Commodore 1541 which originally had the linear TO3 voltage regulators. It’s definitely a non-trivial task to build a switching power supply that meets the requirements of sensitive electronics like these. Switch mode power supplies aren’t new ideas, either, and surprisingly pre-date the first commercially-available transistor although modern ones like these are much less expensive to build.

Continue reading “Drop-In Switch Mode Regulators”

Modular Vacuum Table Custom-Fits The Parts

[enhydra] needed to modify a bunch of side inserts from some cheap ABS enclosures, and to save time and effort, he created a simple vacuum table with swappable inserts to precisely fit the parts. Suction is provided by a shop vacuum (plugged in near the bottom in the photo above) and it worked very well! Sealing and gaskets weren’t even required.

A vacuum table provides a way to hold workpieces flat and secure while a CNC machine does its thing, and because no clamps are involved, it can really speed up repetitive work. [enhydra]’s solution combines a vacuum table with a jig that ensures every rectangular piece is held exactly where the machine expects it to be, making the whole process of modifying multiple units significantly more efficient.

The whole thing — vacuum table and modular top — was straightforward to CNC cut out of what looks like particle board and worked as-is, no added gaskets or seals required, making this a very economical solution.

Vacuum tables can be pretty versatile and applied in more than one way, so keep that in mind the next time you’re wondering how best to approach a workshop problem. We’ve seen a well-engineered table used to speed up PCB milling, and we’ve also seen a DIY vacuum table combined with a heat gun and plastic plates from the dollar store make a bare-bones thermoforming rig.