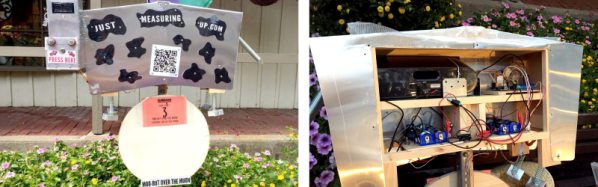
Follow The Bouncing Ball Of Entropy

When [::vtol::] wants to generate random numbers he doesn’t simply type rand() into his Arduino IDE, no, he builds a piece of art. It all starts with a knob, presumably connected to a potentiometer, which sets a frequency. An Arduino UNO takes the reading and generates a tone for an upward-facing speaker. A tiny ball bounces on that speaker where it occasionally collides with a piezoelectric element. The intervals between collisions become our sufficiently random number.

The generated number travels up the Rube Goldberg-esque machine to an LCD mounted at the top where a word, corresponding to our generated number, is displayed. As long as the button is held, a tone will continue to sound and words will be generated so poetry pours forth.

If this take on beat poetry doesn’t suit you, the construction of the Ball-O-Bol has an aesthetic quality that’s eye-catching, whereas projects like his Tape-Head Robot That Listens to the Floor and 8-Bit Digital Photo Gun showed the electronic guts front and center with their own appeal.

Continue reading “Follow The Bouncing Ball Of Entropy”

Fail Of The Week: Arduino Sand Matrix Printer

NYC beaches are where tropical beaches addicted to meth go to die. So says [Vije Miller] in his write-up for his Arduino sand matrix printer. It’s a clever idea, five servo-operated cardboard plungers that indent a pattern of dots in the sand as the device is pulled forward, resulting in something not unlike a dot matrix printer that can write messages in the sand.

He’s submitted it to us as a Fail Of The Week, because it doesn’t do a very good job of writing in the sand, and it’s burned out a servo. But we feel this isn’t entirely fair, because whether or not it has delivered the goods it’s still an excellent build. Cardboard isn’t a material we see much of here at Hackaday, but in this case he’s mastered it in a complex mechanism that while it may have proved a little too flexible for the job in hand is nevertheless a rather impressive piece of work.

You can see a brief video below the break showing it in action. He tells us his motivation has waned on this project, and expresses the hope that others will take up the baton and produce a more viable machine.

Continue reading “Fail Of The Week: Arduino Sand Matrix Printer”

Hackaday Prize Entry: ESPMetric, A Simple And Easy Matrix

There’s a lot you can do with a bunch of LEDs connected to the Internet. You can display the time, the weather, the bus schedule, or any one of a number of important data points in your life. Custom matrices are a pain in the butt to set up, which is why we like to see one looking rather polished and clean. [Faire-soi-meme] prettied up an 8×32 NeoPixel matrix with some diffusers and a grid bezel. It’s the ESPMetric, and it’s also an entry for this year’s Hackaday Prize.

The NeoPixel matrix is controlled by a NodeMcu using elements from [squix]’s ESP82666 weather station code as well as Adafruit’s NeoMatrix library. There is a photoresistor to control brightness as well as 3 buttons to control its various modes. Tapping the buttons brings you by various settings like the time, WiFi status, stock market, and so on.

If you parlez-vous français–or enjoy the Google Translate experience–[Faire-soi-meme] has detailed the build steps on his blog, though you can also download his code from his GitHub repository. There’s a great video of this build, you can check that out below.

Continue reading “Hackaday Prize Entry: ESPMetric, A Simple And Easy Matrix”

Mouse Mis-Clicking? We Got You.

A mouse with malfunctioning buttons can be a frustrating to deal with — and usually a short leap to percussive maintenance. Standard fixes may not always last due to inferior build quality of the components, or when the microswitch won’t close at all. But, for mice that double/triple-click, will release when dragging, or mis-click on release, this Arduino-based hack may be the good medicine you’re after.

Instructables user [themoreyouknow]’s method cancels click malfunctions by latching the mouse’s controller switch trace to ‘on’ when pressed, keeping it there until the button normally closed contact closes again completely. Due to the confined spaces, you’ll want to use the smallest Arduino you can find, some insulating tape to prevent any shorts, and care to prevent damaging the wires this process adds to the mouse when you cram it all back together.

Before you take [themoreyouknow]’s guide as dogma, the are a few caveats to this hack; they are quick to point out that this won’t work on mice that share two pins between three buttons — without doing it the extra hard way, and that this might be trickier on gaming or other high-end mice, so attempt at your own peril.

Speaking of gaming mice, we recently featured a way to add some extra functionality to your mouse — cheating optional — as well as how to stash a PC inside an old Logitech model.

Hackaday Prize Entry: Fochica Alerts You

It seems like no one should need to be reminded about the importance of not leaving children in cars, but it still happens. The Fochica project is a Hackaday Prize entry that equips the family minivan with car seat monitors—the name comes from FOrgotten CHild in Car Alert.

It’s an Open Source project consisting of a Bluetooth LE-equipped Arduino that monitors whether the seat is empty or occupied. Paired with a phone app, Fochica monitors pressure sensors and the seat belt’s reed switch to determine whether there’s a kid there. The user’s app checks whether he or she is within Bluetooth range of the car, while also checking whether the kid’s seat is occupied. When the first comes up false and the second true, an alert is sounded.

We could see this technology also being useful for home automation tasks–for instance, reminding you to close the garage door before you go to bed. It’s a great project, and also one of the finalists in the Best Product challenge of the Hackaday Prize this year.

Continue reading “Hackaday Prize Entry: Fochica Alerts You”

Design And 3D Print Robots With Interactive Robogami

Internals of 3D printed “print and fold” robot. [Image source: MIT CSAIL]
Robot design traditionally separates the body geometry from the mechanics of the gait, but they both have a profound effect upon one another. What if you could play with both at once, and crank out useful prototypes cheaply using just about any old 3D printer? That’s where Interactive Robogami comes in. It’s a tool from MIT’s Computer Science and Artificial Intelligence Laboratory (CSAIL) that aims to let people design, simulate, and then build simple robots with a “3D print, then fold” approach. The idea behind the system is partly to take advantage of the rapid prototyping afforded by 3D printers, but mainly it’s to change how the design work is done.

To make a robot, the body geometry and limb design are all done and simulated in the Robogami tool, where different combinations can have a wild effect on locomotion. Once a design is chosen, the end result is a 3D printable flat pack which is then assembled into the final form with a power supply, Arduino, and servo motors.

A white paper is available online and a demonstration video is embedded below. It’s debatable whether these devices on their own qualify as “robots” since they have no sensors, but as a tool to quickly prototype robot body geometries and gaits it’s an excitingly clever idea.

Continue reading “Design And 3D Print Robots With Interactive Robogami”

Cluephone For Partiers

[Sam Horne] adapted an old school landline phone to deliver clues to birthday party guests. When guests find a numerical clue, they type it into the keypad to hear  the next clue, which involves decoding some Morse code.

The phone consists of an Arduino Pro Mini, a MP3/WAV trigger, and the phone itself, of which the earpiece and keypad have been reused. [Sam] had to map out the keypad and solder leads connecting the various contact points of the phone’s PCB to the Arduino’s digital pins. He used a digitally-generated voice to generate the audio files, and employed the Keypad and Password Arduino libraries to deliver the audio clues.

This seems like a great project to do for a party of any age of attendee, though the keying speed is quick. Hopefully [Sam]’s guests have a high Morse WPM or are quick with the pen! For more keypad projects check out this custom shortcut keyboard and printing a flexible keyboard.

Continue reading “Cluephone For Partiers”