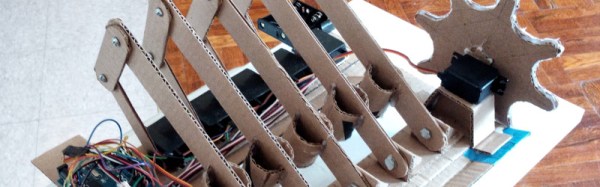
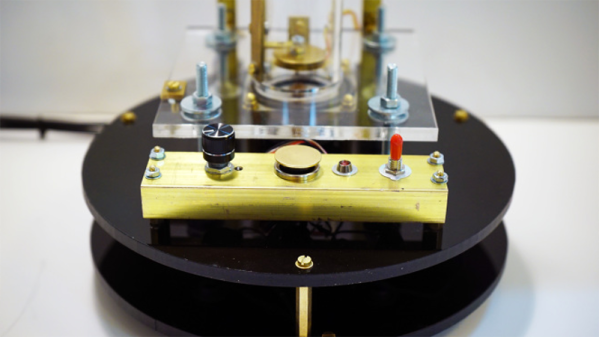
Hackaday Prize Entry: Fochica Alerts You

It seems like no one should need to be reminded about the importance of not leaving children in cars, but it still happens. The Fochica project is a Hackaday Prize entry that equips the family minivan with car seat monitors—the name comes from FOrgotten CHild in Car Alert.

It’s an Open Source project consisting of a Bluetooth LE-equipped Arduino that monitors whether the seat is empty or occupied. Paired with a phone app, Fochica monitors pressure sensors and the seat belt’s reed switch to determine whether there’s a kid there. The user’s app checks whether he or she is within Bluetooth range of the car, while also checking whether the kid’s seat is occupied. When the first comes up false and the second true, an alert is sounded.

We could see this technology also being useful for home automation tasks–for instance, reminding you to close the garage door before you go to bed. It’s a great project, and also one of the finalists in the Best Product challenge of the Hackaday Prize this year.

Continue reading “Hackaday Prize Entry: Fochica Alerts You”

Design And 3D Print Robots With Interactive Robogami

Internals of 3D printed “print and fold” robot. [Image source: MIT CSAIL]
Robot design traditionally separates the body geometry from the mechanics of the gait, but they both have a profound effect upon one another. What if you could play with both at once, and crank out useful prototypes cheaply using just about any old 3D printer? That’s where Interactive Robogami comes in. It’s a tool from MIT’s Computer Science and Artificial Intelligence Laboratory (CSAIL) that aims to let people design, simulate, and then build simple robots with a “3D print, then fold” approach. The idea behind the system is partly to take advantage of the rapid prototyping afforded by 3D printers, but mainly it’s to change how the design work is done.

To make a robot, the body geometry and limb design are all done and simulated in the Robogami tool, where different combinations can have a wild effect on locomotion. Once a design is chosen, the end result is a 3D printable flat pack which is then assembled into the final form with a power supply, Arduino, and servo motors.

A white paper is available online and a demonstration video is embedded below. It’s debatable whether these devices on their own qualify as “robots” since they have no sensors, but as a tool to quickly prototype robot body geometries and gaits it’s an excitingly clever idea.

Continue reading “Design And 3D Print Robots With Interactive Robogami”

Cluephone For Partiers

[Sam Horne] adapted an old school landline phone to deliver clues to birthday party guests. When guests find a numerical clue, they type it into the keypad to hear  the next clue, which involves decoding some Morse code.

The phone consists of an Arduino Pro Mini, a MP3/WAV trigger, and the phone itself, of which the earpiece and keypad have been reused. [Sam] had to map out the keypad and solder leads connecting the various contact points of the phone’s PCB to the Arduino’s digital pins. He used a digitally-generated voice to generate the audio files, and employed the Keypad and Password Arduino libraries to deliver the audio clues.

This seems like a great project to do for a party of any age of attendee, though the keying speed is quick. Hopefully [Sam]’s guests have a high Morse WPM or are quick with the pen! For more keypad projects check out this custom shortcut keyboard and printing a flexible keyboard.

Continue reading “Cluephone For Partiers”

A Disc Shooter For When Rubber Bands Or Nerf Darts Aren’t Enough

There are times in everybody’s life when they feel the need to shoot at things in a harmless manner. For those moments there are rubber bands and Nerf darts, but even then they feel like mere toys. If that is the point at which you find yourself, then maybe [Austin]’s home-made electric disc shooter can help.

Operation of the shooter is simple enough. A stack of 3D-printed plastic discs is loaded into a tubular magazine, from which individual disks are nudged by a motor-driven cam controlled by the trigger. Once the disc leaves the magazine it reaches a vacuum cleaner belt driven by a much more powerful motor, that accelerates the disc to ejection velocity.

The video below the break shows the gun’s construction, as well as a sequence involving the destruction of plenty of balloons, soda cans, and food items. The 3D-printed ammunition seems to us to be the weak link as in our experience it is inevitable that there is a high ammunition loss rate with these type of weapons, but maybe [Austin] has a line on some cheap filament. Either way, his disc gun looks like the kind of toy that could provide an entertaining diversion for many readers.

Continue reading “A Disc Shooter For When Rubber Bands Or Nerf Darts Aren’t Enough”

Hackaday Prize Entry: CPAP Humidifier Monitor Alarm

CPAP (Continuous Positive Airway Pressure) machines can be life-changing for people with sleep apnea. [Scott Clandinin] benefits from his CPAP machine and devised a way to improve his quality of life even further with a non-destructive modification to monitor his machine’s humidifier.

With a CPAP machine, all air the wearer breathes is air that has gone through the machine. [Scott]’s CPAP machine has a small water reservoir which is heated to humidify the air before it goes to the wearer. However, depending on conditions the water reservoir may run dry during use, leading to the user waking up dried out and uncomfortable.

To solve this in a non-invasive way that required no modifications to the machine itself, [Scott] created a two-part device. The first part is a platform upon which the CPAP machine rests. A load cell interfaced to an HX711 Load Cell Amplifier allows an Arduino Nano to measure the mass of the CPAP machine plus the integrated water reservoir. By taking regular measurements, the Arduino can detect when the reservoir is about to run dry and sound an alarm. Getting one’s sleep interrupted by an alarm isn’t a pleasant way to wake up, but it’s much more pleasant than waking up dried out and uncomfortable from breathing hot, dry air for a while.

The second part of the device is a simple button interfaced to a hanger for the mask itself. While the mask is hung up, the system is idle. When the mask is removed from the hook, the system takes measurements and goes to work. This makes activation hassle-free, not to mention also avoids spurious alarms while the user removes and fills the water reservoir.

Non-invasive modifications to medical or other health-related devices is common, and a perfect example of nondestructive interfacing is the Eyedriveomatic which won the 2015 Hackaday Prize. Also, the HX711 Load Cell Amplifier has an Arduino library that was used in this bathroom scale refurb project.

Hackaday Prize Entry: E.R.N.I.E. Teaches Robotics And Programming

[Sebastian Goscik]’s entry in the 2017 Hackaday Prize is a line following robot. Well, not really; the end result is a line following robot, but the actual project is about a simple, cheap robot chassis to be used in schools, clubs, and other educational, STEAM education events. Along with the chassis design comes a lesson plan allowing teachers to have a head start when presenting the kit to their students.

The lesson plan is for a line-following robot, but in design is a second lesson – traffic lights which connect to a main base through a bus and work in sync. The idea of these lessons is to be fairly simple and straightforward for both the teachers and the students in order to get them more interested in STEM subjects.

What [Sebastian] noticed about other robot kits was that they were expensive or complicated or lacked tutorials. Some either came pre-assembled or took a long time to assemble. [Sebastian] simplified things – The only things required after the initial assembly of the chassis are: Zip-ties, electrical tape and a few screws. The PCB can’t be disassembled, but the assembled PCB can be reused.

The hardware [Sebastian] came up with consists of some 3mm material that can be laser cut (acrylic or wood) and a sensor board that has 5 IR LEDs and corresponding IR sensors. The chassis can be put together using nothing more than a Phillips screwdriver, and the sensor PCBs are well documented so that soldering them is as easy as possible. An Arduino is used as the brains of the unit.

[Sebastian] has come up with a great project and the idea of a platform like this with a couple of lesson plans included is a great one. He’s released the hardware under an Open Hardware license as well so others can share and add-on. Of course, there are other line following robots, like this miniature one created with analog circuitry, and there are other open source robots for teaching, like this one. But [Sebastian]’s focus on the lesson plans is a really unique way of approaching the problem – one that will hopefully be very successful.

Continue reading “Hackaday Prize Entry: E.R.N.I.E. Teaches Robotics And Programming”

Latskap Semi-Automatic Liquor Cabinet

A well-stocked liquor cabinet is a necessity for the classy gentleman or gentlelady who likes to entertain. Having the proper spirits and mixers on hand to make anything from a martini to a sidecar is always a solid way to ensure guests have a good time at your cocktail party. In the past, a beautifully crafted cherry or walnut liquor cabinet was enough to impress visitors with your affluence. These days, if you don’t want to look like a pauper, you have to take it a step further.

[Elias Bakken] and his uncle [Mike Moulton] have decided to take liquor cabinets into the 21st century with a semi-automatic liquor cabinet called Latskap. The project is still in progress, and in the prototyping stage, but their build log on Hackaday.io is showing a lot of potential. It shouldn’t be long before they have a fully functional prototype finished.

Continue reading “Latskap Semi-Automatic Liquor Cabinet”