Roving Hexapod Poops Out 3D Prints

[Jia Wu, Mary Sek, and Jeff Maeshiro], students  at the California College of the Arts (CCA) in San Francisco, took on the task of developing a walking 3D printer. The result is Geoweaver, a hexapod robot with a glue gun extruder system. Hackaday has seen walking CNC machines before, but not a 3D printer. Geoweaver uses two servos on each of its six legs to traverse the land. The team was able to program several gaits into the robot, allowing it to traverse uneven terrain. Walking is hard enough on its own, but Geoweaver also uses a glue gun based extruder to make 3D prints. The extruder head uses two servos to swing in a hemispherical arc. The arc is mapped in software to a flat plain plane, allowing the robot to drop a dollop of glue exactly where it is programmed to. Geoweaver doesn’t include much in the way of on board processing – an Arduino Uno is used to drive the 15 servos. Those servos coupled with a glue gun style heater pull quite a bit of power, which has earned Geoweaver nicknames such as Servo Killer, Eater of Shields, Melter of Wires, and Destroyer of Regulators.

Geoweaver’s prints may not be much to look at yet, however the important thing to remember is that one of the future visions for this robot is to print on a planetary scale. Geoweaver currently uses reacTIVision to provide computer control via an “eye in the sky”. ReacTIVision tracks a fiducial marker on the robot, and applies it to a topographical map of the terrain. This allows Geoweaver to change its height and print parameters depending on the flatness of the ground it is printing on. On a scaled up Geoweaver, reacTIVision would be replaced by GPS or a similar satellite based navigation system.  Most of the software used in Geoweaver is opensource, including Grasshopper and Firefly, written by the team’s professor, [Jason Kelly Johnson]. The exception is Rhino 5. We would love to see an option for a free or open source alternative to laying out ~$1000 USD in software for our own Geoweaver.


Continue reading “Roving Hexapod Poops Out 3D Prints” →

Hackaday Links: December 29, 2013

hackaday-links-chainThere are a ton of cheap RF transceiver boards available. [Martin] recently took a look at several of the most common ones and reports back on what you want to look for when acquiring wireless hardware for your projects.

Ikea picture frame plus old laptop equals a roll-your-own digital picture frame which [Victor] built. It runs Ubuntu and is more powerful and extensible than anything you could purchase outright.

Our friend [HowToLou] sure loves the FlowRider. So much so that he’s trying to figure out how to make them less expensive to operate. He put together an example of how he thinks a standing wave can be created that follows the rider as they move along the surfing area.

[Garrett] released an Arduino library that offers threading, debugging, and error handling. The usertools package can be downloaded from his Github repository.

There’s only one way to gauge your Christmas cheer — hook yourself up to the XMeter built by [Geoff]. He’s the same guy who built a breathalyzer a couple of years back. It flashes images of holiday activities on a television while measuring galvanic response using a couple of DIY probes.

And finally, play around with a virtual x86 system. [Fabian Hemmer] wrote the incredibly full-featured virtual machine in JavaScript. You can get your hands on the code via his GitHub repo. [Thanks Martin]

The Magnetophone

The Magnetophone

The Magnetophone is the latest electro-acoustic instrument from [Aaron Sherwood]. This tower contains 14 strings, and 14 hand-wound electromagnets. By energizing each electromagnet with a square wave, the strings can be vibrated to create music.

The brains of the device consist of an Arduino Mega attached to the top of the tower. The microcontroller has 6 timers, which allows for 6 notes to play at the same time. An open source tone library was used to generate square waves at the correct frequencies. These square waves are amplified by LM386 based circuits, which provide enough power to the coil to oscillate the string. By using square waves at specific frequencies, overtones of strings can be created.

This isn’t the first time we’ve seen [Aaron] combine strings and electronics. His Glockentar used solenoids to strike strings. However, this project provides new possibilities by allowing the rate of oscillation to be controlled precisely. You can see the instrument in action after the break.

Continue reading “The Magnetophone” →

Quick Candy Sorting Machine

OCD. Sometimes things just get to you, like those pesky bags of randomly assorted candies. [Torsten] decided to build a sorting machine capable of sorting Skittles or M&Ms into separate cups by color at around 80 pieces per minute. It’s a great implementation, using an Arduino Duo. He based the code on the principles of a finite-state machine, in order to make it as quick as possible.

It works as you would expect: When a candy piece is loaded, the color is determined using an RGB sensor. A 360-degree servo is used to move the chute to the proper position, and interestingly, the system preemptively releases the candy before the chute is in position in order to maximize the speed. If you watch closely, you can see this behavior in the video (embedded after the break).

[Torsten] includes a complete bill of materials, if you’d like to try it for yourself. He also included a list of possible improvements.

Continue reading “Quick Candy Sorting Machine” →

3D Scanner Using A Sharp Infrared Sensor

[Fernando] sent in a tip about a pet project he’s been working on. It’s an interesting take on a 3D scanner. He used a stepper motor to rotate the object being scanned, and an Arduino for control, but the real novelty is the way he used the sensor. [Fernando] mounted a Sharp GP2D120X on vertical surface, and used a second stepper motor to raise the sensor during the scan. As you can see in the videos (embedded after the break), this results in the scan being put together in an ascending spiral.

The Sharp sensor is cheap and decent, but you’re obviously not going to get amazing accuracy. Still, using the average of several measurements, he ends up with a decent result. Happily, [Fernando] has released the code, and it should be easy enough to repurpose it with a more accurate sensor. It would be interesting to see a laser-based sensor paired with this code.

Continue reading “3D Scanner Using A Sharp Infrared Sensor” →

Touching Conversations: Email Snippets Scroll By On Electro-Embroidery Piece

electroembroidery

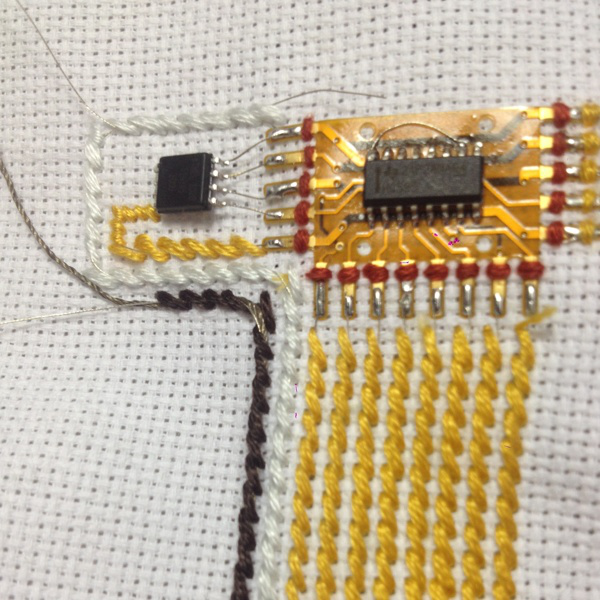
[Wei Chieh Shih] really moves the needle when it comes to wearable technology. His textile design project entitled I Am Very Happy I Hope You Are Too is a striking marriage of masterful hand embroidery, delicate circuitry, and careful programming.

[Wei] is using an Arduino micro to drive a matrix of surface-mount LEDs in the Hello, World video, which is a ramp-up to the scrolling text version that’s in progress now finished. That full version is part of his residency project at Arquetopia in Oaxaca, Mexico and displays snippets of emails from his past relationships. It’s huge, with multiple matrices as large as 8×25 pixels!

No build notes could be found for this or any of [Wei]’s similar projects, like this awesomely dangerous 200 laser diode jacket or this eerily beautiful light installation on Taiwan’s north beach. Based on the pictures, our speculation is that he is using ordinary 6-strand embroidery floss to make stem or half cross-stitches on all the paths. He then runs very thin, flexible conductor underneath the channel of stitches and solders the wires to the component pads.

If [Wei] wants another way to wear his heart on his sleeve, he could investigate these dynamic LED clothing hacks.

Update: [Wei] has completed this project, and has more information available at his Behance site.

Continue reading “Touching Conversations: Email Snippets Scroll By On Electro-Embroidery Piece” →

Arduino Xmas Tree Shield

christmasshield

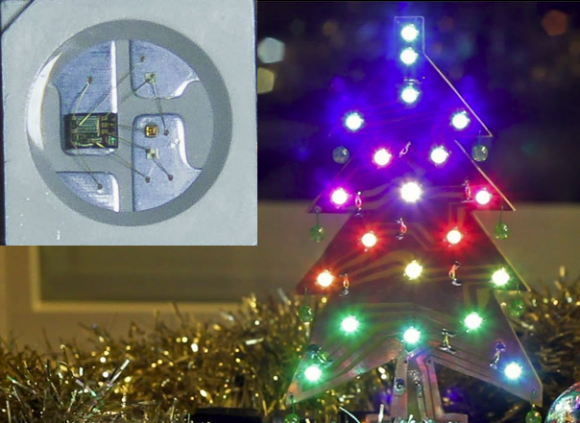
Nothing reminds us that it’s the holiday season more than an LED Christmas Tree submission. This obviously is not the first of its kind, but [Jose] does offer up a new technique using addressable RGB LEDs.

[Jose] decided to use 20 WS2812B RGB LEDs, which if you haven’t seen before, are RGB LEDs with an integrated controller. Yep, that’s right, just power/ground and 1 data line is all that is needed to control hundreds of RGB LEDs. This LED tree’s design is simple: a custom-etched PCB cut it in to the shape of a Christmas tree. The WS2812B LEDs helped keep everything clean, so the tree lacks any ‘ugly’ ornaments, except for the required bypass cap here and there. For an added bonus, the tree’s LEDs are synchronized to music generated by an Arduino via a piezo buzzer. Why is it a shield?  Well, the whole tree plugs in nicely to a standard Arduino interface. This looks like the perfect starter project to familiarize yourself with addressable LEDs, or at least to get you warmed up before building your own infinity portal.

Continue reading “Arduino Xmas Tree Shield” →