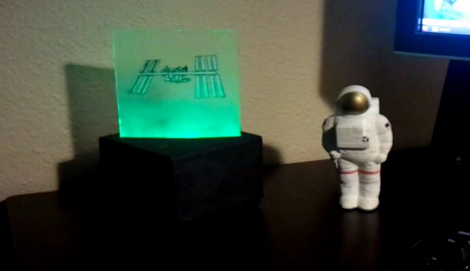
ChipKIT Uno32: First Impressions And Benchmarks

Following Maker Faire, we’ve had a few days to poke around with Digilent’s 32-bit Arduino-compatible chipKIT boards and compiler. We have some initial performance figures to report, along with impressions of the hardware and software.

Continue reading “ChipKIT Uno32: First Impressions And Benchmarks”

Low-cost, Low-bandwidth Wireless Arduino To Android Communications

android_nfc

[Joe] was experimenting with his Arduino when he started thinking about how he could get it to communicate wirelessly with his Android phone. Bluetooth is an option, but it requires some extra components, and Google’s ADK works as well – just not wirelessly.

Instead, he thought it would be neat to see if he could get the two devices to communicate with a simple magnetic coil. He constructed a small 1cm diameter coil, connecting it to the Arduino via a resistor and diode. Using the Android Tricorder app, he was able to locate his phone’s magnetometer, after which he ran some tests to narrow down the best sample rate and frequency range for communications.

To transfer data between the two devices, he had to bit bang the signal in software, since the Arduino’s UART has a lower limit far faster than the 7 bps data rate he was able to achieve with the magnetometer.

While his wireless Arduino to Android bridge isn’t likely to win any awards for throughput, it is a great proof of concept project. Be sure to check out the video below to see his “poor man’s NFC” in action.

Continue reading “Low-cost, Low-bandwidth Wireless Arduino To Android Communications”

Long-range Canon DSLR Remote Video Trigger

canon_60D_remote_video_trigger

Instructables user [Justin] generally enjoyed shooting video with his Canon 60D DSLR, though there was one small problem. The only way that the camera could be remotely triggered to shoot video was via a small IR remote with a paltry 10 foot range. Even worse, the remote had to be pointed directly at the front of the camera to work at all. To remedy the situation, he decided to rig up his own long-range trigger mechanism.

He cobbled together an Arduino with components he had sitting around, mounting it in a project box on top of the camera. A commercially available RF remote shutter release is also mounted on the top of the camera, and wired to the Arduino using a small 2.5mm plug. When he activates the RF remote, it sends a pulse to the Arduino, which in turn sends the appropriate signal to his camera via a small IR LED.

While he readily admits that he could have likely used a much simpler configuration, the Arduino does its job, and he’s quite happy with his solution. We agree with him about the Arduino, but it’s hard to argue with saving money by using components you already have on-hand.

I2C Arduino GPS Shield

i2c_gps_shield

[Wayne] wrote in to share an item he just finished working on, an I2C GPS shield for the Arduino. While other GPS solutions have existed for quite some time, his caught our eye due to its feature list.

The shield removes a good bit of the hassle associated with parsing raw NMEA data from traditional GPS addons. While you have the option to communicate with the GPS module over serial in order to obtain the raw data, the use of the I2C interface makes getting the most commonly used GPS data a breeze. The GPS module itself can be set to update at anywhere from 1 to 10 Hz, and [Wayne] says that the I2C bus blows away the oft-used 9600 baud serial interface. While I2C is primarily used for receiving data, it can also be utilized to configure the GPS via its control registers, allowing for on the fly settings tweaks.

While he does sell the units pre-assembled at a competitive price, [Wayne] also provides a full schematic, making this an easy afternoon project once you have sourced the proper components.

Automated Faucet Keeps Your Cat Watered

Like many of us [Chris Dillon]’s cat prefers to drink cold fresh water directly from the tap. However, unlike us, [Chris]’s feline buddy is too preoccupied with cat stuff to bother flipping off the faucet after its use. As it turns out, this was an excellent opportunity not only for [Chris] to flex his project muscles, but also to lay the groundwork for future home automation projects.  While most of us may go for a simple solenoid [Chris] had to make the rig completely reversible. The result is an automated  faucet control which involves an infrared sensor, Arduino,  and tight fitting rail system with a servo to operate the sink handle.

After getting all of the hardware and the sensor sorted [Chris] went on to add a data logging PC to the mix. The faucet setup communicates with a Linux server via Xbee modules, and populates a MongoDB database. The setup even allows [Chris] to flag false positives (human sink use for example) and produce charts of his feline friend’s water usage. We suspect the cat will be none too pleased when it gets its water bill.

Don’t forget to check out [Chris Dillon]’s site for details on the project including code and a list of lessons learned. Also, since this is the internet after all, we have several other cat related projects for your viewing pleasure.

[Thanks Chris Burrows (and nephew)]

Check out a video of the setup in action after the jump.

Continue reading “Automated Faucet Keeps Your Cat Watered”

RF Robot Controlled From A Terminal Window

This robot can be controlled from the terminal window of your computer. You can see a manilla-colored board mounted between the wheels. This is the RF receiver which has quite a long antenna that we’ve cropped out to get a better look at the bot itself. [Ashish] picked up an RF transmitter/receiver pair for about $4 and after the break you can watch him walk us through the method he’s using for control.

First off, he had to find a way to interface the transmitter with his computer. He decided to use an Arduino because sending data to it from the computer is as simple as writing to /dev/ttyUSB0. The Arduino sketch just listens for incoming characters on the serial connection and pushes them over the RF transmitter.

We like his development methods. In the video he shows the command syntax used to drive and stop the robot. Once he figured that out he wrote a shell script to send the bot on a preprogrammed square path. From there a bit more coding would give him real-time control which could be extended to something like a web-based interface for smartphone control.

Oh, and if you’re wondering about the bot itself it’s a kit robot which normally uses IR control. [Ashish] upgraded to RF since it doesn’t require line-of-sight to work.

Continue reading “RF Robot Controlled From A Terminal Window”

Sound Localization And A Treaded Rover

soundlocalization_and_a_robot

[Jad] recently wrote in to share a pair of projects that have been keeping him busy as of late.

The first is a sound localization system not unlike one we showed you a few weeks ago. The difference is that his system displays the sound source via a set of LEDs rather than by motion, making it far less prone to interference by things like servo noise. His system uses four identical circuits, each of which are wired to a separate analog input on the Arduino. Each channel is adjustable, making it easy to tweak how the system responds to a particular sound.

His second project is a sizable robot built on the Motoruino platform. His contraption features several stacked control boards that handle the bots locomotion as well as camera control. It connects to his computer via a Bluetooth module that boasts a 1 mile range, allowing him to control everything from his PC. [Jad] is using the robot as a prototype for a much larger scale creation, and he says that his current focus is getting the robot to track and follow objects automatically using the on-board camera.

Continue reading to see a small preview of his bot’s progress so far.

Continue reading “Sound Localization And A Treaded Rover”