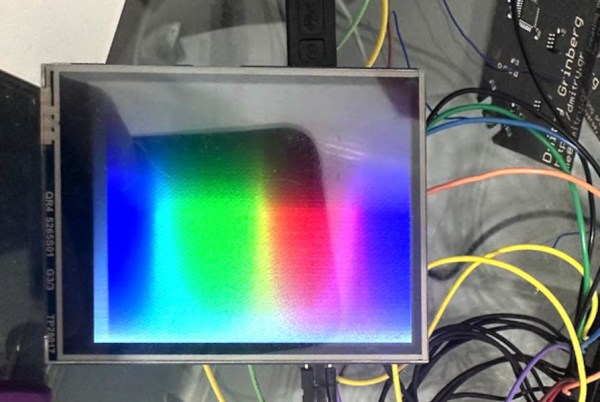
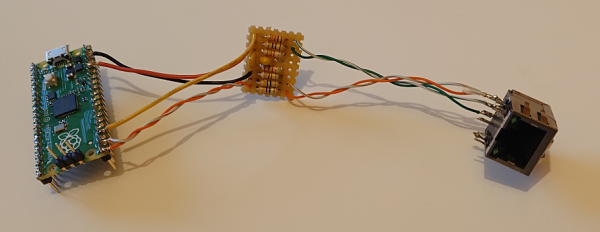
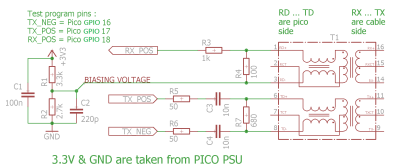
Low-Cost Display Saved By RP2040

Anyone looking for components for electronics projects, especially robotics, microcontrollers, and IoT devices, has likely heard of Waveshare. They are additionally well-known suppliers of low-cost displays with a wide range of resolutions, sizes, and capabilities, but as [Dmitry Grinberg] found, they’re not all winners. He thought the price on this 2.8-inch display might outweigh its poor design and lack of documentation, and documented his process of bringing it up to a much higher standard with a custom driver for it.

The display is a 320×240 full-color LCD which also has a touchscreen function, but out-of-the-box only provides documentation for sending data to it manually. This makes it slow and, as [Dmitry] puts it, “pure insanity”. His ultimate solution after much poking and prodding was to bit-bang an SPI bus using GPIO on an RP2040 but even this wasn’t as straightforward as it should have been because there are a bunch of other peripherals, like an SD card, which share the bus. Additionally, an interrupt is needed to handle the touchscreen since its default touch system is borderline useless as well, but after everything was neatly stitched together he has a much faster and more versatile driver for this display and is able to fully take advantage of its low price.

For anyone else attracted to the low price of these displays, at least the grunt work is done now if a usable driver is needed to get them up and running. And, if you were curious as to what [Dmitry] is going to use this for, he’s been slowly building up a PalmOS port on hardware he’s assembling himself, and this screen is the perfect size and supports a touch interface. We’ll keep up with that project as it progresses, and for some of [Dmitry]’s other wizardry with esoteric displays make sure to see what he’s done with some inexpensive e-ink displays as well.

Magnetic jack version of the bit-bang ethernet peripheral for Raspberry Pi Pico

Bit-Banging Bidirectional Ethernet On A Pi Pico

These days, even really cheap microcontroller boards have options that will give you Ethernet or WiFi access. But what if you have a Raspberry Pi Pico board and you really want to MacGyver yourself a network connection? You could do worse than check out this project by [holysnippet] that gives you a bit-banged bidirectional Ethernet port using only scrap passive components and software.

This project is similar to one we shared back in August by [kingyo], but differs in that what [holysnippet] has achieved is a fully-functional (albeit only around 7 Mbps) Ethernet port, rather than a simple UDP transmit device. The Ethernet connection itself is handled by the lwip stack. Connection to the RJ45 socket can be made from any of the Pi Pico pins, provided TX_NEG is followed directly by TX_POS, but the really hacky part is in the hardware.

schematic of Pi Pico bit-banged ethernet peripheral
Schematic showing the empirically-determined passive component values required.

Rather than developing hardware that would protect the Pico, this design admits that it “shamefully relies on the Pico’s input protection devices” to limit the Ethernet voltages to 3.3 V.

You’ll need an isolation transformer from some old Ethernet-enabled gear (either standalone or as part of a magnetic jack), but then it’s only resistors and capacitors from there. There are warnings not to connect this to PoE networks for obvious reasons, and the component layout needs to keep in mind the ~20 MHz frequencies involved, but to get this working at all feels like quite a feat.

Normally, there’d be no reason to go to these lengths, but it’s always educational to see if it can be done and, with the current component shortages, this is another trick to keep up your sleeve for emergencies!

Putting ports where they shouldn’t belong is not a new idea, of course.  Back in the day we even shared an inadvisable ATTINY implementation of bit-banged Ethernet with no protection at all.

Thanks to [biemster] for the tip-off

Silicon Bugs In The FTDI FT232R, And A Tidy RF VCO Project

[Scott Harden] wrote in to tell us of some success he’s having using the FT232 chip to speak SPI directly from his laptop to a AD98850 digital signal generator. At least that was his destination. But as so often in life, more than half the fun was getting there, finding some still-unsolved silicon bugs, and (after simply swapping chips for one that works) potting it with hot glue, putting it in a nice box, and putting it up on the shelf.

In principle, the FTDI FT232 series of chips has a bit-bang mode that allows you to control the individual pins from a fairly simple API on your target computer, using their drivers and without installing anything on basically any platform. We wrote this feature up way back in 2009, and [Scott] was asking himself why he doesn’t see more hacks taking advantage of bit-bang mode.

“Square” waves

Then he answered his own question the hard way, by spending hours “debugging” his code until he stumbled on the FTDI errata note (PDF), where they admit that bit-bang mode doesn’t get timings right at all on the FT232R and FT232RL parts. FTDI has made claims that they fixed the bug in subsequent chip revisions, but the community has not been able to confirm it. If you want to use bit-bang mode, which is plenty cool, steer clear of the FT232R chips — the ones found in the ever-popular FTDI cables and many adapter dongles.

The good news here is twofold. First, now you know. Second, bit-bang mode is tremendously useful and it works with other chips from the vendor. Particularly, the FT232H and FT230X chips work just fine, among others. And [Scott] got his command-line controlled digital VCO up and running. All’s well that ends well?

We’ll wrap up with questions for the comment section. Do other manufacturers’ cheap USB-serial chips have an easily accessible bit-bang mode? Are any of you using USB bit-bang anyway? If so, what for?

Bit Banging Through A USB Parallel Port Adapter

If you’ve ever looked into low-level parallel port access you may have learned that it only works with actual parallel port hardware, and not with USB parallel port adapters. But here’s a solution that will change your thinking. It borrows from the way printers communicate to allow USB to parallel port bit banging without a microcontroller (dead link, try Internet Archive).

Sure, adding a microcontroller would make this dead simple. All you need to do is program the chip to emulate the printer’s end of the communications scheme. But that’s not the approach taken here. Instead the USB to RS232 (serial) converter also pictured above is used as a reset signal. The strobe pin on the parallel port drives an inverter which triggers a thyristor connected to the busy pin. Thyristors are bistable switches so this solution alone will never clear the busy pin. That’s where the serial connection comes into play. By alternating the data transmitted from the computer between the bit-bang values sent to LP0 and 0xF0 sent to the serial connector the eight parallel data bits become fully addressable. See the project in action in the clip after the break.

Gaining Low-level SPI Access On The Raspberry Pi

Raspberry Pi - rpi

We’ve seen a ton of projects that interface hardware with the Raspberry Pi. But they usually depend on bit-banging. That means they toggle the pins in software to match a specific protocol. The thing is that the beefy Broadcom SoC that anchors the board has a lot of built-in peripherals that are just waiting to be used instead of bit banging. In this case, it’s the hardware SPI peripheral which can be accessed via the bcm2835 library for RPi.

One of the things that would have really complicated this process is the pin mapping between the Broadcom chip and the RPi GPIO header. Since not all pins are broken out, it was either luck or good design forethought that made all of the SPI0 pins from the chip available on the RPi breakout header. The library page (linked above) explains this well. But if you’re looking for more of a working example check out [EngineerByNight’s] project with adds an accelerometer using hardware SPI.

Low-cost, Low-bandwidth Wireless Arduino To Android Communications

android_nfc

[Joe] was experimenting with his Arduino when he started thinking about how he could get it to communicate wirelessly with his Android phone. Bluetooth is an option, but it requires some extra components, and Google’s ADK works as well – just not wirelessly.

Instead, he thought it would be neat to see if he could get the two devices to communicate with a simple magnetic coil. He constructed a small 1cm diameter coil, connecting it to the Arduino via a resistor and diode. Using the Android Tricorder app, he was able to locate his phone’s magnetometer, after which he ran some tests to narrow down the best sample rate and frequency range for communications.

To transfer data between the two devices, he had to bit bang the signal in software, since the Arduino’s UART has a lower limit far faster than the 7 bps data rate he was able to achieve with the magnetometer.

While his wireless Arduino to Android bridge isn’t likely to win any awards for throughput, it is a great proof of concept project. Be sure to check out the video below to see his “poor man’s NFC” in action.

Continue reading “Low-cost, Low-bandwidth Wireless Arduino To Android Communications”

RF Control From Just About Any Device

[Mirko] is working on a library that will allow you to add RF control to just about any device. The only requirement is that the device be capable of running a Linux kernel, and that it have a few GPIO pins available. One example is fairly straight forward, a Netgear router. Many, if not most routers run a Linux kernel natively and most have solder points on the board for unused IO pins so patching into the hardware is very straight forward. Less obvious and much more impressive is the hack seen in the image above. [Mirko] built an SD card adapter cable and uses the contacts in the card reader to bit bang four-wire SPI to communicate with that RF module.