A Real Turn Off

[Newbrain] had a small problem. He’d turn off the TV, but would leave the sound system turned on. Admittedly, not a big problem, but an annoyance, none the less. He realized the TV had a USB port that went off when it did, so he decided to build something that would sense when the USB port died and fake a button press into the amplifier.

He posted a few ideas online and, honestly, the discussion was at least as interesting as the final project. The common thread was to use an optoisolator to sense the 5 V from the USB port. After that, everyone considered a variety of ICs and discretes and even did some Spice modeling.

In the end, though, [Newbrain] took the easy way out. An ATtiny 84 is probably overkill, but it easy enough to press into service. With only three other components, he built the whole thing into a narrow 24-pin socket and taped it to the back of the audio unit’s wired remote control.

Continue reading “A Real Turn Off”

TinyDriver – ATtiny84 Platform Without Arduino

You don’t need an Arduino for everything! Or do you? This is an argument that plays out here quite often. Whatever the outcome, most folks agree that once you’ve dipped your feet in the shallow end of the pool, the real fun is when you dive into the deep end.

[Mahesh Venkitachalam] designed tinyDriver, an experimental Open Source breakout board for the Atmel ATtiny84 chip. His idea was to create a convenient platform which can be used to understand microcontrollers in-depth, by letting users dive under the hood and make use of the various features of the chip such as timers, PWM, interrupts, ADC, and digital I/O. The ATtiny84 is cheap and simple enough for starters. Add a low-cost AVR programmer, install the free and cross-platform avr-gcc and avrdude tool chain, read up the data sheet, learn some C programming and start experimenting. Rinse and repeat and you’ll be a pro at it soon. He’s got a few starter projects documented on his website to get you going.

The hardware is open source, and the Git repository contains the hardware source and example code. If you’re a hardware noob, he’s thoughtfully added a PTC resettable fuse and reverse polarity protection on the board to make sure you don’t release the magic blue smoke prematurely. All of the I/O’s are broken out on a header, and the motor driver and RGB LED can be disabled when not needed. The board isn’t hand-assembly friendly, but he plans to crowd fund it shortly. If you want to move beyond the Arduino platform, projects like the tinyDriver are the way to go.

The HackadayPrize2016 is Sponsored by:

A Cheap DIY Smoke Detector That Can Save Lives

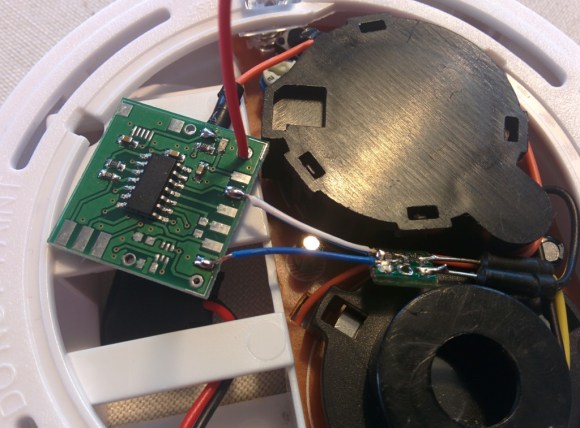
2014-07-19-16.33.53 A faulty wire, a discarded burning cigarette, or a left-on curling iron can trigger sparks of fire to engulf everything nearby until all that’s left is brittle mounds of smoldering ash. Which is why smoke detectors are so important. They are life saving devices that can wake people up sleeping inside, well before the silent, but deadly carbon monoxide starts to kick in. But what happens if no one is home, and the alarm begins to blare? The place burns down into the ground without the owners knowing.

So when [Martin] purchased a battery-powered smoke detector and rigged it up to notify him exactly when the piezo siren is activated, the evolution of the automatic fire alarm continued into the realm of wireless internet-connected things.

His home automation system (a Raspberry Pi running Node-Red) links to a Funky ATTiny84-based sensor and transmits the data wirelessly, redirecting the information to his phone. SMS messages can be sent, as well as emails and pushbullet notifications. Once the piezo siren starts to sing, the system alerts him that smoke has been detected and that he should check on it as soon as possible.

The electronics fit perfectly inside the case waiting for any smoky disturbance in the room to light up. And what makes this project even better, besides the life saving capabilities and the instant push notifications, is that it was hooked up for the cheap. No need to buy a brand-new, expensive Nest protect, when all it takes it a sensor or two and a Raspberry Pi to hack the fire alarm that already sits in the house.

This video coming up after the break shows how simple it is to make. Continue reading “A Cheap DIY Smoke Detector That Can Save Lives”

Tic Tac Clock

tic-tac-clock

Here’s an excuse to eat a bunch of Tic Tac candies: once the container is empty it makes a nice little enclosure for your next project. This particular offering introduces a point-to-point clock project that’s a ton of fun.

[Danny Chouinard] did a lot with very little. You can get the gist of the circuit just by looking at the photos above. it uses a 3×5 Charlieplexed LED display (this is given away by the fact that there’s only a few resistors on the board. A bit difficult to see, but between the resistors and the ATtiny84 there is a clock crystal, and on the back is a little piezo buzzer. The one thing that isn’t completely obvious is the power source. Two AAAA batteries, salvaged from a 9V battery, are able to keep the unit running at an estimated 2 years of moderate use.

The video after the break is worth a look though. It shows the various characters and information that can be flashed on the LED matrix. At first it’s hard to tell that the single user input button is being pressed by [Danny’s] thumb.

If you don’t want to build a clock, there are still plenty of reasons to eat a whole container of these mints. You could replace them with a PIC programmer or a discreet camera.

Continue reading “Tic Tac Clock”

ATtiny84 Powered Minimalist LED Clock

LED Clock ATtiny84

We feature a lot of clock builds on HaD, and the reason is that they are cool. Even simple ones are cool. Not everyone can say they built a clock. [Chris] took a ride on the DIY Clock train and came up with this LED-based clock that is controlled by an ATtiny84 chip.

The clock has 24 LEDs total, 1 for each hour and 1 for every 5 minute increment. The 24 LEDs are arranged in 2 concentric rings. To display the hour, both LEDs at the same angle are lit up. To show the minutes, just the inner LED is lit. The main image above shows 6:40.

If you are familiar with the ATtiny84 you know that it only has 12 in/out pins, which is significantly less than the amount of LEDs that need controlling. [Chris] decided to use some 74HC595 shift registers to increase the IO pins on the ATtiny. The entire build is installed on a protoboard with quite a bit of point-to-point wiring. A simple tinted plastic case finishes the project and gives it a modern look.

[Chris] made the code for his clock available in case any readers are interested in making one.

LED Clock ATtiny84

A DIY NFC Tag

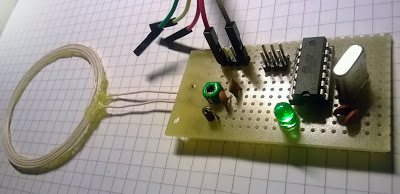
[Nicholas] built a simple NFC tag using an ATtiny84 microcontroller, four resistors, three capacitors, a diode, and an antenna. It implements ISO 14443-3, a standard for identification cards, and can communicate with the NFC chip sets found in most new smartphones.

This standard uses on-off keying for communication, which makes the hardware slightly more complex than the AVR RFID tag that we saw a few years back. The antenna and a variable capacitor form an LC circuit tuned at 13.56 MHz, which is the carrier frequency for the protocol. The diode acts as an envelope detector, letting the microcontroller recover the signal.

It may not be fully compliant with the standard, but [Nicolas] successfully tested out the device with his Lumia 620 phone. The firmware is available on Google Code so you can program your own tag data into main.c, build the firmware, and send some NFC packets. You can also check out a demo of the device after the break.

Continue reading “A DIY NFC Tag”

Haunted Dollhouse Microcontroller Networking For World Maker Faire

master-slave-networks

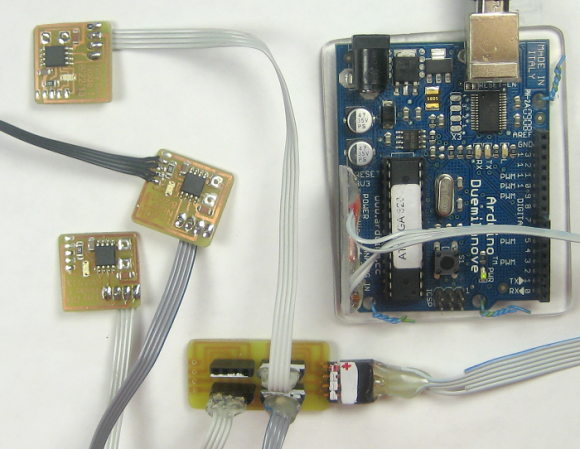
It’s pretty awesome to get see the number of projects presented at World Maker Faire. But we still love digging into the gritty details that only an in-depth build post can deliver. Here we get both. You can see the circuits pictured above in the Circuit Castle exhibit at WMF this weekend, and you can read about how the microcontroller network was built in [Jim’s] article.

As the title states, this is a network built for a dollhouse. Each slave device performs a different task; adding color, sound, motion, and interactivity using some sensors.  The post discusses the i2c (or TWI to get around licensing issues as [Jim] mentions) communications used to talk to the ATtiny85 chips on the slave boards. Because the eight-pin package leaves few I/O pins to work with an ATtiny84 was also added. It brings 14-pins to the party, including multiple ADC inputs for reading sensors.

If this ends up being too much of a read for you jog to the “Update 9/17/13” to get the general overview of progress. Like any project on a timeline, not everything works quite as well as they would have liked it to. But it’s the journey that makes something like this so fun — a fully working project would signal an end to the enjoyment, right?

[via Workshop 88]