Hackaday Prize Entry: Under Cabinet LED Lighting Controller

[Matt Meerian]’s workbench seems to be in perpetual shadow, so he has become adept at mounting LED strips under all his shelves and cabinets. These solve any problems involving finding things in the gloom, but present a new problem in that he risks a lot of LED strips being left on, and going round turning them all off is tedious.

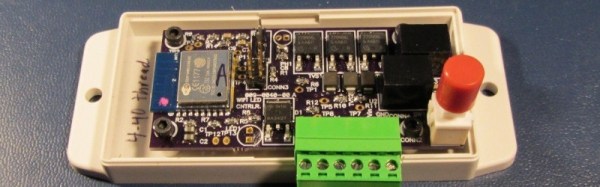
His solution is to make a wireless controller for all his home LED strips, under the command of a web app from his Android tablet. An ESP8266 and a set of MOSFETs provide the inner workings, and the whole is presented on a very compact and well-designed purple OSH Park PCB reflow soldered on a $20 Wal-Mart hotplate and set in a plastic enclosure. The web interface is still in development, but has a fairly simple CSS front end for the ESP8266 code. All software, the schematic, and BoM can be downloaded from the Hackaday.io page linked above.

This project isn’t going to end world hunger or stop wars, but it’s beautifully done and well documented, and it makes [Matt]’s life a lot easier. And that makes it a good entry for the Hackaday Prize.

A Real Turn Off

[Newbrain] had a small problem. He’d turn off the TV, but would leave the sound system turned on. Admittedly, not a big problem, but an annoyance, none the less. He realized the TV had a USB port that went off when it did, so he decided to build something that would sense when the USB port died and fake a button press into the amplifier.

He posted a few ideas online and, honestly, the discussion was at least as interesting as the final project. The common thread was to use an optoisolator to sense the 5 V from the USB port. After that, everyone considered a variety of ICs and discretes and even did some Spice modeling.

In the end, though, [Newbrain] took the easy way out. An ATtiny 84 is probably overkill, but it easy enough to press into service. With only three other components, he built the whole thing into a narrow 24-pin socket and taped it to the back of the audio unit’s wired remote control.

Continue reading “A Real Turn Off”

Line Follower With No Arduino

There’s hardly a day that passes without an Arduino project that spurs the usual salvo of comments. Half the commenters will complain that the project didn’t need an Arduino. The other half will insist that the project would be better served with a much larger computer ranging from an ARM CPU to a Cray.

[Will Moore] has been interested in BEAM robotics — robots with analog hardware instead of microcontollers. His latest project is a sophisticated line follower. You’ve probably seen “bang-bang” line followers that just use a photocell to turn the robot one way or the other. [Will’s] uses a hardware PID (proportional integral derivative) controller. You can see a video of the result below.

Continue reading “Line Follower With No Arduino”

New Part Day: Wireless BeagleBones On A Chip

The BeagleBone is a very popular single board computer, best applied to real-time applications where you need to blink LEDs really, really fast. Over the years, the BeagleBone has been used for stand-alone CNC controllers, the brains behind very large LED installations, and on rare occasions has been used to drive CRTs. If you just want a small Linux board, get a Pi. If you want to do something interesting with hardware, get a BeagleBone.

The BeagleBone ecosystem has grown a lot in the last year, from the wireless and Grove connector equipped BeagleBone Green, the robotics-focused BeagleBone Blue, the Zoolander-inspired Blue Steel. Now there’s a new BeagleBone, built around a very interesting System on Module introduced earlier this year.

The new board is called the BeagleBone Black Wireless, and it brings to the table all you know and love about the BeagleBone. There’s a 1GHz ARM355x with two 32-bit 200MHz PRUs for the real-time pin toggling. RAM is set at 512MB, with 4GB of eMMC Flash and Debian pre-installed, and a microSD card for larger storage options. The new feature is wireless connectivity: a TI WiFi and Bluetooth module with provisions for 802.11s replaces the old Ethernet connector.

Taken at face value, the new BeagleBone Black Wireless deserves a mention — it’s a BeagleBone with wireless — but isn’t particularly noteworthy. But when you get to the gigantic brick of resin dropped squarely in the middle of the board does the latest device in the BeagleBone family become very, very interesting. The System on Module for this version of the BeagleBone is the BeagleBone On A Chip released a few months ago. The Octavo Systems OSD335x is, quite literally, a BeagleBone on a chip. It’s a BGA with big balls, making it solderable with hand-applied solder paste and a toaster oven reflow conversion. In fact, the BeagleBone Wireless was designed by [Jason Kridner] in Eagle as a 6-layer board. It’s still a bit beyond the standard capabilities of OSHPark, but the design can still be cut down, and shows how this BeagleBone on a Chip can be applied to other Open Hardware projects.

Smart Sutures

Researchers at Tufts University are experimenting with smart thread sutures that could provide electronic feedback to recovering patients. The paper, entitled “A toolkit of thread-based microfluidics, sensors, and electronics for 3D tissue embedding for medical diagnosis”, is fairly academic, but does describe how threads can work as pH sensors, strain gauges, blood sugar monitors, temperature monitors, and more.

Conductive thread is nothing new but usually thought of as part of a smart garment. In this case, the threads close up wounds and are thus directly in the patient’s body. In many cases, the threads talked to an XBee LilyPad or a Bluetooth Low Energy module so that an ordinary cell phone can collect the data.

Continue reading “Smart Sutures”

Retrotechtacular: Power Driven Articulated Dummy

If any of you have ever made a piece of clothing, you’ll know some of the challenges involved. Ensuring a decent and comfortable fit for the wearer, because few real people conform exactly to commercial sizes. It’s as much a matter of style as it is of practicality, because while ill-fitting clothing might be a sartorial fail, it’s hardly serious.

When the piece of clothing is a space suit though, it is a different matter. You are not so much making a piece of clothing as a habitat, and one that will operate in an environment in which a quick change to slip into something more comfortable is not possible. If you get it wrong at best your astronaut will be uncomfortable and at worst their life could be threatened.

Continue reading “Retrotechtacular: Power Driven Articulated Dummy”

3D Printed Acoustic Holograms: Totally Cool, Not Totally Useless

If you wave your hand under the water’s surface, you get a pattern of ripples on the surface shortly thereafter. Now imagine working that backwards: you want to produce particular ripples on the surface, so how do you wiggle around the water molecules underneath?

That’s the project that a crew from the University of Navarre in Spain Max Planck Institute for Intelligent Systems undertook. Working backwards from the desired surface waves to the excitation underwater is “just” a matter of math and physics. The question is then how to produce the right, incredibly irregular, wavefront. The researchers’ answer was 3D printing.

The idea is that, by creating the desired ripples on the water’s surface, the researchers will be able to move things around. We’ve actually seen this done before in air by [mikeselectricstuff], and a more sophisticated version from the University of Navarre in Spain uses multiple ultrasonic transducers and enables researchers to move tiny objects around in mid-air.

What’s cool about the work done underwater by the Navarre Max Planck Institute group is that all they’re doing is printing out a 3D surface and wiggling it up and down to make the waves. The resulting surface wave patterns are limited in comparison to the active systems, but the apparatus is so much simpler that it ought to be useful for hackers with 3D printers. Let the era of novelty pond hacking begin!