Forget The Coax, Wire Up Your Antennas With Cat 6 Cable

These days, anything with copper in it is expensive. If you doubt that, a walk into any Home Depot electrical department, where the wire is locked up tighter than Fort Knox, will prove otherwise. Coaxial cable is a particularly expensive species, which is a pity for hams and other radio enthusiasts since it’s the only thing we can use for antenna feedlines.

Or is it? [Steve (VE6WZ)] has found a way to use ordinary Cat 6 Ethernet cable for antenna feed lines that seems pretty clever. As he points out, Ethernet cables are designed to handle frequencies that coincide nicely with most of the interesting amateur radio bands, and their insertion losses are acceptably low, especially for Cat 6 cable. The twisted pairs are also a balanced system that’s good at rejecting common mode noise. Cat 6 cable also has four pairs of conductors, allowing you to feed multiple antennas with one cable, or to distribute power to amplifiers and switches along with antenna feeds.

The downside? Cat6 conductor pairs have a characteristic impedance of around 100 ohms, which isn’t a match for the 50-ohm feedline impedance universally expected by ham radios. Also, the relatively small wires probably aren’t up to the job of carrying much current, limiting their use to feedlines for receive-only antennas. That works for [Steve] since he uses Cat 6 to support his massive Beverage antenna farm (Beverage antennas are non-resonant horizontal antennas that live close to the ground and point in the direction of the signal, rather than broadside to the signal as with a resonant antenna like a dipole.) Each antenna in his farm has a transimpedance amplifier that needs to be powered, plus switching relays so he can turn the correct antennas on for the signals he wants to receive. He describes the amps in detail in the video below, along with the custom impedance-matching transformers he uses and the combining gear.

Coax will probably still be the cable of choice for most feedline applications, but it’s nice to know there are alternatives. And who knows—if you stick to QRP work, maybe Cat 6 could even be used for transmitting.

Continue reading “Forget The Coax, Wire Up Your Antennas With Cat 6 Cable”

Beverage Coaster Indicates Ideal Drinking Temperature

When temperatures plummet, there’s nothing like a hot beverage to keep you warmed up inside. [Palingenesis] aka [Tim] sure does fancy a nice cuppa, but only within a certain temperature range is it ideal to drink. In an attempt to signal when the time is just right, he created various iterations of a hot beverage coaster.

To be clear, this is a plywood sandwich that does not keep the beverage warm, though that would be an interesting addition to the project. Rather, it indicates when the beverage’s temperature is just right using LEDs. When it’s too hot, the red LEDs are lit. The green LEDs flash while it’s just right, and once [Tim]’s tea has gone cold, the blue LEDs take center stage.

The brains of the operation is an STM8S103F module, aka the Blue Pill, which is paired with a DS18B20 temperature sensor. [Tim]’s original coaster has one in a TO-92 package embedded in the top layer, but ultimately he went with the probe version as it reads a truer temperature by virtue of being directly in the liquid. Be sure to check out the video after the break which covers planning the original version.

If you do want to keep you drink warm, here’s an ESP8266-based solution. If you’re more into looks, check out this blinkencoaster.

Continue reading “Beverage Coaster Indicates Ideal Drinking Temperature”

Boat Brings Bathers Beverages

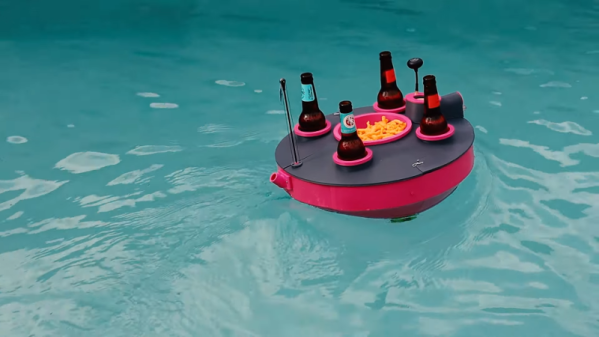
Chilling in the pool is great, but what a drag to have to get out to grab a cold brew. [Alister] had his eye on a commercial drink float, but the company was out of business. But 3D printing, of course, comes to the rescue in this video, also embedded below.

The payload amounts to four bottles and some snacks. Brushless thrusters allow the bartender to steer the little robot around the pool to deliver libations.

Continue reading “Boat Brings Bathers Beverages”

The Mouth-Watering World Of NIST Standard Foods

The National Institute Of Standards and Technology was founded on March 3, 1901 as the National Bureau of Standards, taking on its current moniker in 1988. The organisation is charged by the government with ensuring the uniformity of weights and measures across the United States, and generally helping out industry, academia and other users wherever some kind of overarching standard is required.

One of the primary jobs of NIST is the production and sale of Standard Reference Materials, or SRMs. These cover a huge variety of applications, from steel samples to concrete and geological materials like clay. However, there are also edible SRMS, too. Yes, you can purchase yourself a jar of NIST Standard Peanut Butter, though you might find the price uncompetitive with the varieties at your local supermarket. Let’s dive into why these “standard” foods exist, and see what’s available from the shelves of our favourite national standards institute. Continue reading “The Mouth-Watering World Of NIST Standard Foods”

The Auto-Bartender

It’s the end of the academic semester for many students around the globe, so here comes the flurry of DIY projects. Always a great time to check out all the cool hacks from our readers all over the world. One project that piques our interest comes courtesy of [Jason Ummel] and his Auto-Bartender. (Video, embedded below.)

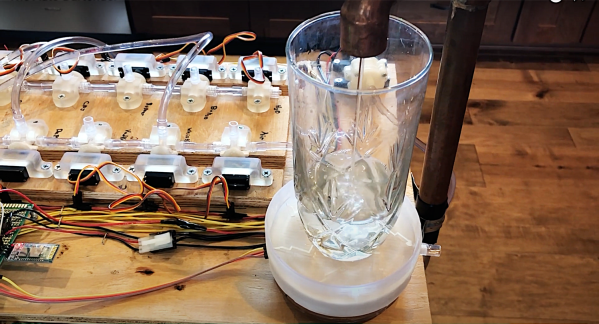
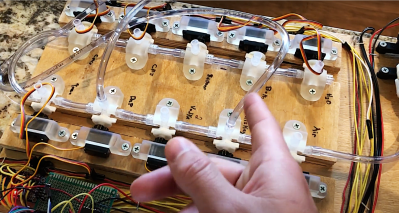
[Jason] developed this project as a part of his robotics class taught by Professor Martinez, one of our friends at FlexiLab. Powered by one of our favorite microcontrollers, the ATmega328, the Auto-Bartender is driven by a single 12 V motor coupled with 10 individual valves for separate drinks. Drinks are pumped into a cup sitting on top of a scale, allowing the device to know how much of each drink has been dispensed. The entire setup is controlled using a smartphone application developed in MIT App Inventor, a super-easy way to prototype Android applications.

Furthermore, [Jason] incorporated a number of user-centered design considerations into his project. These include an LCD to display updates, a green LED to indicate the device is in progress, and a buzzer to let the user know the drink is complete.

We really like the combination of craftsmanship, electronics hardware design, and software development that [Jason] put into his project. It’s the kind of project we know our readers will enjoy.

It looks like Jason substituted tap water for Whiskey and Dr. Pepper for his demo. Not exactly what we had in mind, but I guess he still has exams to finish.

Cool project [Jason]! We can’t wait to see Auto-Bartender on Hackaday.io.

Bottoms up! Continue reading “The Auto-Bartender”

Enjoy A Refreshing Beverage With The Chilled Drink Calculator

Hackers are quite often the price conscious type, unwilling to pay jacked up prices for cold beverages when they can be purchased warm and in bulk for much lower cost. However, when guests are on the way and time is running out, it’s crucial to chill the drinks down to the right temperature, and fast. To take the guessing out of the process, [Álvaro Díez] and [Tibor Pal] collaborated to create the Chilled Drink Calculator.

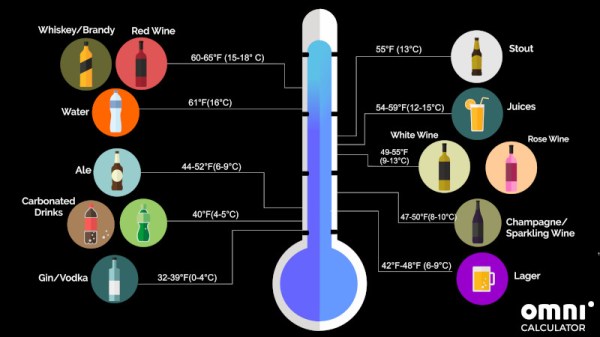
It’s a resource jam-packed full of everything you need to know to get your drinks cold, pronto. Based on heat transfer equations and data from empirical studies, the calculator is able to show you just how long it will take to cool practically any beverage to any temperature. There are presets for different types of container and cooling method, as well as information on the ideal serving temperatures for things like wine, beer and soft drinks. There’s even information on helpful hacks to help cool things down more quickly – with the salt and ice bath being devastatingly effective with minimal equipment requirements.

Keep the calculator in your bookmarks for the next time your pals show up with a case of beer that’s been sitting in the sun all day in the back of a pickup truck (Authors note: looking at you, Terry). Alternatively, consider building an advanced cooling apparatus.

inside shot of a refrigerator with water bulk tank and seltzer pump

Continuous Seltzer Deployment System Solves Our Bubbly-Water Sourcing Problems

Seltzer water – that bubbly, carbonated water that disappoints sugar-craving children everywhere – has experienced a steady rise in popularity over the past few years. This is perhaps partly fueled by the availability of countertop carbonators such as the SodaStream.

Not satisfied with the tedious and pedestrian process of manually carbonating individual bottles of water, [piyoman] has instead built a tidy little tap of unlimited cold, filtered seltzer. It’s no easy gag. The build uses a commercial carbonator pump, reverse osmosis water filter, bulk tank, and a standard CO2 cylinder to create a constant source of carbonated water. Most of this setup is stuffed into a dorm-sized fridge (tetris-style) and topped with a fancy beer faucet to dispense the resulting bubblewater.

At roughly $800 for the documented system, you need to have a great reason to build your own. But [piyoman] provides detailed instructions, a parts list, and suggestions for cost savings and future improvements if you do take on a system like this for your seltzer needs.

Cheaper Carbonation Options

While looking at how DIY carbonation has been done in the past we found [Richard Kinch’s] Carbonating at Home with Improvised Equipment and Soda Fountains page which dives into many other options. His site – a wonderful, dense demonstration of the beauty of “web 1.0” – walks through the basics of carbonated water, discusses CO2 tanks and gauges, and shows how to build a simple carbonation cap for making seltzer in standard PET soda bottles.