Current-Based Side-Channel Attacks, Two Ways

Funny things can happen when a security researcher and an electronics engineer specializing in high-speed circuits get together. At least they did when [Limpkin] met [Roman], which resulted in two interesting hardware solutions for side-channel attacks.

As [Limpkin] relates it, the tale began when he shared an office with [Roman Korkikian], a security researcher looking into current-based attacks on the crypto engine inside ESP32s. The idea goes that by monitoring the current consumption of the processor during cryptographic operations, you can derive enough data to figure out how it works. It’s difficult to tease a useful signal from the noise, though, and [Roman]’s setup with long wire runs and a noisy current probe wasn’t helping at all. So [Limpkin] decided to pitch in.

The first board he designed was based on a balun, which he used to isolate the device under test from the amplification stage. He found a 1:8 balun, normally used to match impedances in RF circuits, and used its primary as a shunt resistance between the power supply — a CR1220 coin cell — and the DUT. The amplifier stage is a pair of low-noise RF amps; a variable attenuator was added between the amp stages on a second version of the board.

Board number two took a different tack; rather than use a balun, [Limpkin] chose a simple shunt resistor with a few twists. To measure the low-current signal on top of the ESP32’s baseline draw would require such a large shunt resistor that the microcontroller wouldn’t even boot, so he instead used an OPA855 wideband low-noise op-amp as an amplified shunt. The output of that stage goes through the same variable attenuator as the first board, and then to another OPA855 gain stage. The board is entirely battery-powered, relying on nice, quiet 18650s to power both the DUT and the shunt.

How well does it work? We’ll let you watch the talk below and make up your own mind, but since they’ve used these simple circuits to break a range of different chips, we’d say this approach a winner.

Continue reading “Current-Based Side-Channel Attacks, Two Ways”

Don’t Let The Baluns Float Over Your Head

Most ham radio operators will build an antenna of some sort when they first start listening or transmitting, whether it’s a simple dipole, a beam antenna like a Yagi, or even just a random wire vertical antenna. All of these will need to be connected feedline of some sort, and in the likely event you reach for some 50-ohm coax cable you’ll also need a balun to reduce noise or unwanted radiation. Don’t be afraid of extra expenses when getting into this hobby, though, as [W6NBC] demonstrates how to construct an “ugly balun” out of the coax wire itself (PDF).

The main purpose of a balun, a contraction of “balanced-unbalanced” is to convert an unbalanced transmission line to a balanced one. However, as [W6NBC] explains, this explanation obscures much of what baluns are actually doing. In reality, they take a three-wire system (the coax) and convert it to a two-wire system (the antenna), which keeps all of the electrical noise and current on the shield wire of the coax from interfering with the desirable RF on the interior of the coax.

This might seem somewhat confusing on the surface, as coax wires only have a center conductor and a shield wire, but thanks to the skin effect which drives currents to the outside of the conductor, the shield wire effectively becomes two conductors when taking into account its inner and outer surfaces. At these high frequencies the balun is acting as a choke which keeps these two high-frequency conductors separate from one another, and keeps all the noise on the outside of the shield wire and out of the transmitter or receiver.

Granted, the world of high-frequency radio circuits can get quite complex and counter-intuitive and, as we’ve shown before, can behave quite unexpectedly when compared to DC or even mains-frequency AC. But a proper understanding of baluns and other types of transformers and the ways they interact with RF can be a powerful tool to have. We’eve even seen other hams use specialty transformers like these to make antennas out of random lengths and shapes of wire.

Continue reading “Don’t Let The Baluns Float Over Your Head”

The $50 Ham: A Cheap Antenna For The HF Bands

So far in the $50 Ham series, I’ve concentrated mainly on the VHF and UHF bands. The reason for this has to do mainly with FCC rules, which largely restrict Technician-level licensees to those bands. But there’s a financial component to it, too; high-frequency (HF) band privileges come both at the price of learning enough about radio to pass the General license test, as well as the need for gear that can be orders of magnitude more expensive than a $30 handy-talkie radio.

But while HF gear can be expensive, not everything needed to get on the air has to be so. And since it’s often the antenna that makes or breaks an amateur radio operator’s ability to make contacts, we’ll look at a simple but versatile antenna design that can be adapted to support everything from a big, powerful base station to portable QRP (low-power) activations in the field: the end-fed half-wave antenna.

Continue reading “The $50 Ham: A Cheap Antenna For The HF Bands”

Homebrew Loop Antenna Brings The Shortwave World To You

Radio may be dead in terms of delivering entertainment, but it’s times like these when the original social network comes into its own. Being able to tune in stations from across the planet to get fresh perspectives on a global event can even be a life saver. You’ll need a good antenna to do that, which is where this homebrew loop antenna for the shortwave radio bands shines.

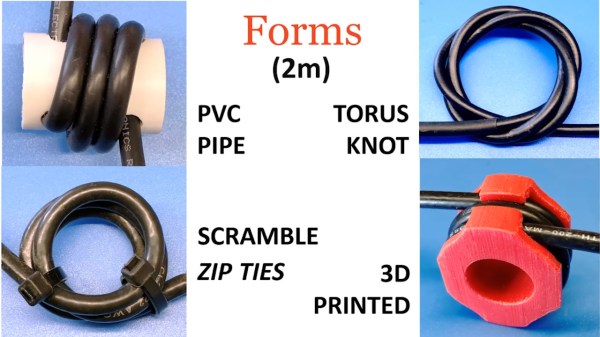
To be honest, pretty much any chunk of wire will do as an antenna for most shortwave receivers. But not everyone lives somewhere where it’s possible to string up a hundred meters of wire and get a good ground connection, which could make a passive loop antenna like this a good choice. Plus, loops tend to cancel the electrical noise that’s so part of life today, which can make it easier to pull in weak, distant stations.

[Thomas]’s design is based on a length of coaxial cable, which should be stiff enough to give the loop some stability, like a low-loss RG-8 or RG-213. The coax braid and dielectric are exposed at the midpoint of the cable to create a feed point, while the shield and center conductor at the other ends are cross-connected. A 1:1 transformer is wound on a toroid core to connect to the feedpoint; [Thomas] calls it a balun but we tend to think it’s more of an unun, since both the antenna and feedline are unbalanced. He reports good results from the loop across the shortwave band.

The shortwave and ham bands are a treasure trove of information and entertainment just waiting to be explored. Check them out — you might learn something, and you might even stumble across spies doing their thing.

[via RTL-SDR.com]

The Hot And Cold Of Balanced Audio

A few summers of my misspent youth found me working at an outdoor concert venue on the local crew. The local crew helps the show’s technicians — don’t call them roadies; they hate that — put up the show. You unpack the trucks, put up the lights, fly the sound system, help run the show, and put it all back in the trucks at the end. It was grueling work, but a lot of fun, and I got to meet people with names like “Mister Dog Vomit.”

One of the things I most remember about the load-in process was running the snakes. The snakes are fat bundles of cables, one for audio and one for lighting, that run from the stage to the consoles out in the house. The bigger the snakes, the bigger the show. It always impressed me that the audio snake, something like 50 yards long, was able to carry all those low-level signals without picking up interference from the AC thrumming through the lighting snake running right alongside it, while my stereo at home would pick up hum from the three-foot long RCA cable between the turntable and the preamp.

I asked one of the audio techs about that during one show, and he held up the end of the snake where all the cables break out into separate connectors. The chunky silver plugs clinked together as he gave his two-word answer before going back to patching in the console: “Balanced audio.”

Continue reading “The Hot And Cold Of Balanced Audio”

Snazzy Balun Lets Ham Use Off-The-Shelf Coax

It’s a dilemma many hams face: it’s easy to find yourself with a big spool of RG-11 coax cable, usually after a big cable TV wiring project. It can be tempting to use it in antenna projects, but the characteristic impedance of RG-11 is 75 Ω, whereas the ham world is geared to 50 Ω. Not willing to waste a bounty of free coax, one ham built a custom 1:1 current balun for a 75 Ω dipole.

Converting between balanced and unbalanced signals is the job of a balun, and it’s where the device derives its name. For hams, baluns are particularly useful to connect a dipole antenna, which is naturally balanced, to an unbalanced coax feedline. The balun [NV2K] built is a bifilar 1:1 design, with two parallel wires wound onto a ferrite core. To tweak the characteristic impedance to the 75 Ω needed for his antenna and feedline, [NV2K] added short lengths of Teflon insulation to one of the conductors, which is as fussy a bit of work as we’ve seen in a while. We appreciate the careful winding of the choke and the care taken to make this both mechanically and electrically sound, and not letting that RG-11 go to waste is a plus.

With as much effort as hams put into antenna design, there’s a surprising dearth of Hackaday articles on the subject. We’ve talked a bit about the Yagi-Uda antenna, and we’ve showcased a cool magnetic loop antenna, but there’s precious little about the humble dipole.

[via r/amateurradio]