4-bit Retrocomputer Emulator Gets Custom PCB

It might be fair to suspect that most people who are considered digital natives have very little to no clue about what is actually going on inside their smartphones, tablets, and computers. To be fair, it is not easy to understand how modern CPUs work but this was different at the beginning of the 80s when personal computers just started to become popular. People who grew up back then might have a much better understanding of computer basics thanks to computer education systems. The Busch 2090 Microtronic Computer System released in 1981 in Germany was one of these devices teaching people the basics of programming and machine language. It was also [Michael Wessel]’s first computer and even though he is still in proud possession of the original he just recently recreated it using an Arduino.

The original Microtronic was sold under the catchy slogan “Hobby of the future which has already begun!” Of course, the specs of the 4-bit, 500 kHz TMS 1600 inside the Microtronic seem laughable compared to modern microcontrollers, but it did run a virtual environment that taught more than the native assembly. He points out though that the instruction manual was exceptionally well written and is still highly effective in teaching students the basics of computer programming.

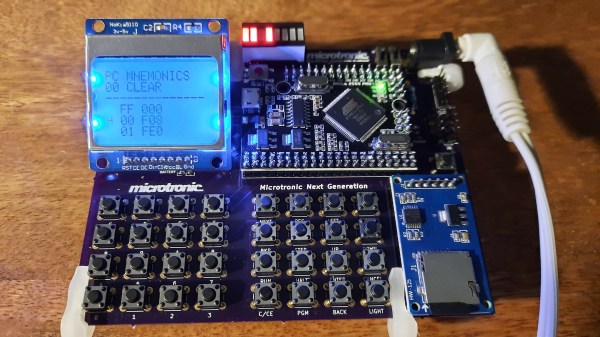
Already, a couple of years back he wrote an Arduino-based Microtronic emulator. In his new project, he got around to extending the functionality and creating a custom PCB for the device. The whole thing is based on ATMega 2560 Pro Mini including an SD card module for file storage, an LCD display, and a whole bunch of pushbuttons. He also added an RTC module and a speaker to recreate some of the original functions like programming a digital clock or composing melodies. The device can also serve as an emulator of the cassette interface of the original Microtronic that allowed to save programs with a whopping data rate of 14 baud.

He has certainly done a great job of preserving this beautiful piece of retro-tech for the future. Instead of an Arduino, retro computers can also be emulated on an FPGA or just take the original hardware and extend it with a Raspberry Pi.

SpaceAusScope Team Listens To The Galaxy

Australia has always had a reputation for astronomy. It is a great site low in the Southern hemisphere and there are lots of sparsely inhabited areas free from light and radio interference. Some of the first video from the Apollo 11 landing, for example, came in from “the dish” — a very large radio telescope down under. Australian hobbyists have formed a group, SpaceAusScope, where teams across Australia are building radio telescopes with the plan — which has been delayed by the pandemic — of collecting data and providing it for public analysis.

A secondary goal of the group is to provide better documentation for amateur radio telescope builders. So even if you don’t live in Australia, you might want to check out their website. It looks as thoughthe documentation will arrive in the future, but there is a very informative blog post from one team member about the helical antenna design most of the teams are using to eavesdrop on the hydrogen line.

Continue reading “SpaceAusScope Team Listens To The Galaxy”

Racing The Old Clock

[Keenan Rebera] recently found himself with an old racing clock (a chronoix cc3000) left behind by a roommate. How the roommate obtained such a clock seems murky at best, but undeterred [Keenan] set to work bringing the clock to life with Bluetooth functionality. The mechanical nature of the digits provided a satisfying auditory click, making it a good candidate for some upgrading. The new brain transplant is the venerable ESP32 with an RTC for good measure. He created a custom PCB with QWIC connectors to daisy chain together the driver boards together. Each PCB has four TBD62083 for driving the digits, two MCP expanders to increase the address space. This allows the ESP32 to address all the various segments over I2C. By soldering different pads together, he can change the address of each MCP, giving a maximum of 16 digits (9 possible MCP’s each driving 2 digits).

A handsomely designed app accompanies the clock, making updating the RTC and setting the timezone a breeze. Currently, it is displaying a count down to the time when 2020 is officially over. While 2020 will certainly go down in the books as a tumultuous year, it was a great year for DIY clocks at Hackaday. Just in the past few weeks, we’ve seen big LED workshop clocks, esoteric domino clocks, and beautiful clocks that double as works of art. Come 2021, we’re quite confident that [Keenan] will still have a gorgeous clock on his wall ticking and clicking away.
Continue reading “Racing The Old Clock”

Magic 8-Ball Gets A Modern Makeover

Back in 2012, [sjm4306] was surprised when his breadboard rendition of the classic “Magic 8-Ball” popped up on Hackaday. If he had known the project was going to be enshrined on these hallowed pages, he might have tidied things up a bit. Now with nearly a decade of additional electronics experience, he’s back and ready to show off a new and improved version of the project.

The 3D printed case helps sell the look.

Conceptually, not much has changed from the original version. Press a button, get a random response. But on the whole the project is more refined, and not just because it’s moved over to a custom PCB.

The original version used a PIC16F886 with a charge controller and experimental RTC, but this time around [sjm4306] has consolidated all the functionality into the ATmega328P and is powering the whole thing with a simple CR2032 coin cell. As you can see in the video after the break, assembly is about as quick and straight-forward as it gets.

As with the original, there’s no accelerometer onboard. If you want to see a new message from your mystic companion, you’ve got to hold the button to “shake” the ball. A timer counts how long the button is held down, which in turn seeds the pseudorandom number generator that picks the response. Since each person will naturally hold the button for a slightly different amount of time, this keeps things from getting repetitive.

We don’t often see creators revisit their projects from the olden days, but we’d certainly like to. Consider this an open invitation to any hacker who wants to show off how much they’ve refined their skills; do-overs are always welcome here at Hackaday.

Continue reading “Magic 8-Ball Gets A Modern Makeover”

Remoticon Video: KiCad To Blender PCB Renders

We seem to want our PCB design software to do everything these days, and it almost delivers. You can not only lay it all out, check electrical and design rules, and even spit out a bill of materials, but many PCB tools produce 3D models that are good enough to check parts clearance or are useful in designing enclosures. But when it comes to producing photorealistic output, whether for advertising or just for eye-candy, you might want to turn to 3D design tools.

In this workshop, Anool Mahidharia takes the output of KiCad’s VRML export, gets it rendering in Blender, and then starts tweaking the result until you’re almost not sure if it’s the real thing or a 3D model. He starts off with a board in KiCad, included in the project’s GitHub repo, and you can follow along through the basic import, or go all the way to copying the graphics off the top of an ATtiny85 and making sure that the insides of the through-plated holes match the tops.

If you don’t know Blender, maybe you don’t know how comprehensive a 3D modelling and animation tool it is. And with the incredible power comes a notoriously steep learning curve up a high mountain. Anool doesn’t even try to turn you into a Blender expert, but focuses on the tweaks and tricks that you’ll need to make good looking PCB renders. You’ll find general purpose Blender tutorials everywhere on the net, but if you want something PCB-specific, you’ve come to the right place.

Continue reading “Remoticon Video: KiCad To Blender PCB Renders”

Bare-Metal STM32: Exploring Memory-Mapped I/O And Linker Scripts

In the first installment of this series we had a brief look at the steps needed to get a bare-metal application running on an STM32 microcontroller. While this allowed us to quickly get to the juicy stuff, there are two essential elements which make an MCU so easy to use. One is found on the hardware side, in the form of so-called memory-mapped I/O (input/output), the other is the information contained in the files that are passed to the linker when we build a firmware image.

Memory-mapping of hardware peripheral registers is a straightforward way to make them accessible to the processor core, as each register is accessible as a memory address. This is both convenient when writing the firmware code, as well as for testing, as we can use a memory mapping specific for unit or integration testing.

We will take an in-depth look at this way of testing, as well as how these linker script files are connected to the memory layout. Continue reading “Bare-Metal STM32: Exploring Memory-Mapped I/O And Linker Scripts”

For Your Holiday Relaxation: The Clickspring Sundial Build Megacut

The fortunate among us may very well have a bit of time off from work coming up, and while most of that time will likely be filled with family obligations and festivities, there’s probably going to be some downtime. And if you should happen to find yourself with a half hour free, you might want to check out the Clickspring Byzantine Calendar-Sundial mega edit. And we’ll gladly accept your gratitude in advance.

Fans of machining videos will no doubt already be familiar with Clickspring, aka [Chris], the amateur horologist who, through a combination of amazing craftsmanship and top-notch production values, managed to make clockmaking a spectator sport. We first caught the Clickspring bug with his open-frame clock build, which ended up as a legitimate work of art. [Chris] then undertook two builds at once: a reproduction of the famous Antikythera mechanism, and the calendar-sundial seen in the video below.

The cut condenses 1,000 hours of machining, turning, casting, heat-treating, and even hand-engraving of brass and steel into an incredibly relaxing video. There’s no narration, no exposition — nothing but the sounds of metal being shaped into dozens of parts that eventually fit perfectly together into an instrument worthy of a prince of Byzantium. This video really whets our appetite for more Antikythera build details, but we understand that [Chris] has been busy lately, so we’ll be patient.

Continue reading “For Your Holiday Relaxation: The Clickspring Sundial Build Megacut”