HotWheels

DIY Hot Wheels Drag Race Timer

[Apachexmd] wanted to do something fun for his three-year-old son’s birthday party. Knowing how cool race cars are, he opted to build his own Hot Wheels drag race timer. He didn’t take the easy way out either. He put both his electronics and 3D printing skills to the test with this project.

The system has two main components. First, there’s the starting gate. The cars all have to leave the gate at the same time for a fair race, so [Apachexmd] needed a way to make this electronically controlled. His solution was to use a servo connected to a hinge. The hinge has four machine screws, one for each car. When the servo is rotated in one direction, the hinge pushes the screws out through holes in the track. This keeps the cars from moving on the downward slope. When the start button is pressed, the screws are pulled back and the cars are free to let gravity take over.

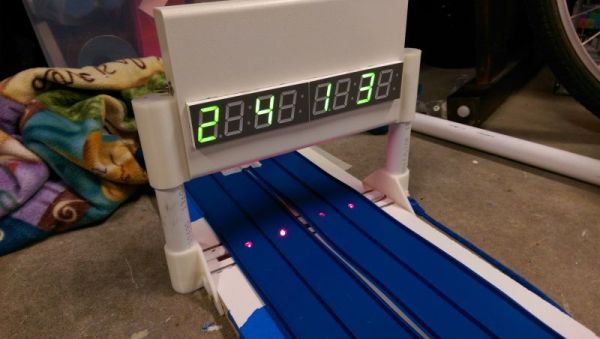
The second component is the finish line. Underneath the track are four laser diodes. These shine upwards through holes drilled into the track. Four phototransistors are mounted up above. These act as sensors to detect when the laser beam is broken by a car. It works similarly to a laser trip wire alarm system. The sensors are aimed downwards and covered in black tape to block out extra light noise.

Also above the track are eight 7-segment displays; two for each car. The system is able to keep track of the order in which the cars cross the finish line. When the race ends, it displays which place each car came in above the corresponding track. The system also keeps track of the winning car’s time in seconds and displays this on the display as well.

The system runs on an Arduino and is built almost exclusively out of custom designed 3D printed components. Since all of the components are designed to fit perfectly, the end result is a very slick race timer. Maybe next [Apachexmd] can add in a radar gun to clock top speed. Check out the video below to see it in action. Continue reading “DIY Hot Wheels Drag Race Timer”

Little Sister’s Turn For Hobby Electronic Party Favors

little-sisiters-turn-for-hobby-electronic-party-favors

[Ian Lee, Sr.] made something special for his daughter’s birthday party. It’s pretty common for girls of this age (this was her 5th birthday) to be enthralled with stories of princesses so he made a blinky princess wand for each party guest. The motivation came when she asked what special thing he was going to do for her celebration. You may remember seeing the LED badge kits that were featured at her brother’s party earlier this year. From the look of the party guests he surely satisfied her desire for a memorable party.

The project is very inexpensive, extremely easy to assemble, and might make a perfect kit for supervised Kindergarteners. It’s basically an LED throwie with a stick and a feather added. [Ian] used CR2032 batteries along with an LED and current limiting resistor to light things up. He clipped off one leg of the LED and replaced it by soldering the LED in place. The remaining leads were then pressed to either side of the coin cell and the whole thing was shoved into a slit cut in the end of a balloon rod. The whole thing was wrapped tightly in with a rubber band before being crowned with a ping pong ball. To trim it out he hot glued a feather at the base of the ball.

The only think that has us worried is what he’s going to do next year to top these parties.

Birthday Badges Teach Kids How To Solder

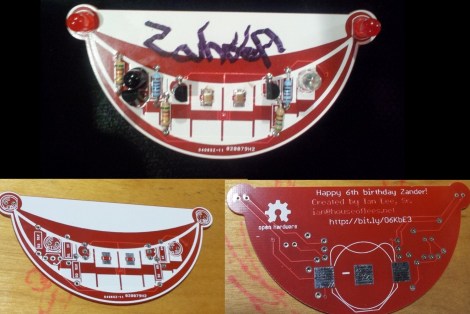
[Ian Lee, Sr] wanted to have an educational activity at his younger son’s birthday party. These were uncharted waters for him as he doesn’t remember education taking place at his own early birthday parties. But he came up with a great idea, with was to teach soldering using interactive badges which each guest could assemble themselves. He needed about twenty, so he tried to keep the BOM as small as possible. But that didn’t mean skimping on features.

You can see the black LED-type package on the left of the assembled badge above. This is an IR receiver whose counterpart transmitter is on the right side of the board. When two of these get within 6-8″ of each other the start talking back and forth. There is no microcontroller involved, instead the system relies on a multivibrator design. One of the red LEDs at the corner of the ‘smile’ is always blinking. When it is off, the IR transmitter is powered. This is picked up by another badge’s receiver, which lights the second ‘smile’ LED. You can see this happen in the short clip after the break.

Although there are relatively few components that went into this, it would take the kids a long time to put them together as they’re just learning. [Ian] and his eldest son soldered on all of the components except for the resistors beforehand.

Continue reading “Birthday Badges Teach Kids How To Solder”

Edge-lit Musical Birthday Card

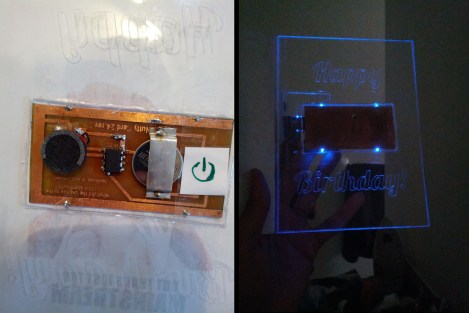
[Monirul Pathan] decided to make the card as unique as this gift when getting ready for a birthday. He designed and built his own musical card with LED edge-lit acrylic to display the message.

The electronic design seeks to keep things as flat as possible. The card-shaped acrylic panel has a void to fit the PCB exactly, and the components are relatively flat. One thing we found quite interesting is that the ATtiny85 which drives the device is surface mounted, but it is not a surface mount component. The layout includes though-hole pads, but instead of drilling holes [Monirul] clipped off the excess of the DIP legs and soldered the remainder directly to the copper. We suppose this isn’t going to get a lot of use so it just needs to hold together for one day.

As you can see in the video after the break, the speaker plays ‘Happy Birthday’ followed by ‘Under the Sea’. At the same time, four blue LEDs pulse to the music, lighting up the words that are engraved in the plastic.

Continue reading “Edge-lit Musical Birthday Card”

Hack A Day Turns 5

hackaday_turns_five

September 5th marks the fifth anniversary of Hack a Day. We hope you’ve had as much fun hacking, reading, and sending us stories as we’ve had sharing them with everyone.

Whether you destroyed your hard drives or built your own web server we tried to keep things interesting over the past year. It was easy at times because of cool parking meter hacks, great advances in the world of hackintosh, and steam powered pleasure devices. But we couldn’t have done any of it without you. So keep reading, don’t forget to send us your hacks, and we’ll serve up the latest and juciest as we find it. We thought about putting up a list of the best hacks we’ve covered over the last five years. We’d rather hear what you think, so please leave a comment to let us know what your favorites have been.

Happy Birthday Internet: 5 History Videos

Leonard-Kleinrock-and-IMP1

National Geographic has pegged September 2, 2009 as the 40th anniversary of the Internet. They do not cite their source and our source doesn’t make the same claim. But, August 30, 1969 is the date the first Interface Message Processor was delivered to the Arpanet. The IMP is what allowed different computer networks to talk to each other and so it follows that September 2 is probably an acceptable date to celebrate.

To commemorate this glorious day we’re sharing some of our favorite History of the Internet videos. Start with the National Geographic video and then take in the geeky, the new, the old, and the simple. Continue reading “Happy Birthday Internet: 5 History Videos”

Breath Controlled LED Candles


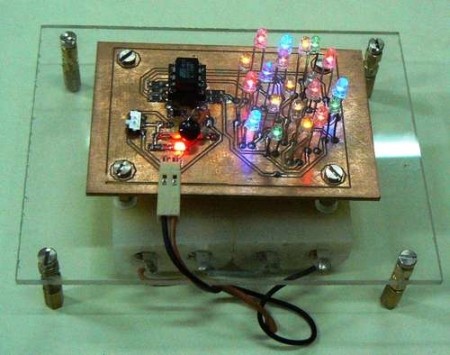
Instructables user [cedtlab] has posted an interesting LED project that simulates birthday candles. The circuit runs on an AVR ATTiny45, and is powered by 4 AA or AAA batteries. By using a Charliplexing technique, they are able to drive all 20 LEDs with only 5 pins of the ATTiny. A thermistor is used for detecting breath by measuring temperature changes, and then blocks of LEDs turn off depending on the change detected. They have provided schematics and source code for everything. Make sure to check out the video of the “ficticious birthday party” after the break.

Continue reading “Breath Controlled LED Candles”