Calculator Remote with Launchpad

Calculator + MSP430 + IR LED = TV Remote?

Eschewing the store-bought solution, [Stefan] managed to build a TV remote out of an old calculator. The brains of the calculator were discarded and replaced with an MSP430, leaving only the button matrix and enclosure. Rather than look it up, he successfully mapped the matrix manually before getting stumped with the infrared code timings. Some research pointed him to a peculiarity with Samsung IR codes and with help from an open source remote control library he got it working.

When the range was too limited to satisfy him he added a booster circuit and an LED driver which he snapped off the top of an old remote; now it works from 30 feet away. Some electrical tape and hot glue later and it all fit back into the original case.

It cannot take photos or play Super Smash Brothers, but it does what a remote needs to do: browses channels in the guide, control volume, and turn the TV on or off. Considering that all this calculator was built to do was boring basic arithmetic, it is a procrastination-enabling upgrade.

See the video after the break for some smiles.

Continue reading “Calculator + MSP430 + IR LED = TV Remote?”

ArTICam Interfaces Game Boy Camera With TI Calculators

[Christopher Mitchell] has given Texas Instruments calculators the ability to capture images through a Game Boy Camera with ArTICam. First introduced in 1998, The Game Boy Camera was one of the first low-cost digital cameras available to consumers. Since then it has found its way into quite a few projects, including this early Atmel AT90 based hack, and this Morse code transceiver.

TI calculators don’t include a Game Boy cartridge slot, so [Christopher] used an Arduino Uno to interface the two. He built upon the Arduino-TI Calculator Linking (ArTICL) Library  to create ArTICam. Getting the Arduino to talk with the Game Boy Camera’s M64282FP image sensor turned out to be easy, as there already are code examples available. The interface between the camera sensor and the Arduino is simple enough. 6 digital lines for an oddball serial interface, one analog sense line, power and ground. [Christopher] used a shield to solder everything up, but says you can easily get away with wiring directly the Arduino Uno’s I/O pins. The system is compatible with the TI-83 Plus and TI-84 Plus family of calculators. Grabbing an image is as simple as calling  GetCalc(Pic1) from your calculator program.

So, If you have an old calculator lying around, give it a try to enjoy some 128×123-pixel grayscale goodness!

Super Smash Bros On A Calculator

Move over, BlockDude! There’s a new calculator game in town. [Hayleia] and a few other programmers have been hard at work on a clone of Super Smash Bros for graphing calculators that is sure to keep you busy in your next calculus class.

The game, called Smash Bros Open, is based on the Nintendo fighting game and is written specifically for monochrome z80 calculators (the TI-83 and TI-84 being the most ubiquitous of these). The game runs in 6 MHz mode with a simple background, or it can run in 15 MHz mode with a more complicated background. The programmers intend for the game to be open source, so that anyone can add anything to the games that they want, with the hopes of making the game true to its namesake.

Anyone who is looking to download a copy of this should know that Smash Bros Open is currently a work-in-progress. Right now both players need to play on the same calculator (with different keys), and Fox is the only playable character. The programmers hope to resolve the two player issue by using a second calculator as a game pad, or by linking the two calculators using Global CalcNet. As for the other characters, those can be added by others based on the existing code which is available on the project’s forum post!

Thanks to [Chris] for the tip.

Nixies And Raspis For A Modern Vintage Calculator

There are a few very rare and very expensive calculators with Nixie tube displays scattered about calculator history, but so far we haven’t seen someone build a truly useful Nixie calculator from scratch. [Scott] did just that. It’s a complete, fully-functional electronic calculator with all the functions you would expect from a standard scientific calculator.

The calculator uses IN-12 Nixies, the standard for anyone wanting to build a clock or other numerical neon discharge display. Each Nixie is controlled by a K155D driver chip, with the driver chip controlled by an I2C IO expander.

The keypad is where this gets interesting; electronics are one thing, but electromechanicals and buttons are a completely new source of headaches. [Scott] ended up using Cherry MX Blue switches, one of the more common switches for mechanical keyboards. By using a standard keyboard switch [Scott] was able to get custom keycaps made for each of the buttons on his calculator.

The brains of the calculator is a Raspberry Pi, with the I2C pins going off to listen in on the several IO expanders on the device. A Raspi might be a little overkill, but an Internet-connected calculator does allow [Scott] to send calculations off to WolframAlpha, or even the copy of Mathematica included in every Pi.

[Scott] has put his project up on Kickstarter. Videos below.

Continue reading “Nixies And Raspis For A Modern Vintage Calculator”

Starting To Wrap Up Maker Faire

It’s almost a week since the NYC Maker Faire, and it’s about time for us to start wrapping up all the posts we’re doing on everything we’ve seen.

DSC_0216[Chris Mitchell], hackaday favorite from Cemetech did what he always does at Maker Faire: brought some stuff he’s doing with TI graphing calculators.

The TI-84 with GPS made a showing, as did the graphing calculator IRC client. By far the coolest looking calculator was the wooden casemod. It’s a TI-82 put into a (what feels and looks like) a maple enclosure. The buttons are painted on, and despite stuffing consumer electronics into a handmade case, it’s still reasonable portable.

DSC_0201There were more Hackaday fans at the faire, but I’m not sure if anyone can beat the guys from Protopalette. Wait. One guy could. Find me in public sometime and I’ll tell you about that.

The Protopalette is a board with a bunch of lights, buttons, switches, sensors, knobs, servos, and buzzers for electronics prototyping. Think of it as a stylized version of the old ‘parts and springs and wire’ radio shack beginner electronic kits.

DSC_0160

Some of the members of the hackerspace with the craziest group narrative, LVL1 in Louisville, made it to the faire. They’re working with GE to create a ‘maker module’ for appliances. It’s called Green Bean, and GE is actually building support for this into some of their fridges, washers, stoves and dishwashers.

There are a few modules already, like a scale that will send out a message when you’re out of milk. It’s an interesting system, and there are already a lot of appliances that support the system.

Pics below.

Continue reading “Starting To Wrap Up Maker Faire”

Retrotechtacular: The CURTA Mechanical Calculator

The CURTA mechanical calculator literally saved its inventor’s life. [Curt Herzstark] had been working on the calculator in the 1930s until the Nazis forced him to focus on building other tools for the German army. He was taken by the Nazis in 1943 and ended up in Buchenwald concentration camp. There, he told the officers about his plans for the CURTA. They were impressed and interested enough to let him continue work on it so they could present it as a gift to the Führer.

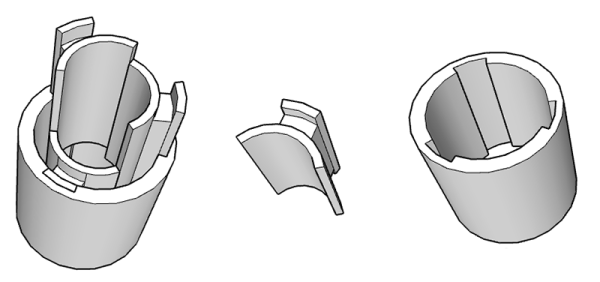
This four-banger pepper mill can also perform square root calculation with some finessing. To add two numbers together, each must be entered on the digit setting sliders and sent to the result counter around the top by moving the crank clockwise for one full rotation. Subtraction is as easy as pulling out the crank until the red indicator appears. The CURTA performs subtraction using nine’s complement arithmetic. Multiplication and division are possible through successive additions and subtractions and use of the powers of ten carriage, which is the top knurled portion.

Operation of the CURTA is based on [Gottfried Leibniz]’s stepped cylinder design. A cylinder with cogs of increasing lengths drives a toothed gear up and down a shaft. [Herzstark]’s design interleaves a normal set of cogs for addition with a nine’s complement set. When the crank is pulled out to reveal the red subtraction indicator, the drum is switching between the two sets.

Several helper mechanisms are in place to enhance the interface. The user is prevented from ever turning the crank counter-clockwise. The crank mechanism provides tactile feedback at the end of each full rotation. There is also a lock that disallows switching between addition and subtraction while turning the crank—switching is only possible with the crank in the home position. There is a turns counter on the top which can be set to increment or decrement.

You may recall seeing Hackaday alum [Jeremy Cook]’s 2012 post about the CURTA which we linked to. A great deal of information about the CURTA and a couple of different simulators are available at curta.org. Make the jump to see an in-depth demonstration of the inner workings of a CURTA Type I using the YACS CURTA simulator.

Continue reading “Retrotechtacular: The CURTA Mechanical Calculator”

THP Entry: A Theatrical Lighting Controller Powered By A Calculator

DMX

Theatrical lighting usually runs with the help of DMX, a protocol that’s basically MIDI for lights; small, lightweight, ancient, and able to run on the lowest spec computers imaginable. For his Hackaday Prize entry, [Alex] figured a regular ‘ol graphing calculator was sufficient to run a complete DMX controller, and with the help of an Arduino, figured out a way to do it.

The hardware for the system consists of a TI-84 graphing calculator, a few bits and bobs in the way of components, and an Arduino Pro Mini powered from the USB port on the calculator. The Arduino handles the transmitting of DMX packets at 250 kbaud using the DMXSimple library over a 5-pin XLR jack.

The software running on the calculator is where the novel part of the project begins. The software is designed to be extremely lightweight, sending packets to the Arduino using the 2-wire link cable. DMX Commands are wrapped up and transferred using the TI-83/84 link protocol, decoded on the Arduino, and sent out to the lighting rig.

While this probably won’t replace the multi-thousand dollar lighting consoles found in theatres, it’s still a very handy and portable tool for debugging lights. It’s also [Alex]’s My First Electronics Project™, and a pretty good one at that.


SpaceWrencherThe project featured in this post is an entry in The Hackaday Prize. Build something awesome and win a trip to space or hundreds of other prizes.