See If You Can Reverse Engineer This Scrap Metal Battery

We got quite a few tips in about a paper from Vanderbilt about a cool scrap metal battery they’ve been playing with. They made some pretty bold claims and when we fed the numbers in they pretty much say they’ve got a battery you can make at home, that can hold half as much as a lead acid, can be made out of scraps in a cave (even if you’re not Tony Stark), charge super fast,and can cycle 5,000 times without appreciable capacity loss.  Needless to say that’s super cool.

Of course, science research is as broken as ever and the paper was hidden behind a paywall. Through mysterious powers such as the library and bothering people we were able to get past this cunning defense and read the paper. Unfortunately the paper reads more like a brag track than a useful experimental guide on how to build the dang battery. It’s also possible that our copy was missing some pages. Anyway, we want to do science!

Anyway, here’s what we know. The battery is based on an ancient battery called the Baghdad Battery. The ancient battery supposedly used iron and copper with a mystery electrolyte. The scrap battery, however, is made from scrap iron and scrap brass. The iron makes sense, but why brass? Well, brass has copper in it, and you can still get at it chemically even if it’s alloyed.

To that end, the next step was to throw some oxygen atoms in with those pesky Fe and Cu ones. The goal is to get a redox reaction going. If you do it right you can achieve pseudocapacitance. To to this the researchers used “common household chemicals and voltages” to anodize the iron and copper inside the brass. The press photo have them holding a gallon of muratic acid, if that helps. We don’t know, but if they can jam a few oxygen atoms in there then so can we!

After that it’s all about sitting the electrodes in a bath of potassium hydroxide. We guess you can scrape the inside of an AA for that. Anyway, the paper’s light on process but the battery seems really cool. They’re not pursuing this research for commercialization, instead going the OSHW route. They hope to get to the point where anyone can just grind up a bunch of scrap steel and brass, maybe throw it in a birdcage, anodize it, and get a super long life battery for grid use for less than a lead acid. If any of you manage to build one of these drop us a tip!


A Quick History Of The Battery

[Colin] tells us it all started with [Benjamin Franklin]’s battery of capacitors. It was a bunch of leyden jars hooked together in series and there wasn’t even chemistry involved yet, but the nomenclature stuck and it wasn’t long before it evolved into the word we use today.

For the word to change, things got chemical. [Alessandro Volta] introduces his voltaic pile. Once scientists latched onto the idea of a stable reaction giving a steady stream of magic pixies for them to play with, it wasn’t long before the great minds were turning their attention to improving this new technology.

In the classic game of one-upmanship loved by technical people all over, we quickly skip forward to the modern era. An era where no man is unburdened with the full weight of constant communication. It’s all thanks to a technology that’s theoretically unchanged from that first pile. Video after the break.

Continue reading “A Quick History Of The Battery”

Etching Your Own Metal

It’s been said that with enough soap, one could blow up just about anything. A more modern interpretation of this thought is that with enough knowledge of chemistry, anything is possible. To that end, [Peter] has certainly been doing a good job of putting his knowledge to good use. He recently worked out a relatively inexpensive and easy way to etch metals using some chemistry skill and a little bit of electricity.

After preparing a set of stencils and cleaning the metal work surface, [Peter] sets his work piece in a salt solution. A metal bar is inserted in the other end of the bath, and both it and the work piece are connected to electrodes. The flow of electricity removes some metal from the exposed work surfaces, producing whatever patterns [Peter] wants.

One interesting thing that [Peter] found is that the voltage must stay under 6 volts. This is probably part of the reason it’s relatively easy to etch with even a wall wort. Above that, the iron work piece produces a different ion which can clog the work surface and create undesirable effects. Additionally, since his first experiments with this process he has upgraded the salt bath with magnetic stirrers. He also gets the best results in a very cold environment.

There are many other uses for etching metals, too. Creating your own printed circuit boards comes to mind, but there are plenty of other uses as well. What will you do with this technique?

Ask Hackaday: How Do You Make A Hotplate?

Greetings fellow nerds. The Internet’s favorite artificial baritone chemist has a problem. His hotplates burn up too fast. He needs your help to fix this problem.

[NurdRage] is famous around these parts for his very in-depth explorations of chemistry including the best ways to etch a PCB, building a thermometer probe with no instructions, and chemical synthesis that shouldn’t be performed by anyone without years of experience in a lab. Over the past few years, he’s had a problem: hotplates suck. The heating element is usually poorly constructed, and right now he has two broken hotplates on his bench. These things aren’t cheap, either: a bare-bones hotplate with a magnetic stirrer runs about $600.

Now, [NurdRage] is asking for help. He’s contacted a few manufacturers in China to get a hundred or so of these hotplate heating elements made. Right now, the cost for a mica and metal foil hotplate is about $30 / piece, with a minimum order quantity of 100. That’s $3,000 that could be better spent on something a bit more interesting than a heating element, and this is where you come in: how do you build the heating element for a hotplate, and do it cheaply?

If you buy a hotplate from the usual lab equipment supplier, you’ll get a few pieces of mica and a thin trace of metal foil. Eventually, the metal foil will oxidize, and the entire hotplate will stop working. Repairs can be done with copper tape, but by the time that repair is needed, the heating element is already on its way out.

The requirements for this heating element include a maximum temperature of around 350 ºC. That’s a fair bit hotter than any PCB-based heat bed from a 3D printer gets, so consider that line of reasoning a dead end. This temperature is also above what most resins, thermoplastics, and composites can handle, which is why these hotplates use mica as an insulator.

Right now, [NurdRage] will probably end up spending $3,000 for a group buy of these heating elements. That’s really not that bad – for the price of five hotplates, he’ll have enough heating elements to last through the rest of his YouTube career. There must be a better way, though, so if you have an idea of how to make a high-temperature heating element the DIY way, leave a note in the comments.

Lego-Like Chemistry And Biology Erector Set

A team of researchers and students at the University of California, Riverside has created a Lego-like system of blocks that enables users to custom build chemical and biological research instruments. The system of 3D-printed blocks can create a variety of scientific tools.

The blocks, which are called Multifluidic Evolutionary Components (MECs) appeared in the journal PLOS ONE. Each block in the system performs a basic lab instrument task (pumping fluids, making measurements or interfacing with a user, for example). Since the blocks are designed to work together, users can build apparatus — like bioreactors for making alternative fuels or acid-base titration tools for high school chemistry classes — rapidly and efficiently. The blocks are especially well suited for resource-limited settings, where a library of blocks can create a variety of different research and diagnostic tools.

Continue reading “Lego-Like Chemistry And Biology Erector Set”

You Can Learn A Lot From A Candle

Beginning in 1827, [Michael Faraday] began giving a series of public lectures at Christmas on various subjects. The “Christmas Lectures” continued for 19 years and became wildly popular with upper-class Londoners. [Bill Hammack], aka [The Engineer Guy], has taken on the task of presenting [Faraday]’s famous 1848 “The Chemical History of a Candle” lecture in a five-part video series that is a real treat.

We’ve only gotten through the first episode so far, but we really enjoyed it. The well-produced lectures are crisply delivered and filled with simple demonstrations that drive the main points home. [Bill] delivers more or less the original text of the lecture; some terminology gets an update, but by and large the Victorian flavor of the original material really comes through. Recognizing that this might not be everyone’s cup of tea, [Bill] and his colleagues provide alternate versions with a modern commentary audio track, as well as companion books with educational guides and student worksheets. This is a great resource for teachers, parents, and anyone looking to explore multiple scientific disciplines in a clear, approachable way.

If there were an award for the greatest scientist of all time, the short list would include [Faraday]. His discoveries and inventions in the fields of electricity, magnetism, chemistry, and physics spanned the first half of the 19th century and laid the foundation for the great advances that were to follow. That he could look into a simple candle flame and see so much is a testament to his genius, and that 150 years later we get to experience a little of what those lectures must have been like is a testament to [Bill Hammack]’s skill as an educator and a scientist.

Continue reading “You Can Learn A Lot From A Candle”

The (Copper) Crystal Method

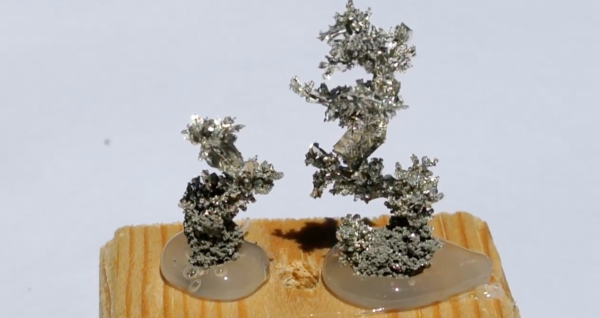
One of the staples of kitchen chemistry for kids is making sugar crystals or rock candy. Why not? It is educational and it tastes good, too. [Science with Screens] has a different kind of crystal in mind: copper crystals. You can see the result in the video below.

To grow pure metal crystals, he used copper wire and copper sulfate. He also used a special regulated power supply to create a low voltage to control the current used to form the crystal. The current needed to be no more than 10mA, and an LM317 holds the voltage constant. However, that regulator only goes as low as 1.25V, so diodes cut a volt off the output.

Continue reading “The (Copper) Crystal Method”