What’s Inside A Neonode Laser Sensor?

Every once in a while, you get your hands on a cool piece of hardware, and of course, it’s your first instinct to open it up and see how it works, right? Maybe see if it can be coaxed into doing just a little bit more than it says on the box? And so it was last Wednesday, when I was at the Embedded World trade fair, and stumbled on a cool touch display floating apparently in mid-air.

The display itself was a sort of focused Pepper’s Ghost illusion, reflected off of an expensive mirror made by Aska3D. I don’t know much more — I didn’t get to bring home one of the fancy glass plates — but it looked pretty good. But this display was interactive: you could touch the floating 2D projection as if it were actually there, and the software would respond. What was doing the touch response in mid-air? I’m a sucker for sensors, so I started asking questions and left with a small box of prototype Neonode zForce AIR sensor sticks to take apart.
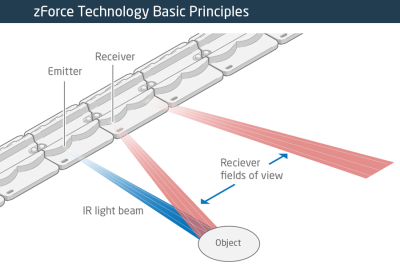
The zForce sensors are essentially an array of IR lasers and photodiodes with some lenses that limit their field of view. The IR light hits your finger and bounces back to the photodiodes on the bar. Because the photodiodes have a limited angle over which they respond, they can be used to triangulate the distance of the finger above the display. Scanning quickly among the IR lasers and noting which photodiodes receive a reflection can locate a few fingertips in a 2D space, which explained the interactive part of the floating display. With one of these sensors, you can add a 2D touch surface to anything. It’s like an invisible laser harp that can also sense distance.

The intended purpose is fingertip detection, and that’s what the firmware is good at, but it must also be the case that it could detect the shape of arbitrary (concave) objects within its range, and that was going to be my hack. I got 90% of the way there in one night, thanks to affordable tools and free software that every hardware hacker should have in their toolbox. So read on for the unfortunate destruction of nice hardware, a tour through some useful command-line hardware-hacking tools, and gratuitous creation of animations from sniffed SPI-like data pulled off of some test points.

Continue reading “What’s Inside A Neonode Laser Sensor?”

Mangling Images With Audio Effects

Ever wonder what those snapshots you took of your trip to Paris would look like if you ran them through a Proco RAT or a Boss Overdrive? How about a BF-3 flanger? [Robert Foss] wrote in with this nifty little script (GitHub) that processes images as if they were audio files so that you can try it out without investing in a rack of analog pedals. Test your audio/visual DSP intuition and see if you can name the images without looking at the effects.

If you know your Linux command-line utilities, there’s really not much to it — scroll down to the very bottom of the script to see how it’s done. ffmpeg converts the images to YUV format, which works much better than RGB for audio processing, and then sox adds the audio effects. Another trip through ffmpeg gets you back to an image or video.

OK, it’s cheating because it’s applying the audio effects inside the computer, but nothing’s stopping you from actually taking the audio out and running it through that dusty Small Stone. Of course, once you’ve got audio outside of the computer, the world is your oyster. Relive the glorious 70’s when video artists made works using souped-up audio synthesizers. If you haven’t seen the Sandin Image Processor or the Scanimate in action, you’ve got some YouTubing to do.

Protocol Snooping Digital Audio

More and more clubs are going digital. When you go out to hear a band, they’re plugging into an ADC (analog-to-digital converter) box on stage, and the digitized audio data is transmitted to the mixing console over Ethernet. This saves the venue having to run many audio cables over long distances, but it’s a lot harder to hack on. So [Michael] trained popular network analysis tools on his ProCo Momentum gear to see just what the data looks like.

[Michael]’s writeup of the process is a little sparse, but he name-drops all the components you’d need to get the job done. First, he simply looks at the raw data using Wireshark. Once he figured out how the eight channels were split up, he used the command-line version (tshark) and a standard Unix command-line tool (cut) to pull the data apart. Now he’s got a text representation for eight channels of audio data.

Using xxd to convert the data from text to binary, he then played it using sox to see what it sounded like. No dice, yet. After a bit more trial and error, he realized that the data was unsigned, big-endian integers.  He tried again, and everything sounded good. Success!

While this is not a complete reverse-engineering tutorial like this one, we think that it hits the high points: using a bunch of the right tools and some good hunches to figure out an obscure protocol.

The Arduino Operating System

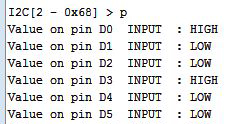
WGPIOhile Arduino and its libraries are the quickest way to interface with a sensor and blink an LED, sometimes you shouldn’t have to write and compile code to do something exceptionally simple. [Oliver] realized most of the overly simple functions of a microcontroller could be done from a command line running on that microcontroller and came up with the MiniPirate, the Arduino command line tool.

The MiniPirate is just a sketch compiled on the Arduino that allows pins to be set high or low, set a PWM value, or reading and writing I2C bytes. It’s basically an extremely slimmed down version of the Bus Pirate meant for extremely simple modifications of circuits and peripherals.

[Oliver] demos his MiniPirate by taking a DS1307 real-time clock, wiring up the I2C bus, and writing values to set the time. It’s a very simple implementation meaning he needs to write everything in hex, but it’s still easy enough to find a use in many other projects.

Headless Tethering Between Raspberry Pi And IPhone

rpi-iphone-tethering

This hack doesn’t necessarily have a target application. But there’s a lot of potential. It’s a headless setup for tethering your Raspberry Pi to an iPhone. Building sensor arrays that upload to the Internet (live or just to dump its logs)  immediately comes to mind. But we’re sure there are a ton of other applications just waiting to be thought of.

Tethering is pretty simple with the Raspberry Pi. Just install a few packages that are available in the repositories and make a quick configuration file tweak to allow hot-plugging. But this is dependent on the iPhone being mounted and that task is normally only automatic if the GUI is running. To get by without the X desktop [Dave Controy] walks through the ifuse setup to mount the phone from command line. The result is that your RPi will establish a network connect whenever the iPhone is plugged into it, without any intervention from you.

[Thanks Michael]

Computing With The Command Line

Here’s something we thought we would never see: computing with just pipes, /dev/zero, and /dev/null.

As a thought experiment, [Linus] imagined a null byte represented an electron. /dev/zero would have an infinite supply of electrons and /dev/null would make a wonderful positive power supply. With a very short program (named mosfet.c), [Linus] can use Linux pipes to control the flow of electrons between /zero and /null. [Linus] used mosfet.c with a very short shell script to create a NAND gate. From there all bets were off. He ended up creating a D flip-flop4-bit adder and a counter.

From a bit of cursory research, Linux has a maximum pipe capacity of 1,048,576 bytes and the maximum number of PIDs is 4,194,304 (correct us if we’re wrong). [Linus]  can theoretically build some of the classic CPUs of the 70s and 80s with his pipe logic. An Intel 486 is just out of reach, though. If you give someone a NAND or a NOR they’ll eventually build a computer; we thought we’d never see this, though.

So You Want To Make A Command Line Interface

[Keba] not only asked Answeres.HackaDay.com, but also sent us an email as follows.

“Can you make a basic guide to designing a good Command Line User Interface?”

Wouldn’t you know the luck, I’m currently working on a Command Line type interface for a project of mine. While after the jump I’ll be walking through my explanation, it should be noted that the other replies to Answers.HackaDay.com are also great suggestions.

Continue reading “So You Want To Make A Command Line Interface”