Our Favorite Things: Binary Search

You might not think that it would be possible to have a favorite optimization algorithm, but I do. And if you’re well-versed in the mathematical art of hill climbing, you might be surprised that my choice doesn’t even involve taking any derivatives. That’s not to say that I don’t love Newton’s method, because I do, but it’s just not as widely applicable as the good old binary search. And this is definitely a tool you should have in your toolbox, too.

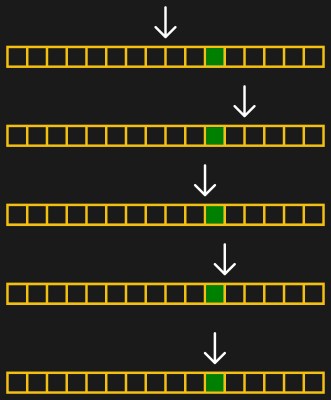
Those of you out there who slept through calculus class probably already have drooping eyelids, so I’ll give you a real-world binary search example. Suppose you’re cropping an image for publication on Hackaday. To find the best width for the particular image, you start off with a crop that’s too thin and one that’s too wide. Start with an initial guess that’s halfway between the edges. If this first guess is too wide, you split the difference again between the current guess and the thinnest width. Updated to this new guess, you split the differences again.

But let’s make this even more concrete: an image that’s 1200 pixels wide. It can’t get wider than 1200 or thinner than 0. So our first guess is 600. That’s too thin, so we guess 900 — halfway between 600 and the upper limit of 1200. That ends up too wide, so we next guess 750, halfway between 600 and 900. A couple more iterations get us to 675, then 638, and then finally 619. In this case, we got down to the pixel level pretty darn fast, and we’re done. In general, you can stop when you’re happy, or have reached any precision goal.

[Ed note: I messed up the math when writing this, which is silly. But also brought out the point that I usually round the 50% mark when doing the math in my head, and as long as you’re close, it’s good enough.]

What’s fantastic about binary search is how little it demands of you. Unlike fancier optimization methods, you don’t need any derivatives. Heck, you don’t even really need to evaluate the function any more precisely than “too little, too much”, and that’s really helpful for the kind of Goldilocks-y photograph cropping example above, but it’s also extremely useful in the digital world as well. Comparators make exactly these kinds of decisions in the analog voltage world, and you’ve probably noticed the word “binary” in binary search. But binary search isn’t just useful inside silicon. Continue reading “Our Favorite Things: Binary Search”

A computer program written in basic next to a modular synthesizer with many switches and lights

Modular Synth Pairs Perfectly With The Apple II

We have a soft spot for synthesizers – seriously, who doesn’t? So when [Joshua Coleman] combined his retro-looking DIY modular synth with the equally retro Apple II computer, we just had to share it with you.

The two machines are paired using a vintage digital-to-analog logic controller pack. This DAC was originally used to control model trains using your Apple II – something that we now desperately need to see in action. The pack can output voltages between 0 and 2.55 V at 8-bit resolution (or 256 steps), which is plenty for a retro synth.

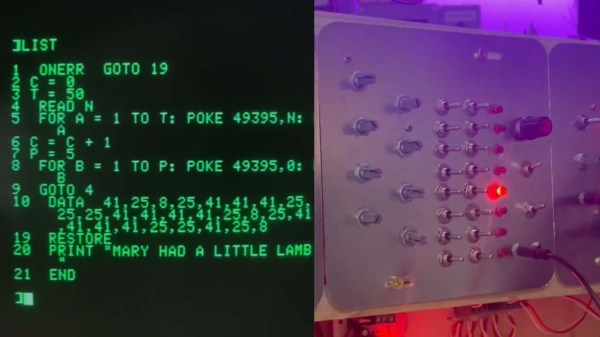
With the card installed in Slot 7 of the Apple II and the DAC wired through to the synth’s CV/gate, it’s then a trivial matter of writing POKE statements in Applesoft BASIC to control the synth. The video after the break demonstrates playing a simple melody, as well as how one might use the Apple II keyboard to ‘play’ the synth in real time.

If you’re interested in building your own, the video below has all the information needed, as well as helpful advice on where to find a DAC for your preferred model of vintage computer. If all that doesn’t tickle your musical fancy, make sure to check out our coverage on the Game Boy MIDI synth, or perhaps this peculiar synth and visualizer combo.

Continue reading “Modular Synth Pairs Perfectly With The Apple II”

Know Audio: It All Depends On The DAC

Our trip through the world of audio technology has taken us step-by step from your ears into a typical home Hi-Fi system. We’ve seen the speakers and the amplifier, now it’s time to take a look at what feeds that amplifier.

Here, we encounter the first digital component in our journey outwards from the ear, the Digital to Analogue Converter, or DAC. This circuit, which you’ll find as an integrated circuit, takes the digital information and turns it into the analogue voltage required by the amplifier.

There are many standards for digital audio, but in this context that used by the CD is most common. CDs sample audio at 44.1 kHz 16 bit, which is to say they express the level as a 16-bit number 44100 times per second for each of the stereo channels. There’s an electrical standard called i2s for communicating this data, consisting of a serial data line, a clock line, and an LRclock line that indicates whether the current data is for the left or the right channel. We covered i2s in detail back in 2019, and should you peer into almost any consumer digital audio product you’ll find it somewhere. Continue reading “Know Audio: It All Depends On The DAC”

Drive High-Impedance Headphones With This Stylish USB DAC

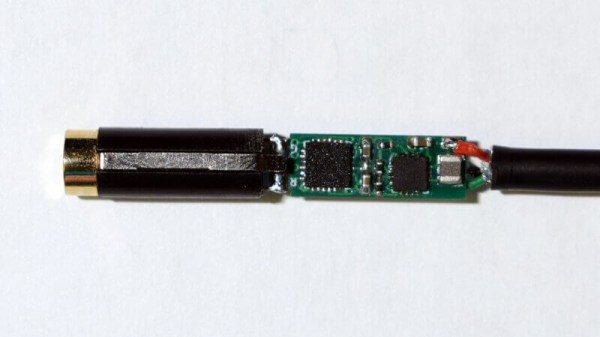
For anyone with an interest in building audio projects, it’s likely that an early project will be a headphone amplifier. They’re relatively easy to build from transistors, ICs, or tubes, and it’s possible to build one to a decent quality without being an electronic engineering genius. It’s not often though that we see one as miniaturized as [daumemo]’s USB-C DAC and headphone amplifier combo, that fits within a slightly elongated 3.5 mm jack cover as part of a small USB-to-headphone cable.

The DAC is an off-the-shelf board featuring an ALC4042 IC, it has a line-level output and a handy place to tap off a 5 volt line for the amplifier. This final part is a tiny PCB with two chips, a TPS65135 that produces clean +5 and -5 volt rails, and an INA1620 which is a high-quality audio amplifier set up for 2x gain. All this has been designed onto a very small PCB, which sits inside a 3D-printed housing along with the 3.5 mm earphone socket. The result is a very neat unit far better able do drive high-impedance headphones than the output from an unmodified DAC, but still looking as svelte as any commercial product. We like it.

This may be one of the most compact USB-to-headphone amplifiers we’ve seen, but it’s by no means the first.

Successive approximation register ADC

Homebrew Circuit Explores The Mysteries Of Analog-to-Digital Conversion

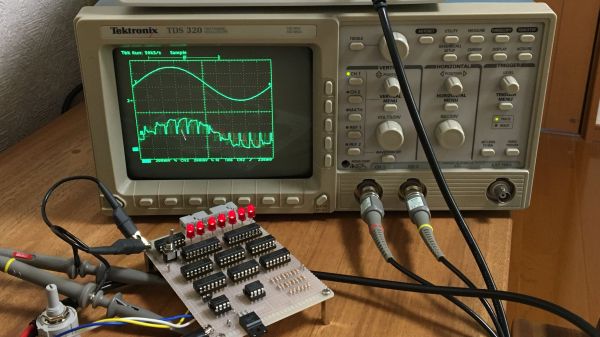
When it comes to getting signals from an analog world into our computers, most of us don’t give much thought to how the hardware that does the job works. But as it turns out, there are a number of ways to skin the analog to digital conversion cat, and building your own homebrew successive approximation register ADC is a great way to dispel some of the mystery.

From his description of the project, it’s clear that [Mitsuru Yamada] wasn’t looking to build a practical ADC, but was more interested in what he could learn by rolling his own. A successive approximation register ADC works by quickly cycling through all possible voltage levels in its input range, eventually zeroing in on the voltage of the input signal at that moment and outputting its digital representation. The video below shows how the SAR ADC works visually, using an oscilloscope to show both the input voltage and the output of the internal R-2R DAC. The ADC has an input range of 0 V to 5 V and seven bits of resolution and uses nothing but commonly available 74xx series logic chips and a couple of easily sourced analogs for the sample-hold and comparator section. And as usual with one of his projects, the build quality and workmanship are impeccable.

We love these sorts of projects, which are undertaken simply for the joy of building something and learning how it works. For more of [Yamada-san]’s projects, check out his 6502-based RPN calculator, or the serial terminal that should have been.

Continue reading “Homebrew Circuit Explores The Mysteries Of Analog-to-Digital Conversion”

C64 Demo, No C64

Never underestimate the ingenuity of the demoscene. The self-imposed limitations lead to incredible creativity, and, the range of devices they manage to get their demos running on never ceases to amaze us. But we never thought we’d see a C64 demo without one central component: the C64.

Full disclosure: [Matthias Kramm]’s demo, called “Freespin”, does need a C64 to get started. The venerable 6502-based computer runs a loader program on a 1541 disk drive.  But from then on, it’s all floppy drive. And [Matthias] has laid bare all his tricks.

The video below shows the demo in full, including a heart-stopping on-camera cable mod. By adding a single 100 Ω resistor, [Matthias] turned the serial clock and data lines into a two-bit digital-to-analog converter, good enough to generate signals for both black and white pixels and the sync pulses needed for the display.

No demo would be complete without sound, and Freespin’s tunes come from controlling the drive’s stepper motor, like a one-voice Floppotron.

Watching nothing but a floppy drive run a cool demo is pretty amazing. Yes, we know there’s a full-fledged computer inside the floppy, but the bit-banging needed to make this work was still mighty impressive. It might be cool to see what you could do with multiple drives, but we understand the minimalistic aesthetic as well. And speaking of tiny little demos:  the 256 bytes of [HellMood]’s “Memories” or [Linus Åkesson]’s “A Mind is Born” still leave us speechless.

Continue reading “C64 Demo, No C64”

Reel In The Years With A Cassette Player Synth

Variable-speed playback cassette players were already the cool kids on the block. How else are you going to have any fun with magnetic tape without ripping out the tape head and running it manually over those silky brown strips? Sure, you can change the playback speed on most players as long as you can get to the trim pot. But true variable-speed players make better synths, because it’s so much easier to change the speed. You can make music from anything you can record on tape, including monotony.

[schollz] made a tape synth with not much more than a variable-speed playback cassette player, an Arduino, a DAC, and a couple of wires to hook it all up. Here’s how it works: [schollz] records a long, single note on a tape, then uses that recording to play different notes by altering the playback speed with voltages from a MIDI synth.

To go from synth to synth, [schollz] stood up a server that translates MIDI voltages to serial and sends them to the Arduino. Then the DAC converts them to analog signals for the tape player. All the code is available on the project site, and [schollz] will even show you where to add Vin and and a line in to the tape player. Check out the demo after the break.

There’s more than one way to hack a cassette player. You can also force them to play full-motion, color video.

Continue reading “Reel In The Years With A Cassette Player Synth”