Raspberry Pi Tablet Gets Radio Surgical Enhancement

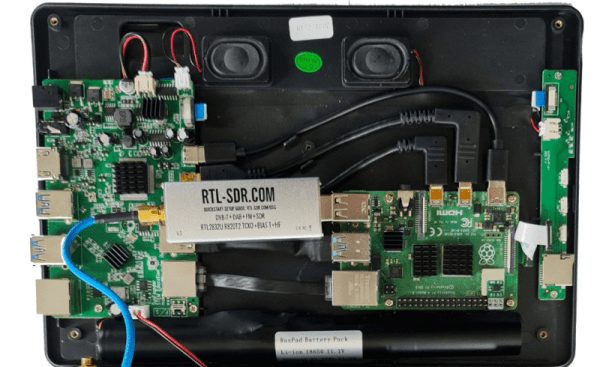
We always get excited when we buy a new tablet. But after a few months, it usually winds up at the bottom of a pile of papers on the credenza, a victim of not being as powerful as our desktop computers and not being as convenient as our phones. However, if you don’t mind a thick tablet, you can get the RasPad enclosure to fit around your own Raspberry Pi so it can be used as a tablet. Honestly, we weren’t that impressed until we saw [RTL-SDR] add an SDR dongle inside the case, making it a very portable Raspberry Pi SDR platform.

The box is a little interesting by itself, although be warned it costs over $200. For that price you get an LCD and driver board, a battery system, speakers, and an SD extension slot with some control buttons for volume and brightness. There’s a video of the whole setup (in German) below.

Continue reading “Raspberry Pi Tablet Gets Radio Surgical Enhancement”

Bright Lightbulb Saves Old Radios

If you work on old equipment, you know that there’s always that tense moment when you first plug it in and turn it on. No matter how careful you have been, there’s some chance your garage sale find is going to go up in smoke. [BasinStreetDesign] built a little box that can help. On one side is a variac and the device you want to test goes into the other side.

In the middle? A lightbulb, a few switches, and a meter to monitor the current. The magic happens because the lightbulb will stay relatively cool and only light dimly if the device under test is drawing an appropriate amount of current. You match the bulb wattage with the approximate watts you expect the load to draw. If the device’s power is shorted to ground, though, the bulb will light brightly and this causes the lightbulb’s resistance to increase, thus helping to protect the device.

Continue reading “Bright Lightbulb Saves Old Radios”

Quit Hunching Over Your Screen With A Little Robotic Help

[Norbert Zare] has identified a problem many of us suffer from – chronically bad posture. Its very common to see computer users hunched forwards over a screen, which eventually will lead to back problems. He mentions that most posture correction devices are pretty boring, so the obvious solution to [Norbert] was to build a simple robot to give you a friendly nudge into the correct position.

This simple Arduino-based build uses the ubiquitous MPU-6050 which provides 3-axis acceleration and 3-axis gyro data all processed on-chip, so it can measure where you’re going, which way you are orientated and how fast you are rotating. This is communicated via the I2C bus, so hooking into an Arduino or Raspberry Pi is a simple affair. There are plenty of Open Source libraries to work with this very common device, which helps reduce the learning curve for those unfamiliar with programming a fairly complex device.

At the moment, he is mounting the sensor on his body, and hard-wiring it, so there’s already some scope for improvement there. The operating premise is simple, if the body angle is more than 55 degrees off vertical, move the servos and shove the body back in to the correct position.

The project GitHub has the code needed, and the project page over on Hackaday.io shows the wiring diagram.

We have seen quite a few projects on this subject over the years, like this one that sends you mobile notifications, an ultrasonic rangefinder-based device, and one that even uses a webcam to keep an eye on you. This one has the silliness-factor, and we like that round these parts. Keep an eye on [Norbert] we’re sure there more good stuff to come!

Continue reading “Quit Hunching Over Your Screen With A Little Robotic Help”

Building A Hammer Powered By Gunpowder

Hammers are pretty straightforward tools. If you need more impact force, just get a bigger hammer. Alternatively, you can look at enhancing performance with chemical means, and we don’t mean by using steroids. No, instead, you can try hammering with the aid of gunpowder, and [i did a thing] has done just that.

The build relies on using 6.8mm blank cartridges designed for the Ramset brand of explosive nail drivers. However, rather than buying such a tool off the shelf, [i did a thing] built one in a traditional hammer format instead. The device looks like a hammer, with a hinge on the two-piece head, which allows a blank cartridge to be placed inside. When the hammer is swung at a hard surface, the impact triggers the blank which drives the nail forward with incredible force.

[i did a thing] was able to pierce steel with the device, and sent a nail clean through a surfboard, too. It’s a very dangerous thing, so if you’re experimenting in this space, do be careful. Video after the break.

Continue reading “Building A Hammer Powered By Gunpowder”

ddrysfeöd circuit art sound and light scultpture

Labyrinthian Circuit Sculpture Evokes Moods With Sound And Light

In a famous letter penned by Victorian era author Oscar Wilde, he wrote:

“Art is useless because its aim is simply to create a mood. It is not meant to instruct, or to influence action in any way. It is superbly sterile, and the note of its pleasure is sterility.” 

We can’t help but wonder if [Eirik Brandal] was evoking such Wilde thoughts when he wrote to tell us about ddrysfeöd, an electronic sound and light sculpture which he called “uselessly applied electronics.” Given the mood created by the video below the break, we have to agree that it is indeed quite artful. But if it serves a purpose to inspire and cause wonderment, is it really useless? Let the philosophers philosophize. On to the hack!

[Eirik] was himself inspired by mazes such as those found in children’s activity books and magazines whose goal is to keep a child busy challenged by drawing a solid line from start to finish. With these in mind, [Eirik] constructed ddrysfeöd as an intricate entanglement of electronics, metal, clear and mirrored acrylic, and plated steel, all flung into a three dimensional vortex.

ddrysfeöd circuit art sound and light scultpture
ddrysfeöd is at home evoking moods in the light as well as the dark.
LED’s of red and white oscillate in time with each other. Orchestrating the multimedia symphony is an ESP32, with one core relegated to dealing with the mundane functions of the sculpture while the other waves its electronic wand to keep the ensemble suitably arranged. LED’s are bored into the base, and the acrylic is sanded on the edges to diffuse the supplied light. The electronics run on the usual  +5 V, but a +12 V power supply gives volume to the LM380 audio amplifier. We also appreciated that [Eirik] expanded his skills on this project by using Sketchup to plan out the project, even printing the patterns for cutting and drilling the acrylic glass.

If [Eirik]’s build style looks familiar, it may be because you’ve seen it here on Hackaday’s Circuit Sculpture Contest, where some of his work was named Most Beautiful. You can also feast your eyes on a BEAM bot inspired pummer in the shape of a satellite. And remember, if you run across something that presses your buttons, let us know via the Tip Line!

Continue reading “Labyrinthian Circuit Sculpture Evokes Moods With Sound And Light”

Tech In Plain Sight: Glucose Meters

If you or someone you know is diabetic, it is a good bet that a glucose meter is a regular fixture in your life. They are cheap and plentiful, but they are actually reasonably high tech — well, at least parts of them are.

The meters themselves don’t seem like much, but that’s misleading. A battery, a few parts, a display, and enough of a controller to do things like remember readings appears to cover it all. You wouldn’t be surprised, of course, that you can get the whole affair “on a chip.” But it turns out, the real magic is in the test strip and getting a good reading from a strip requires more metrology than you would think. A common meter requires a precise current measurement down to 10nA. The reading has to be adjusted for temperature, too. The device is surprisingly complex for something that looks like a near-disposable piece of consumer gear.

Of course, there are announcements all the time about new technology that won’t require a needle stick. So far, none of those have really caught on for one reason or another, but that, of course, could change. GlucoWatch G2, for example, was a watch that could read blood glucose, but — apparently — was unable to cope with perspiration.

Even the meters that continuously monitor still work in more or less the same way as the cheap meters. As Hackaday’s Dan Maloney detailed a few years back, continuous glucose monitors leave a tiny sensor under your skin and measure fluid in your body, not necessarily blood. But the way the sensor works is usually the same.

For the purposes of this article, I’m only going to talk about the traditional meter: you insert a test strip, prick your finger, and let the test strip soak up a little bit of blood.

Continue reading “Tech In Plain Sight: Glucose Meters”

Refining The Greatest Joystick Of The 1980s

The Competition Pro joystick is often considered to be the pinnacle of input devices, at least as far as the 1980s gaming goes. But the design isn’t perfect, and time hasn’t been kind to certain aspects of its mechanism. For example, the large rubber disc used to keep the stick centered on early generations of the hardware will invariably be hardened up on any surviving specimens. Looking to return these classic controllers to their former glory, and then some, [mageb] has released a number of 3D printed modifications for the Competition Pro that should be of great interest to the vintage gamer.

The new microswitches

First and foremost is the deletion of the original rubber disc for a new spring mechanism. Even if this is the only modification you do, [mageb] says you’ll already have a better and longer-lasting joystick to show for it. But if you want to continue with the full rebuild, be aware that there’s no going back to stock. Once you start cutting the original parts, you’re committed to taking it all the way.

Assuming you’re not afraid to get your hands dirty, the next step is cutting the metal contacts from the bottom of the face buttons so they’ll work with the new microswitch array he’s designed. Each button gets its switch, and four handle movement of the joystick. You can try out different switches to adjust the feel of the joystick, but [mageb] assures us that he’s already done the research and put the best quality switches in the bill of materials.

The end result is a Competition Pro joystick that looks more or less the same from the outside, but is considerably improved internally. That’s always a win in our books, though we’re sure somebody out there is going to get mad that the brittle old rubber disc wasn’t sent to the Smithsonian.