Ask Hackaday: Dude, Where’s My MOSFET?

(Bipolar Junction) Transistors versus MOSFETs: both have their obvious niches. FETs are great for relatively high power applications because they have such a low on-resistance, but transistors are often easier to drive from low voltage microcontrollers because all they require is a current. It’s uncanny, though, how often we find ourselves in the middle between these extremes. What we’d really love is a part that has the virtues of both.

The ask in today’s Ask Hackaday is for your favorite part that fills a particular gap: a MOSFET device that’s able to move a handful of amps of low-voltage current without losing too much to heat, that is still drivable from a 3.3 V microcontroller, with bonus points for PWM ability at a frequency above human hearing. Imagine driving a moderately robust small DC robot motor forwards with a microcontroller, all running on a LiPo — a simple application that doesn’t need a full motor driver IC, but requires a high-efficiency, moderate current, and low-voltage-logic compatible transistor. If you’ve been here and done that, what did you use?

Continue reading “Ask Hackaday: Dude, Where’s My MOSFET?”

Treadmill To Belt Grinder Conversion Worked Out

[Mike] had a bunch of disused fitness machines lying around. Being a skilled welder, he decided to take them apart and put them back together in the shape of a belt grinder.

In particular, [Mike] is reusing the height-adjustment guide rail of an old workout bench to build the adjustable frame that holds the sanding belt. A powerful DC motor including a flywheel was scavenged from one treadmill, the speed controller came from another. [Mike] won’t miss the workout bench: Once you’re welding a piece of steel tube dead-center on a flywheel, as happened for the grinder’s drive wheel, you may call yourself a man (or woman) of steel.

The finished frame received a nice paint job, a little switching cabinet, proper running wheels and, of course, a sanding belt. Despite all recycling efforts, about 80 bucks went into the project, which is still a good deal for a rock-solid, variable-speed belt grinder.

Apparently, disused fitness devices make an ideal framework to build your own tools: Strong metal frames, plentiful adjustment guides, and strong treadmill motors. Let us know how you put old steel to good use in the comments and enjoy [Mike’s] build documentation video below!

Continue reading “Treadmill To Belt Grinder Conversion Worked Out”

Plastic Cutter Made Of 3.5” Floppy Disk

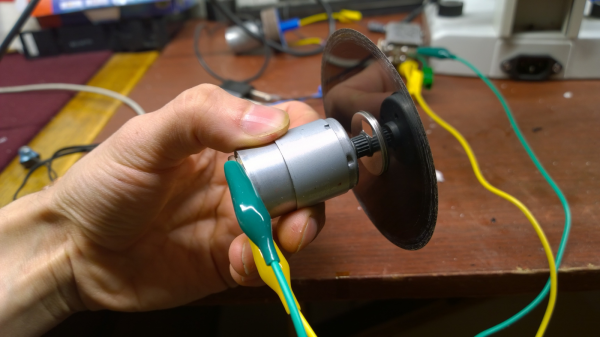
This is so cool; an unexpected use for an antiquated digital storage medium. [DeepSOIC] built a cutter that shaves off plastics but cannot cut through metal. It’s made out of the media part of a 3.5” floppy disk. For the new kids, here’s what a Floppy Disk is.

The disk is attached to any high speed DC motor connected to a plain ol’ power supply – variable if you want to adjust speed. As you can see from the video after the break, it cuts through plastic quite well, but is unable to damage any metal that it encounters. This property makes it extremely handy for many applications. Want to strip through an old 3.5mm phono jack without damaging the wires? Want to wind a coil over a plastic former and then strip away the plastic? Want to trim some 3D printed parts? All game for this handy tool. According to [DeepSOIC], if you don’t have floppy disks, you can use other kinds of plastic films too – such as overhead transparencies or plastic printer films. If you are in a pinch, he claims even paper works, although it doesn’t last too long. Don’t throw away all of those business cards yet.

This isn’t the only trick up his sleeve. He’s documenting a whole series on his project page at Hacks and Tricks. And if you like these, then also checkout [RoGeorge]’s bag of tricks over at The Devil is in the Details.

Continue reading “Plastic Cutter Made Of 3.5” Floppy Disk”

SATA Cable Replaces DC Motor Brushes As Macgyver Looks On

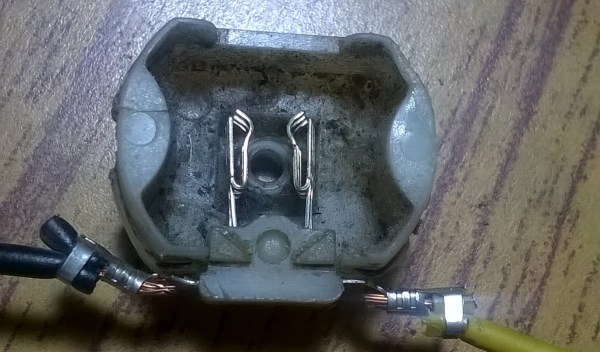
[dmalhar] was digging around in his bins for motors and found one with missing brushes. Being resourceful (and not able to find another motor), he managed to tear apart a SATA cable and form the pins into brushes with just the right amount of spring. Yes, this looks like a cheap motor, but in the moment of necessity availability wins, and this hack is truly commendable. If he had used a paperclip, MacGyver would have been proud, but the SATA cable pins make us proud.

Normally the brushes of DC motors are made with a graphite or some other material which provides a small amount of resistance so that when the motor is spinning the brushes will provide a gradual shift of current from one commutator to the next. Also, the softness of the carbon makes the brush wear down instead of the commutator, and in large motors the brushes are replaceable. In cheap motors the engineers design the brush material around the expected lifetime of the product. In [dmalhar’s] case, the motor just got its lifetime extended by a while.

EZ-Spin Motor Spins “Forever”

Now this isn’t a perpetual motion machine, but it’s darn close. What [lasersaber] has done instead is to make the EZ Spin, an incredibly efficient motor that does nothing. Well, nothing except look cool, and influence tons of people to re-build their own versions of it and post them on YouTube.

The motor itself is ridiculously simple: it’s essentially a brushless DC motor with a unique winding pattern. A number of coils — anywhere from six to twenty-four — are wired together with alternating polarity. If one coil is a magnetized north, its two neighbors are magnetized south, and vice-versa. The rotor is a ring with permanent magnets, all arranged so that they have the same polarity. A capacitor is used for the power source, and a reed switch serves as a simplistic commutator, if that’s even the right term.

As the motor turns, a permanent magnet passes by the reed switch and it makes the circuit. All of the electromagnets, which are wound in series, fire and kick the rotor forwards. Then the reed switch opens and the rotor coasts on to the next position. When it gets there the reed switch closes and it gets a magnetic kick again.

The catch? Building the device so that it’s carefully balanced and running on really good (sapphire) bearings, entirely unloaded, and powered with high impedance coils, leads to a current consumption in the microamps. As with most motors, when you spin it by hand, it acts as a generator, giving you a simple way to charge up the capacitor that drives it. In his video [lasersaber] blows on the rotor through a straw to charge up the capacitor, and then lets it run back down. It should run for quite a while on just one spin-up.

The EZ Spin motor is absolutely, positively not perpetual motion or “over-unity” or any of that mumbo-jumbo. It is a cool, simple-to-build generator/motor project that’ll definitely impress your friends and challenge you to see how long you can get it running. Check out [lasersaber]’s website, this forum post, and a 3D model on Thingiverse if you want to make your own.

Continue reading “EZ-Spin Motor Spins “Forever””

Hackaday Prize Entry: DC Motor Controller

There are a lot of cheap Chinese CNC machines out there with okay mechanics and terrible electronics. The bearings aren’t complete crap, but the spindle of these CNC machines is a standalone PWM controller with a pot to control the speed. This means you can’t control the spindle speed with LinuxCNC or Mach3.

For his Hackaday Prize entry, [SUF] is building a DC motor controller for a Chinese spindle motor that doesn’t use any kind of encoder. The first part of that project is fairly easy; [SUF] has already built a high current driver. The second bit is a little it harder – because these spindles don’t have an encoder, [SUF] will have to read voltage spikes on the motor poles, giving him the RPM of the spindle. From there, it’s a bit of PID code to get this spindle running at a desired RPM and connecting it to a CNC control box.

So far, [SUF] has a second version of his board waiting for assembly. In the first version of the board, the switching time for the MOSFET was a little slow, but that’s all corrected in the current revision. It’s a great project to extend the capability of these cheap CNC machines, and perfect project for the Hackaday Prize.


The 2015 Hackaday Prize is sponsored by:

Closed Loop Control For 3D Printers

One of the bigger problems with any CNC machine or 3D printer is the issue of missed steps when moving the toolhead. If a stepper motor misses a step, the entire layer of the print – and every layer thereafter – will be off by just a tiny bit. Miss a few more steps, and that print will eventually make its way into the garbage. [Misan] has the solution to this: closed loop control of DC motors for a 3D printer.

Most printer firmwares use an open loop control system for moving their motors around. Step a few times in one direction, and you know where the nozzle of a 3D printer will be. Missed steps confound the problem, and there’s no way for the firmware to know if the nozzle is where it should be at any one time.

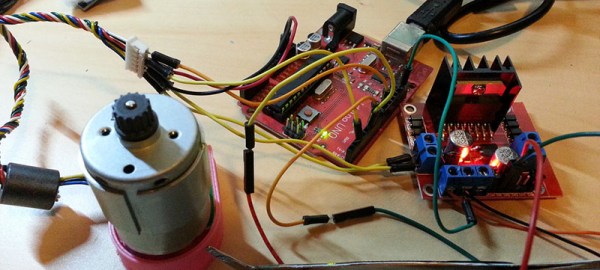
[Misan]’s solution to this was a DC motor coupled to an optical encoder. Both the motor and the encoder are connected to an Arduino Pro Mini which receives step and direction commands from the printer controller. The controller takes care of telling the motor where to go, the Arduino takes care of making sure it gets there.

The entire build is heavily derived from ServoStrap, but [Misan] has a very cool demo of his hardware: during a print, he can force the X and Y axes to either side, and the Arduino in each motor will move the print head back to where it needs to be. You can check that out below.

Continue reading “Closed Loop Control For 3D Printers”