Prusa Dares You To Break Their Latest Printer

Two months after its surprise reveal at the 2019 East Coast RepRap Festival, the Prusa Mini has started shipping out to the first wave of early adopters. True to form, with the hardware now officially released to the public, the company has begun the process of releasing the design as open source. In their GitHub repository, owners can already find the KiCad files for the new “Buddy” control board and STLs for the machine’s printable parts.

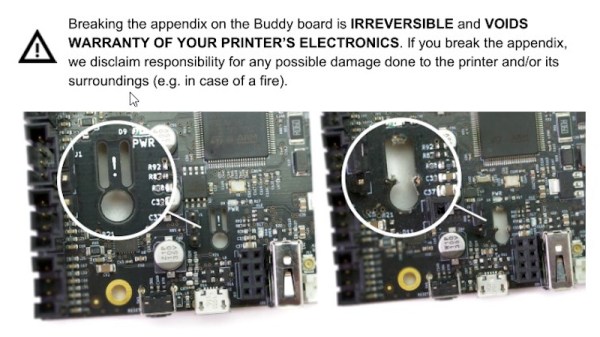
But even so, not everyone feels that Prusa Research has made the Mini as “open” as its predecessors. Some concerned owners have pointed out that according to the documentation for the Buddy board, they’ll need to physically snap off a section of the PCB so they can flash custom firmware images via Device Firmware Upgrade (DFU) mode. Once this piece of the board has been broken off, which the documentation refers to as the Appendix, Prusa Research will no longer honor any warranty claims for the electronic components of the printer.

For the hardcore tinkerers out there, this news may come as something of a shock. Previous Prusa printers have enjoyed a fairly active firmware development community, and indeed, features that started out as user-developed modifications eventually made their way into the official upstream firmware. What’s more, certain hardware modifications require firmware tweaks to complete.

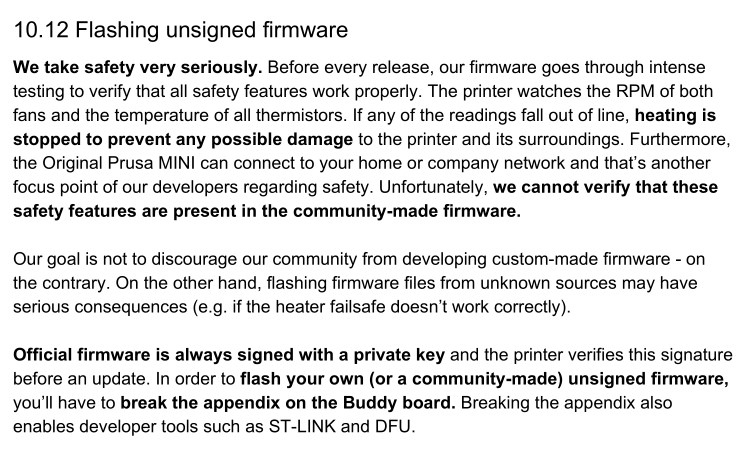
Prusa Research explains their stance by saying that there’s no way the company can verify the safety of community developed firmware builds. If thermal runaway protections have been disabled or otherwise compromised, the results could be disastrous. We’ve already seen it happen with other printers, so it’s hard to fault them for being cautious here. The company is also quick to point out that the installation of an unofficial firmware has always invalidated the printer’s warranty; physically breaking the board on the Mini is simply meant as a way to ensure the user understands they’re about to leave the beaten path.

How much support is a manufacturer obligated to provide to a user who’s modified their hardware? It’s of course an issue we’ve covered many times before. But here the situation is rather unique, as the user is being told they have to literally break a piece off of their device to unlock certain advanced functionality. If Prusa wanted to prevent users from running alternate firmware entirely they could have done so (or at least tried to), but instead they’ve created a scenario that forces the prospective tinkerer to either back down or fully commit.

So how did Prusa integrate this unusual feature into their brand new 32-bit control board? Perhaps more importantly, how is this going to impact those who want to hack their printers? Let’s find out.

Continue reading “Prusa Dares You To Break Their Latest Printer”

Software Defined Radio Gets Physical Control

Software Defined Radio (SDR) is a great technology, but there’s something so satisfying about spinning a physical knob to cruise the airwaves. Wanting to restore that tactile experience, [Tysonpower] purchased a cheap USB volume knob and set out to get it working with his software. Unfortunately, getting it up and running took a lot more work than you’re probably expecting.

Programming the knob’s STM32

After verifying that the knob worked for volume control on his computer, [Tysonpower] decided to try and pull the firmware from the device’s STM32 microcontroller. Unfortunately, this is where things got tricky. It turned out the chip had Code Protection enabled, so when it was wired up to a programmer and put into DFU mode, the firmware got wiped. Oops.

That left [Tysonpower] with no choice but to write a new firmware from scratch, which naturally required reverse engineering the device’s hardware. Step one was reading up on STM32 development and getting the toolchain working, which paved the way to getting the knob’s LED to blink. A couple more hours worth of work and some multimeter poking later, and he was able to read the knob’s movement. He describes getting USB HID working as a nightmare due to lack of documentation, but eventually he got that sorted out as well.

The end result is a firmware allows the volume knob to mimic a mouse scroll wheel, which can be used for tuning in many SDR packages. But we think the real success story is the experience [Tysonpower] gained with reverse engineering and working with the STM32 platform. After all, sometimes the journey is just as important as the end result. Continue reading “Software Defined Radio Gets Physical Control”

Using The Second Microcontroller On An Arduino

While newer Arduinos and Arduino compatibles (including the Hackaday.io Trinket Pro. Superliminal Advertising!) either have a chip capable of USB or rely on a V-USB implementation, the old fogies of the Arduino world, the Uno and Mega, actually have two chips. An ATMega16u2 takes care of the USB connection, while the standard ‘328 or ‘2560 takes care of all ~duino tasks. Wouldn’t it be great is you could also use the ’16u2 on the Uno or Mega for some additional functionality to your Arduino sketch? That’s now a reality. [Nico] has been working on the HoodLoader2 for a while now, and the current version give you the option of reprogramming the ’16u2 with custom sketches, and use seven I/O pins on this previously overlooked chip.

Unlike the previous HoodLoader, this version is a real bootloader for the ’16u2 that replaces the DFU bootloader with a CDC bootloader and USB serial function. This allows for new USB functions like HID keyboard, mouse, media keys, and a gamepad, the addition of extra sensors or LEDs, and anything else you can do with a normal ‘duino.

Setup is simple enough, only requiring a connection between the ‘328 ISP header and the pins on the ’16u2 header. There are already a few samples of what this new firmware for the ’16u2 can do over on [Nico]’s blog, but we’ll expect the number of example projects using this new bootloader to explode over the coming months. If you’re ever in an Arduino Demoscene contest with an Arduino and you’re looking for more pins and code space, now you know where to look.

Exploiting DFU Mode To Snag A Copy Of Firmware Upgrades

[Travis Goodspeed] continues his work at educating the masses on how to reverse engineer closed hardware devices. This time around he’s showing us how to exploit the Device Firmware Updates protocol in order to get your hands on firmware images. It’s a relatively easy technique that uses a man-in-the-middle attack to dump the firmware image directly to a terminal window. This way you can get down to the nitty-gritty of decompiling and hex editing as quickly as possible.

For this hack he used his Facedancer board. We first saw the hardware used to emulate a USB device, allowing the user to send USB commands via software. Now it’s being used to emulate your victim hardware’s DFU mode. This is done by supplying the vendorID and productID of the victim, then pushing the firmware update as supplied by the manufacturer. In most cases this shouldn’t even require you to have the victim hardware on hand.

AVR Programmer Made Without A Programmer

[blueHash] uses this cheap development board as an AVR programmer. What’s interesting to us is that it solves the chicken-or-egg problem that is usually encountered when bootstrapping a programmer. We’ve written about this issue before. Most programmers use microcontrollers, which first need to be flashed using a programmer. But it turns out the chip on this dev board has a DFU mode which gets around that conundrum.

He grabbed a uSD dev board for about $6. It’s got a crystal, an ATmega32u4 chip, and on the other side there’s a MicroSD card slot. We looked around and found an Atmel Datasheet (PDF) which describes the Device Firmware Upgrade mechanism. The AVR devices which support DFU are factory configured to use it. This dev board is designed to use DFU so all [blueHash] needed to do is find and configure a ISP firmware package that worked with this chip.