Large Format… Videography?

Large format photography gives a special quality to the images it produces, due to the differences in depth of field and resolution between it and its more modern handheld equivalents. Projecting an image the size of a dinner plate rather than a postage stamp has a few drawbacks though when it comes to digital photography, sensor manufacturersdo not manufacture consumer products at that size.

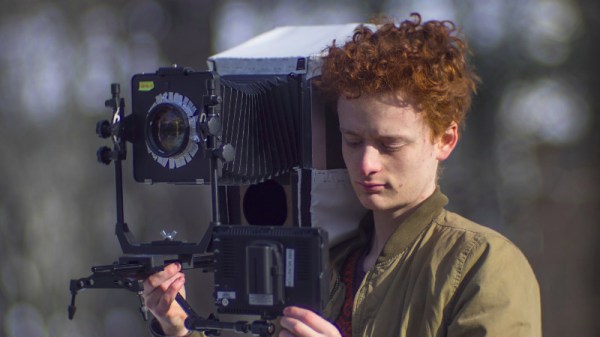
[Zev Hoover] has created a large format digital camera, and is using it not only for still images but for video. And it’s an interesting device, for the way he’s translated a huge large-format image into a relatively small sensor in a modern SLR. He’s projecting the image from the large-format lens and bellows onto a screen made from an artist’s palette, a conveniently available piece of bright white plastic, and capturing that image with his SLR mounted beneath the large-format lens assembly. This would normally cause a perspective distortion, but to correct that he’s mounted his SLR lens at an offset.

He does point out that since less light reaches the camera there is also a change in the ISO setting on the camera, but once that has been taken into account it performs satisfactorily. The result is a camera that allows something rather unusual, for Victorian-style large-format images to come to life as video. He demonstrates it in the video below, complete with friends in suitably old-fashioned looking steampunk attire.

Continue reading “Large Format… Videography?”

Featured Image

Giving A Camera Mount A Little (Magnetic) Attractiveness

It’s probably safe to say that most hackers and makers don’t really want to fuss around with the details of making video documentation of their work. They would rather spend their time and energy on the actual project at hand…you know — the fun stuff.

[Daniel Reetz] has been wanting more mounting options for his camera mount to make it easier and quicker to set up.  One end of his existing camera mount is a clamp. This has been working for [Daniel] so far, but he wanted more options. Realizing that he has plenty of ferrous metal surfaces around his shop, he had an idea — make a magnetic base add-on for his camera mount.

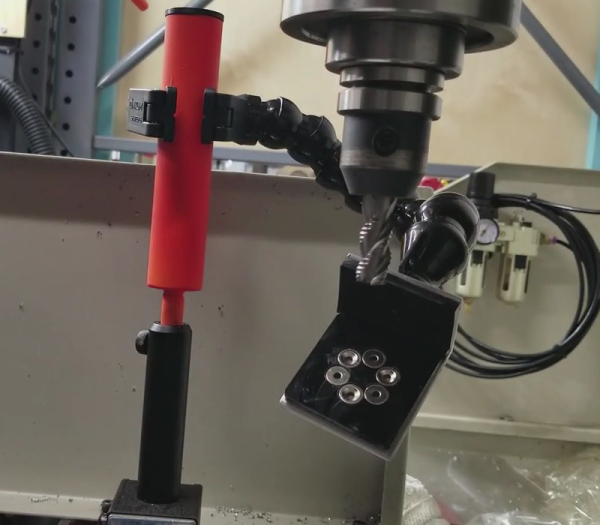
In the video, [Daniel] walks us through the process of creating this magnetic camera mount add-on, starting with the actual base. It is called a switchable magnetic base (or mag-base as he calls it) and looks like a handy little device. This was surely the most expensive part of the build, but looks like it should last a very long time. Basically, it’s a metal box with magnets on the inside and a rotating switch on the outside. When the switch is in one position, the box’s bottom is magnetic. Rotate the switch to the other position, and the bottom is no longer magnetic. These switchable magnetic bases come with a stud on top for attaching other things to it, which it looks like [Daniel] has already done. From there on out though, he explains and shows the rest of the build.

Some mild steel rod was cut and modified to slip into the pipe. The rod is held in place by a set screw which allows for easy adjustment of the mount’s height. Then he welds the rod to a washer which is, in turn, welded to a tube. After the welding, he takes the whole thing to a deburring wheel to clean it up. After that, the final touches are made with some spray paint and a custom 3D printed cap.

Sprinkled throughout the video are some useful tips, one of them being how he strips the zinc off of the washer with acid prior to welding. The reason for this is that you don’t want to weld over zinc because it produces neurotoxins.

Now [Daniel] can attach his camera mount quickly just about anywhere in his shop with the help of his new magnetic base.

There’s no shortage of camera mount hacks that we’ve covered. Here’s another one involving a magnet, but also has an automatic panning feature. Do you need a sliding camera mount? How about a motorized sliding camera mount — enjoy.

Continue reading “Giving A Camera Mount A Little (Magnetic) Attractiveness”

Mod Your Camera With ModBus

Industrial hardware needs to be reliable, tough, and interoperable. For this reason, there are a series of standards used for command & control connections between equipment. One of the more widespread standards is ModBus, an open protocol using a master-slave architecture, usually delivered over RS-485 serial. It’s readily found being used with PLCs, HMIs, VFDs, and all manner of other industrial equipment that comes with a TLA (three letter acronym).

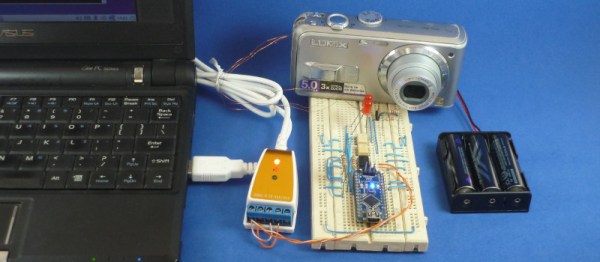
[Absolutelyautomation] decided to leverage ModBus to control garden variety digital cameras, of the type found cluttering up drawers now that smartphones have come so far. This involves getting old-school, by simply soldering wires to the buttons of the camera, and using an Arduino Nano to control the camera while talking to the ModBus network.

This system could prove handy for integrating a camera into an industrial production process to monitor for faults or defective parts. The article demonstrates simple control of the camera with off-the-shelf commercial PLC hardware. Generally, industrial cameras are very expensive, so this hack may be useful where there isn’t the budget for a proper solution. Will it stand up to industrial conditions for 10 years without missing a beat? No, but it could definitely save the day in the short term for a throwaway price. One shortfall is that the camera as installed will only save pictures to its local memory card. There’s a lot to be said for serving the images right to the engineer’s desk over a network.

We’ve seen [Absolutelyautomation]’s work before – check out this implementation of Pong on an industrial controller.

Shop-built Inspection Camera Lends Optical Help On A Budget

As your builds get smaller and your eyes get older, you might appreciate a little optical assistance around the shop. Stereo microscopes and inspection cameras are great additions to your bench, but often command a steep price. So this DIY PCB inspection microscope might be just the thing if you’re looking to roll your own and save a few bucks.

It’s not fancy, and it’s not particularly complex, but [Saulius]’ build does the job, mainly because he thought the requirements through before starting the build. MDF is used for the stand because it’s dimensionally stable, easy to work, and heavy, which tends to stabilize motion and dampen vibration. The camera itself is an off-the-shelf USB unit with a CS mount that allows a wide range of lenses to be fitted. A $20 eBay macro slider allows for fine positioning, and a ring light stolen from a stereo microscope provides shadow-free lighting.

We’d say the most obvious area for improvement would be a linkage on the arm to keep the plane of the lens parallel to the bench, but even as it is this looks like a solid build with a lot of utility – especially for hackers looking to age in place at the bench.

Building The First Digital Camera

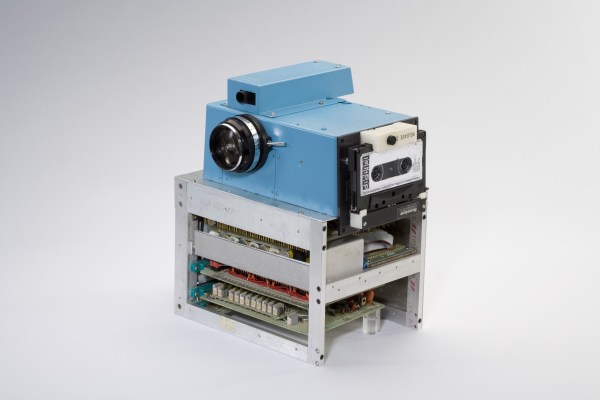
While the official history of the digital camera begins with a Kodak engineer tinkering around with digital electronics in 1975, the first digital camera was actually built a few months prior. At the Vintage Computer Festival East, [William Sudbrink] rebuilt the first digital camera. It’s wasn’t particularly hard, either: it was a project on the cover of Popular Electronics in February, 1975.

Cromemco catalog page for the Cyclops, the first digital camera

[William]’s exhibit, Cromemco Accessories: Cyclops & Dazzler is a demonstration of the greatest graphics cards you could buy for S-100 systems and a very rare, very weird solid-state TV camera. Introduced in the February, 1975 issue of Popular Electronics, the Cyclops was the first digital camera. This wasn’t a device that used a CCD or a normal image sensor. The image sensor in the Cyclops was a 1 kilobit DRAM from MOS, producing a digital image thirty-two pixels square.

The full description, schematic, circuit layout, and theory of operation are laid out in the Popular Electronics article; all [William] had to do was etch a PCB and source the components. The key part – a one kilobit MOS DRAM in a metal can package, carefully decapsulated – had a date code of 1976, but that is the newest component in the rebuild of this classic circuit.

To turn this DRAM into digital camera, the circuit sweeps across the rows and columns of the DRAM array, turning the charge of each cell into an analog output. This isn’t a black or white camera; there’s gray in there, or green if you connect it to an oscilloscope.

This project in Popular Electronics would be manufactured by Cromemco in late 1975 and was released as their first product in January, 1976. The Cromemco was marketed as a digital camera, designed to interface with the MITS Altair 8800 computer, allowing anyone to save digital images to disk. This was the first digital camera invented, and the first digital camera sold to consumers. It’s an amazing piece of history, and very happy [William] was able to piece this together and bring it out to the Vintage Computer Festival this weekend.

Witness The Birth Of A 36-Lens Panoramic Camera

We are suckers for a teardown video here at Hackaday: few things are more fascinating than watching an expensive piece of equipment get torn apart. [Jonas Pfeil] is going the other way, though: he has just published an interesting video of one of his Panono panoramic ball cameras being built.

The Panono is a rather cool take on the panoramic camera: it is a ball-shaped device fitted with 36 individual cameras. When you press the button and throw the camera in the air, it waits until the highest point and then takes pictures from all of the cameras. Sound familiar? We first coverd [Jonas’] work way back in 2011.

Photos are stitched together into a single panoramic image with an equivalent resolution of up to 106 megapixels. The final image is panoramic in both horizontal and vertical directions: you can scroll up, down, left, right or in and out of the image. Since images are all taken at the same time you don’t have continuity problems associated with moving a single camera sensor. There are a number of sample images on their site but keep reading for a look at some of the updated hardware since our last look at this fascinating camera.

Continue reading “Witness The Birth Of A 36-Lens Panoramic Camera”

Arduino Based Remote Shutter For Beme

The well-dressed hacker [Sean Hodgins] has put together a neat little project: a battery powered remote shutter. He built it for use with Beme, the latest Snapchat clone that all of the cool kids are now using.

This service is designed to get away from the selfie culture by starting to record when you hold your phone against your chest, so you are looking at the thing being recorded, not your phone. [Sean] wanted a bit more control than that, so he built a remote control that starts the recording by moving the servo arm over the proximity sensor.

He built this neat little device from an Arduino Pro Mini, a battery, a small servo, a couple of power control boards and a cheap RF link from SeedStudio, all glued onto an iPhone case. It’s a bit rough around the edges (the servo makes some noise that is picked up on the recording, for one thing), but it is a great example of how to lash together a quick prototype to test a project out.

Continue reading “Arduino Based Remote Shutter For Beme”