Early computer kits aimed at learning took all sorts of forms, from full-fledged computer kits like the Altair 8800 to the ready-made MicroBee Computer-In-A-Book. For those just wanting to dip their toes in the computing world, many low-cost computer “trainers” were released, and Japan had some awesome ones. [Jason Jacques] shows off his Gakken Micro-Computer FX-System (or is it the FX-Computer? Or maybe the FX-Micom? It seems like they couldn’t make up their minds). In any event, it was a combination microcomputer and I/O building blocks system running a custom version of the Texas Instrument TMS1100 microprocessor. Specifically designed to introduce users to the world of computing, the included guide is very detailed and includes 100 example programs and lots of information on how all the opcodes work.
This 4-bit system is similar to the Kenbak computer, with a very simple instruction set and limited address space. However, adding electronic components in plastic blocks brings this machine to a new level of interactivity. Connections can be made to and from the microcomputer block, as well as to the on-board speaker and simple input/output pins. The example circuit displayed on the front cover of the box enables the microcontroller to connect to the speaker and allows a switch to light up a small incandescent bulb. We can imagine many users wiring up all sorts of extra components to their FX-Computers, and with the advent of 3D printing, it wouldn’t be difficult to create new blocks to insert into the grid.
We’re big fans of calculators, computers and vintage magazines, so when we see something at the intersection of all three we always take a look. Back in 1966, Electronics Illustrated included instructions in their November issue on building, in their words, a “Space-Age Decimal Computer!” using neon lamps, a couple of tubes, and lots of soldering. The article starts on page 39 and it’s made fairly clear that it will be an expensive and complicated project, but you will be paid back many times over by the use and experience you will get!
Our modern idea of a computer differs greatly from the definitions used in the past. As many readers likely know, “Computer” was actually a job title for a long time. The job of a computer was to sit with pen, paper, and later on electromechanical devices, and compute and tabulate long lists of numbers. Imagine doing payroll for large companies completely by hand, every month. The opportunity for errors was large and was just part of doing business. As analog and later transistor-based computers started to be developed, they replaced the jobs of human computers in calculating and tabulating numbers. This is why IBM was originally called the Computing, Recording and Tabulating Company!
Trawling classified ads or sites like Craigslist for interesting hardware is a pastime enjoyed by many a hacker. At a minimum, you can find good deals on used tools and equipment. But if you’re very lucky, you might just stumble upon something really special.
Which is exactly how [John] came into possession of the TRANSBINIAC. Included in a collection of gear that may have once belonged to a silent key, the device is a custom-built solid-state computer that appears to have been assembled in the early 1960s. Featuring a large see-through window not unlike what you might find on a modern gaming computer and a kickstand that tilts it back at a roughly 45° angle, it was obviously built to be shown off. Perhaps it was a teaching aid or even a science fair entry.
After some digging, it looks like the design of the TRANSBINIAC was based on plans published in the January 1960 issue of Electronics Illustrated. Though there are some significant differences. This computer uses eight bistable flip-flip modules instead of the original six, deletes the multiplication circuit, and employs somewhat simplified wiring. Whoever built this machine clearly knew what they were doing, which for the time, is really saying something. This truly unique machine may well have been one of the first privately owned digital computers in the world.
Which is why we’re glad to see [John] trying to restore the device to its former glory. Naturally it’s a little tricky since the computer came with no documentation and its design doesn’t exactly match anything out there. But with the help of other Hackaday.io users, he’s hoping to get everything figured out. It sounds like the first step is to try and diagnose the 2N554 germanium transistor flip-flop modules, as they appear to be behaving erratically. If you have experience with this sort of hardware, feel free to chime in.
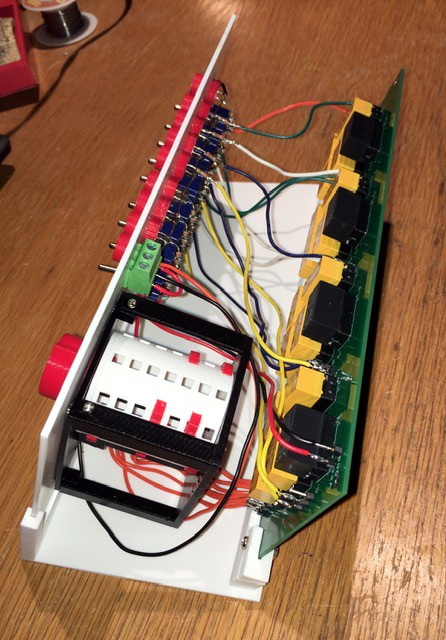
Back in 1968, a book titled “How to Build a Working Digital Computer” claimed that the sufficiently dedicated reader could assemble their own functioning computer at home using easily obtainable components. Most notably, the design utilized many elements that were fashioned from bent paperclips. It’s unclear how many readers actually assembled one of these so-called “Paperclip Computers”, but today we’re happy to report that [Mike Gardi] has completed his interpretation of the 50+ year old homebrew computer.
A view behind the computer’s ALU
The purist might be disappointed to see how far [Mike] has strayed from the original, but we see his embrace of modern construction techniques as a necessary upgrade. He’s recreated the individual computer components as they were described in the book, but this time plywood and wheat bulbs have given way to 3D printed panels and LEDs. While the details may be different, the end goal is the same: a programmable digital computer on a scale that can be understood by the operator.
To say that [Mike] did a good job of documenting his build would be an understatement. He’s spent the last several months covering every aspect of the build on Hackaday.io, giving his followers a fantastic look at what goes into a project of this magnitude. He might not have bent many paperclips for his Working Digital Computer (WDC-1), but he certainly designed and fabricated plenty of impressive custom components. We wouldn’t be surprised if some of them, such as the 3D printed slide switch we covered last month, started showing up in other projects.
For a little over a year now we’ve been covering the incredible replicas [Mike Gardi] has been building of educational “computers” from the very dawn of the digital age. These fascinating toys, many of which are now extremely rare, are recreated using 3D printing and other modern techniques for a whole new generation to enjoy and learn from.
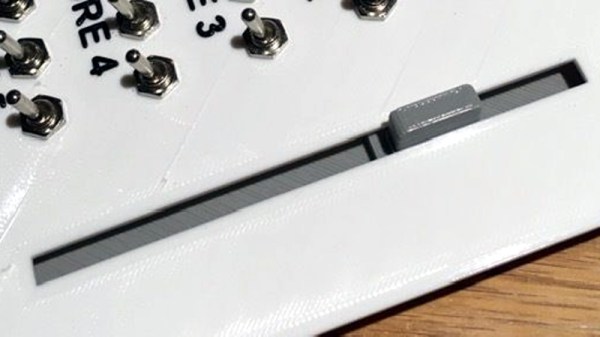
He’s picked up a trick or two building these replicas, such as this method for creating bespoke slide switches with a 3D printer. Not only does this idea allow you to control a custom number of devices, but as evidenced in the video after the break, the printed slider sounds absolutely phenomenal in action. Precisely the sort of “clunk” you want on your front panel.
Of course, [Mike] doesn’t expect anyone to create this exact switch. He’s designed it as part of his Working Digital Computer (WDC-1) project that he’s documenting on Hackaday.io, so it has a rather specific set of design parameters. But with the steps he outlines in the write-up, you should have no problem adapting the concept to fit your specific needs.
So how does it work? One half of the switch is a track is printed with indents for both reed switches and 6 x 3 mm disc magnets. The other is a small shuttle that itself has spaces for two of the same magnets. When it slides over the reed switches they’re activated by the magnet on one side, while the magnet on the other side will be attracted to the one embedded into the track. This not only gives the switch detents that you can feel and hear while moving it, but keeps the shuttle from sliding off the intended reed switch.
If you like this, you’ll absolutely love his mostly 3D printed binary encoder that we featured recently. With his track record, we’re excited to follow the WDC-1 project as it develops, and thrilled that [Mike] has brought it to Hackaday.io.
[Mike Gardi] credits his professional successes in the world of software development on the fact that he had access to logic-based educational games of a sort that simply don’t exist anymore. Back in the 1960s, kids who were interested in electronics or the burgeoning world of computers couldn’t just pick up a microcontroller or Raspberry Pi. They had to build their “computers” themselves from a kit.
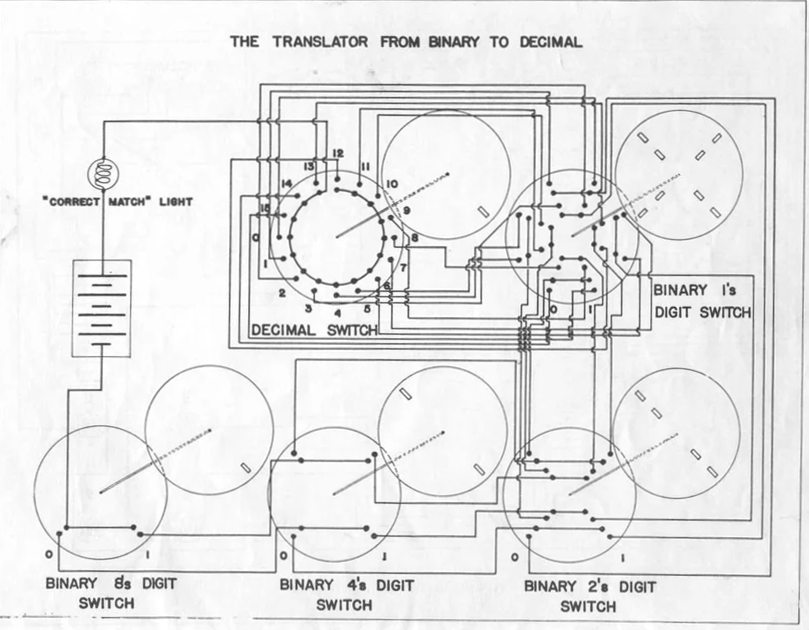
One of those kits was the GENIus Almost-automatic Computer (GENIAC), a product which today is rare enough to essentially be unobtainable. Using images and documentation he was able to collect online, [Mike] not only managed to create a functioning replica of the GENIAC, but he even took the liberty of fixing some of the issues with the original 60-odd year old design.
Fundamentally, the GENIAC is composed of rotary switches which feed into each other to perform rudimentary logical functions. With banks of incandescent bulbs serving as the output, users could watch how placing the switches in different positions would influence the result.
This might seem a little silly to modern audiences, but thanks to a well written manual that featured a collection of compelling projects, the GENIAC managed to get a lot of mileage out of a couple light bulbs and some wire. In fact, [Mike] says that the GENIAC is often considered one of the first examples of an interactive electronic narrative, as the carefully crafted stories from the manual allowed players to go on virtual adventures long before the average kid had ever heard of a “video game”. A video about how one of these stories, “The Uranium Shipment and the Space Pirates“, can be seen after the break. Even today it would be an interesting enough toy, but back in 1955 it would have been mind-blowing.
Construction of this replica will require access to a laser cutter so you can approximate the original’s drilled Masonite backing and rotors. From there, [Mike] has produced an array of 3D printable components which are attached to the board to serve as contacts, spacers, and various other pieces of bric-a-brac. Some of the parts he couldn’t find pictures of, so he was forced to come up with his own designs. But considering the finicky nature of the original, he thinks his printed parts may actually be better than what the toy shipped with.
When you write a program for your computer, whether it is a desktop machine, a microcontroller, or a supercomputer, the chances are that you use software tools to help you get the job done. High level languages, compilers, linkers, assemblers, debuggers, and code libraries have become so integrated that in many cases you will barely be aware of their existence. To all intents and purposes this huge toolchain will be the computer. But the first computer programmers had none of these luxuries. They had to hand assemble their own binaries, check them by hand, and debug them by guessing what had happened when they failed.
EDSAC I, 1948, W.Renwick with 5 hole tape reader and Creed teleprinter. Copyright Computer Laboratory, University of Cambridge. Reproduced by permission. [CC BY 2.0 UK]EDSAC (Electronic delay storage automatic calculator) was the first computer operated by the University of Cambridge in the UK and one of the first few computers in the entire world when it was built in the late 1940s. It is the subject of the 1951 film you’ll find embedded below. Originally produced for a conference, the video sports a 1976 introduction and narration from the machine’s creator Professor Maurice Wilkes. It doesn’t take us through the design of the machine itself, instead it concentrates on the workflow required to program it.
The Paper-Heavy Process of Programming EDSAC
To illustrate the programming process, a committee of people who would now call themselves computer scientists, but probably then called themselves mathematicians, breaking a formula into subroutines before the code is laboriously hand assembled. The linking process is performed manually too by the secretary who types the code into a teletype for transfer to a punched tape. When a library function is required she reaches into a filing cabinet for the roll of tape containing it before running it through a tape duplicator to add it to the program. Finally the completed tape is checked and added to a job queue that consists of a row of hooks on the wall. Never complain that your toolchain is unwieldy again!
The original EDSAC was decommissioned in the late 1950s after serving the university and spawning a commercial version, the LEO, which became the first ever computer manufactured for use in commerce. That was not the end of the EDSAC story though, because in this century a team at the National Museum of Computing at Bletchley Park set about recreating EDSAC as an exhibit. And as luck would have it a member of that team was at the recent Electromagnetic Field hacker camp to give a talk about their work which you will also find below.
Building a Faithful Reproduction of EDSAC
Tony Abbey gives us both a history of the machine and a description of its architecture, followed by a run through their efforts in rebuilding it. You may be surprised by some of the unexpected facts from the talk. For instance, while all the tubes used in the EDSAC are still available, their bases are not. Equivalents were sourced from China, but team members had to modify them with dental drills.
They also needed to manufact the 1940s-style tube chassis, and the solution to that problem happened to be just down the road. Bletchley is part of modern-day Milton Keynes, a post-war new town that is also home to another famous name: Marshall amplifiers. Tube amps are built in a surprisingly similar way, so they took on the manufactured challenge. Not all the parts of the new EDSAC are original though. The memory used mercury delay lines in 1949, but for 2018 recreation the computer has a delay line using nickel wire and modern components. Tony admits that even that has caused problems, and there is a simulator using a microcontroller.


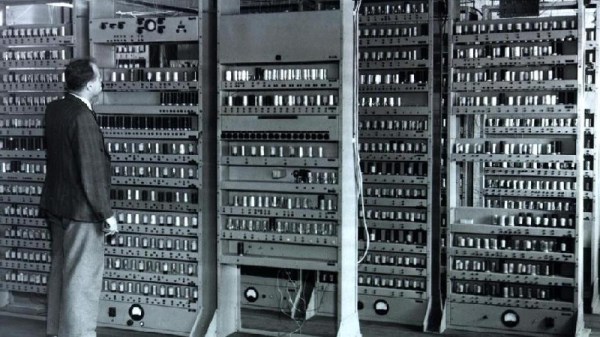
![EDSAC I, 1948, W.Renwick with 5 hole tape reader and Creed teleprinter. Copyright Computer Laboratory, University of Cambridge. Reproduced by permission. [CC BY 2.0 UK]](https://hackaday.com/wp-content/uploads/2018/09/edsac99-34.jpg)


