Hackaday Links: February 2, 2014

hackaday-links-chain

[Michel] was in need of a 9V battery connector, and in a brilliant bit of insight realized 9V batteries will plug directly into other 9V batteries (just… don’t do that. ever.) Taking a dead 9V, he tore it open, was disappointed by the lack of AAAA cells, and soldered some wires onto the connector.

Sometimes a project starts off as a reasonable endeavour, but quickly becomes something much more awesome. [Wallyman] started off building a hammock stand and ended up making a giant slingshot. We’re not one to argue with something that just became a million times more fun.

We’ve seen solder stencils made out of laser-cut metal, photoetched metal, plastic cut on a vinyl cutter, laser-cut plastic, and now finally one made on a 3D printer. It’s a pretty simple process – get the tCream layer into a .DXF file, then subtract it from a plastic plate in OpenSCAD.

Apple loves their proprietary screws, and when [Jim] tried to open his Macbook Air with the pentalobe screwdriver that came with an iPhone repair kit, he found it was too large. No problem, then: just grind it down. Now if only someone could tell us why a laptop uses smaller screws than a phone…

[Victor] has been playing around with an RTLSDR USB TV tuner dongle for a few months now. It’s a great tool, but the USB thumb drive form factor wasn’t sitting well with him. To fix that, he stuck everything into a classy painted Hammond 1590A enclosure. It looks much cooler, and now [Victor] can waterproof his toy and add a ferrite to clean things up.

RasPi “Inception” CD-ROM Case Mod

raspiInception

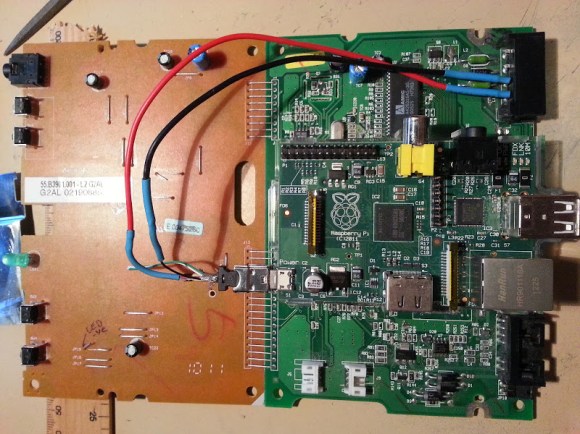
At first glance, [John’s] CD-ROM RasPi case may not seem all that unique, but we like both the implementation as well as the end-result functionality it provides. His goal was to use the Pi as a torrent downloader, and to store the downloaded files on a shared network drive. The Pi drive would slide into a bay in the server’s case—hence the Inception reference: a computer in a computer—allowing downloads while putting another step between the server and the outside world keeping, as well as guaranteeing that the network share would be available, because the server and the Pi would use the same power source.

[John] gutted the CD-ROM’s internals to leave only the PCB, which he stripped of most everything save for the power connector in the back. He then used the base of his old RasPi case as a standoff, mounting it to the top of the CD-ROM’s PCB. He soldered the power lines to the ROM’s power connector and temporarily hooked up a 5V adapter until he gets the server running. The final step was to carve out the back of the case for access to the Ethernet and USB ports, which [John] accomplished with a dremel, a hacksaw and a file. The front of the case still looks like a stock CD-ROM drive, and [John] has plans for future mods: re-purposing the LED to show network activity and modifying the buttons to serve as a reset, pause, or start for torrent downloads.

The BatBox: Portable Power, Polished And Professional. Plus Smoke!

batBox

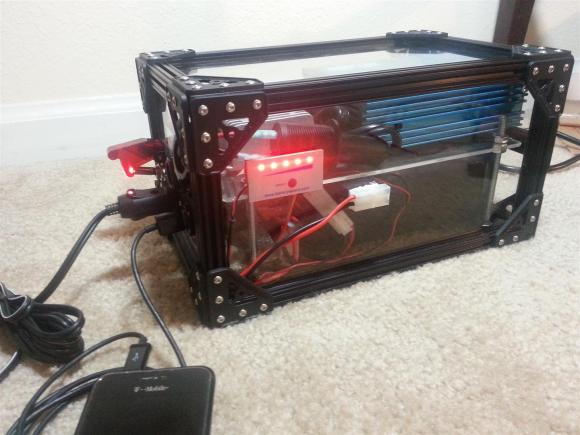
About the size of a shoebox and stuffed with a compact battery/inverter combo, the BatBox packs a mean wallop at 480Wh. What else was [Bill Porter] supposed to do with his free time? He’s already mailed out electronic wedding invitations and built custom LED centerpieces for the reception. He and his wife [Mara] then made an appearance in a Sunday roundup tying the knot by soldering a circuit together. Surely the LED Tetris Tie would have been in the ceremony had it existed. This time, though, [Bill’s] scrounged up some leftover electronics to put a realistic spin on a Minecraft favorite: the BatBox.

A pair of 18V high energy density batteries connect up to a 12V regulator, stepping them down to drive a 110VAC inverter. The BatBox also supplies 5V USB and 12VDC output for portable devices. Unfortunately, [Bill]’s first inverter turned out to be a low-quality, voltage-spiking traitor; it managed to let the smoke out of his fish tank’s LED bar by roasting the power supply. Undeterred, [Bill] pressed on with a new, higher-quality inverter that sits on an acrylic shelf above the batteries. OpenBeam aluminum extrusion seals up the remainder of the enclosure, completing the BatBox with a frame that looks both appealing and durable.

Best Practices To Include In Your Final Projects

electronic-best-practices

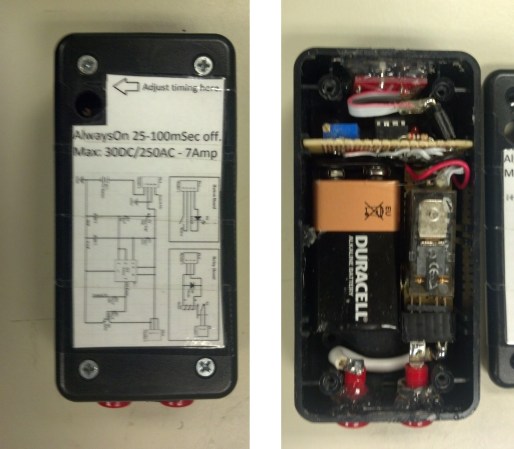
Making that final push to button up your projects can be a bit daunting. It’s kind of like the punch list on a construction project — add switch plates, fill nail holes in baseboards, screw in light bulbs, clean windows — that stuff adds up quickly. But having a set of best practices in mind throughout the development phase will cut down on that burden. [Caleb P.] just published a quick guide using a recent project as an example.

First and foremost is the label seen on the project box lid. How many times have you pulled out a circuit board from a year or two earlier and not been able to figure out the pinout? As with ancient televisions and radios, including the service schematic will save you big time! He also mentions that the size and orientation of the components in the case was in the back of his mind the whole time. That paid off because everything fits like a glove. [Caleb] makes sure the battery is easy to get to, and the each component has some type of connector so that it may be removed and serviced/replace without soldering. There’s certainly nothing groundbreaking in this guide. But ask yourself: have I been following all of these guidelines in my own work?

Easily 3D Print Mesh Screens

easy-way-to-3d-print-mesh-screens

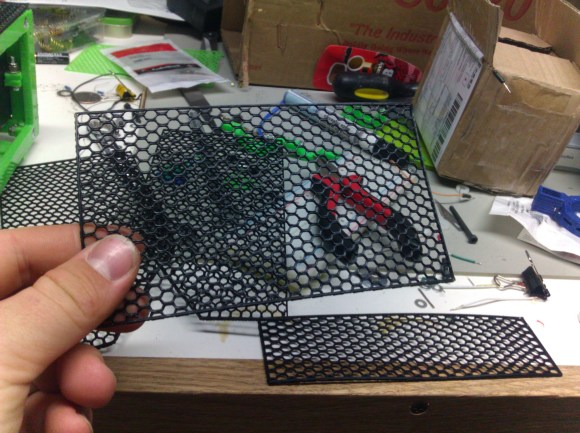
If you need a way to make openings in your project enclosures look nice just head on over to the 3D printer. In the image above [Alfred] is showing off the result of his Slic3r hack for printing mesh grills.

It’s important to note that you need to make sure you’re using Slic3r version 0.9.8. This won’t work with newer versions because starting with 0.9.9 the software will add a raft to the bottom of your design.

The grill can be in any shape you desire. It starts by modelling this outline, then extruding the edges downward the same distance as your desired mesh thickness. After importing the design file into Slic3r [Alfred] uses the support material settings to choose this honeycomb design. He then sets the fill density to zero. This means the design will not be printed at all, only the fill material, resulting in these honeycomb screens.

Slic3r’s a fantastic piece of software. Check out this interview with Slic3r’s lead developer.

USB Infrared Receiver Looks Good Sitting In Your Livingroom

usb-ir-receiver

The problem with building your own electronics for the living room is that the final product may not fit your decorating style. This was true with [Itay’s] prototype of a universal USB IR receiver. So after testing it out for a few weeks he decided to build a final version that started by selecting an enclosure he could be proud of.

He came across an LED flash light at the dollar store which has an aluminum body. When we read about this we envisioned a cheap version of a Mag Light from which he removed the cylinder that holds the batteries. But actually, the pod seen above is the entire flashlight (with an added base). It forced him to design a tiny surface mount PCB to fit everything inside.

It’s not too much of a stretch since IR receivers tend to be small anyway. [Itay’s] design put a PIC 18F2553 on one side of the board. The other side hosted the through hole components: an IR receiver, LED for feedback, and the connections for the USB cable that exit through the rubber button cover that used to switch the flashlight on. He had a problem with one of the resistor values which took a while to figure out. But eventually he got it working. It’s been in use now for six months.

Acrylic Enclosures Use Integrated Clips To Do Away With Fasteners

acrylic-clip-lock-enclosures

Here’s a design that lets you make acrylic enclosures without using fasteners. The red outline in the diagram above is a bit hard to make out. But look closely and you’ll realize that there is very little material which has been removed to form the clip. This uses the rigidity/flexibility of the material to form a spring that will hold a couple of pieces tightly together.

In a links post last year we looked at [Patrick Fenner’s] fantastic analysis of the strength of using kerf-bending to form several sides of a case out of one piece of material. He’s used that same analytic expertise to take a look into this design. He even suggests that making the cut on the hook-side a bit deeper will help improve the resilience of the part. If you have a laser cutter on hand and want to give this a try he’s posted the plans on Thingiverse.