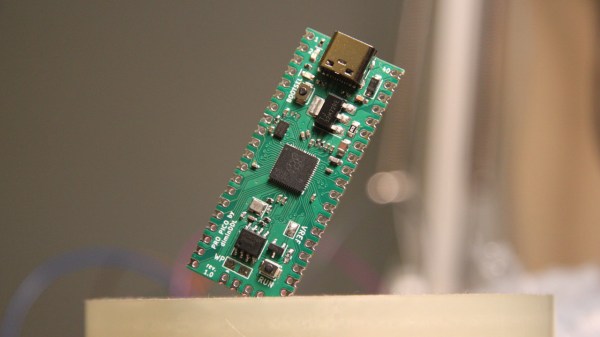
The Pi Pico replacement board in question, assembled, held diagonally in some type of holder

ProPico For Your Pro Pico Needs

Ever feel like the Pi Pico board could be doing way more given its footprint? Does it bother you that the RP2040’s ADC quality is even further decreased because of the noisy onboard switching regulator? Miffed about decisions like the MicroUSB socket, the 2MB flash, or lack of the reset button? [Dmytro] brings us an open-source Pi Pico design, sporting the same RP2040 and a fully compatible footprint, but adding a number of improvements to its surroundings.

There’s a good few additions, all of them hacker-friendly – [Dmytro] adds comfortably-spaced reset and boot buttons, a USB-C socket, a dedicated low-noise voltage reference for the ADC, one more LED, and an I2C EEPROM footprint socket that is compatible with FRAM chips. Everything worth preserving is preserved – the pinout stays the same, including the SWD connector, which now sports an extra RESET pin. The bottom side USB testpoints remain, with only the four testpoints changed for more useful signals. Last but not least, the switching regulator is replaced by the venerable 1117 – you lose the ability to power your Pico from two AAs, and the capacitor series resistor requirement isn’t great, but you can easily put one of the drop-in 1117 replacement regulators on there.

What’s great is that the design is fully open-source, with KiCad files available. Want to design your own Pi Pico footprint board, improve upon this one even further, or maybe make a more tailored one? Treat yourself to the GitHub repository! There’s also a pinout diagram and a KiCanvas schematic for all your tinkering needs. We’ve covered drop-in replacements for classic drawer-inhabiting parts like the Pi Zero, for the 7805 (twice!), the 6502 CPU, and even for the DE9 serial port connector. No matter the purpose, they’re always a joy to see.

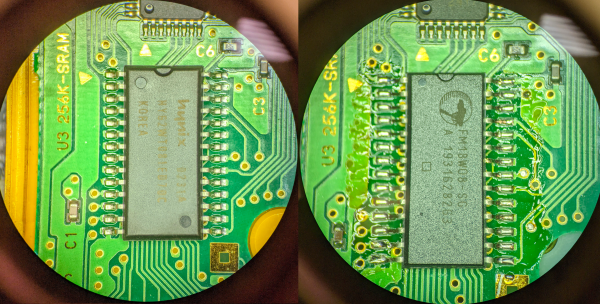
the conversion from hynix SRAM to FRAM on a Pokemon Yellow PCB

Pokemon Time Capsule

The precious Pokemon we spent hours capturing in the early nineties remain trapped, not just by pokeballs, but within a cartridge ravaged by time. Generally, Pokemon games before the GameBoy Advance era had SRAM and a small coin cell to save state as NVRAM (Non-volatile random access memory) was more expensive. These coin cells last 10-15 years, and many of the Pokemon games came out 20 years ago. [9943246367] decided to ditch the battery and swap the SRAM for a proper NVRAM on a Pokemon Yellow cartridge, 23 years later.

The magic that makes it work is a FRAM (ferroelectric random access memory) made by Cypress that is pin-compatible with the 256K SRAM (made by SK Hynix) on the original game cartridge PCB. While FRAM data will only last 10 years, it is a write-after-read process so as long as you load your save file every 10 years, you can keep your Pokemon going for decades. For stability, [9943246367] added a 10k pull-up on the inverted CE (chip enable) pin to make sure the FRAM is disabled when not in use. A quick test shows it works beautifully. Overall, a clever and easy to have to preserve your Pokemon properly.

Since you’re replacing the chip, you will lose the data if you haven’t already. Perhaps you can use [Selim’s] Pokemon Transporter to transport your pokemon safely from the SRAM to the FRAM.

Show That Sega Saturn Save Battery Who’s Boss

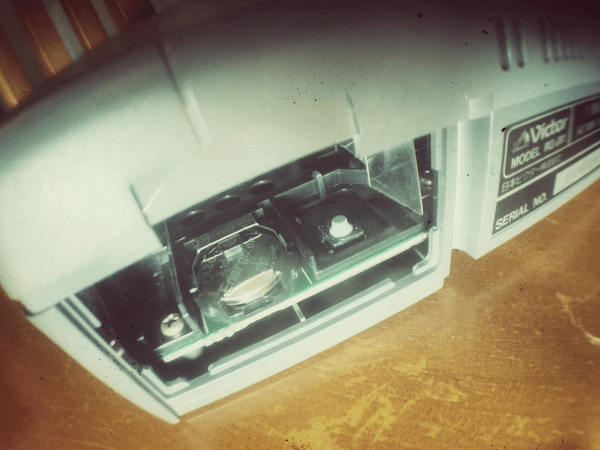
Breaking out the Sega Saturn out of the closet for a hit of 90’s nostalgia comes with its own set of compromises: the wired controllers, the composite video, and worst of all that dead CR2032 battery behind the backdoor. Along with the death of that battery went your clock and all those precious hours put into your game save files. While the bulk of us kept feeding the insatiable SRAM, a friendly Canadian engineer named [René] decided to fix the problem for good with FRAM.

The issue with the battery-backed memory in the Saturn stems from the particularly power-hungry factory installed SRAM chip. Normally when the console is plugged-in to a main power source the CR2032 battery is not in use, though after several weeks in storage the battery slowly discharges. [René’s] proposed solution was to use a non-volatile form of RAM chip that would match the pinout of the factory SRAM as close as possible. This would allow for easier install with the minimum number of jumper wires.

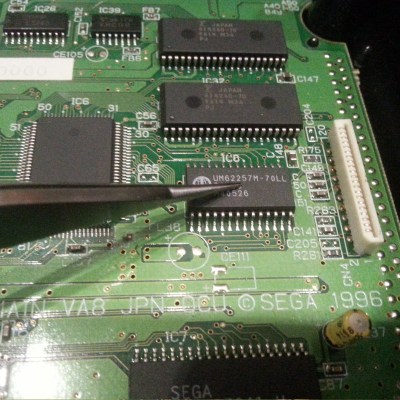
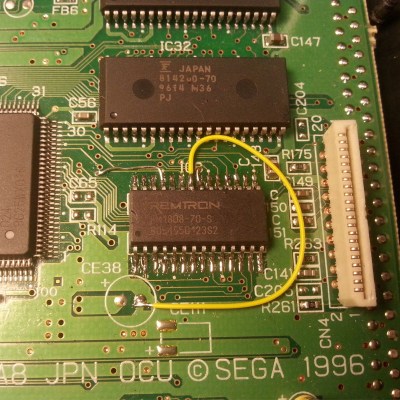
Enter the FM1808 FRAM chip complete with a whopping 256 kb of addressable memory. The ferroelectric chip operates at the same voltage as the Saturn’s factory SRAM, and has the added benefit of being able to use a read/write mode similar to that of the Saturn’s original memory chip. Both chips conform to a DIP-28 footprint, and only a single jumper wire on pin 22 was required to hold the FM1808 chip’s output-enable signal active-low as opposed to the active-high enable signal on the Saturn’s factory memory chip. The before and after motherboard photos are below:

After a quick test run of multiple successful read and writes to memory, [René] unplugged his Saturn for a couple days and found that his save files had been maintained. According to the FM1808 datasheet, they should be there for the next 45 years or so. The only downside to the upgrade is that the clock & calendar settings were not maintained upon boot-up and reset to the year 1996. But that’s nothing a bit of button-mashing through couldn’t solve, because after all wasn’t the point of all this to relive a piece of the 90s?

For more Sega Saturn goodness, check out how the Sega Saturn was finally cracked after 20 years.

Web Interface For The FRAM LaunchPad

webUILaunchpad The Internet of Things is here in full force. The first step when adding to the Internet of Things is obvious, adding a web interface to your project. [Jaspreet] wrote in to tell us about his project that adds a web interface to his MSP430 based project, making it easy to add any project to the internet of things.
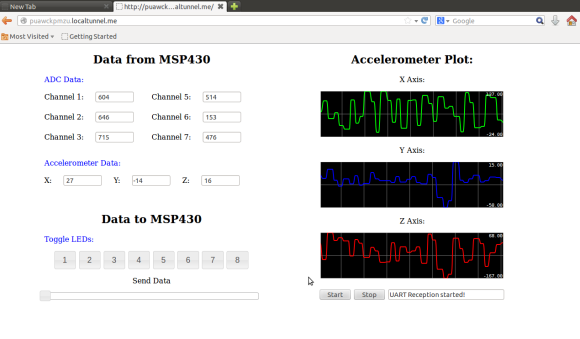
Creating a web interface can be a bit overwhelming if you have never done it before. This project makes it easy by using a dedicated computer running Linux to handle all of the web related tasks. The LaunchPad simply interfaces with the computer using USB and Python, and the computer hosts the webpage and updates it in real time using Node.js. The result is a very professional looking interface with an impressively responsive display that can control the on-board LEDs, read analog values from the integrated ADC, and stream accelerometer data. Be sure to see it in action after the break!

We could see this project being expanded to run on the Raspberry Pi with a multitude of sensors. What will you add a web interface to next? Home automation? A weather station? Let us know!

Continue reading “Web Interface For The FRAM LaunchPad”

New Version Of Energia Supports Wolverine And Connected

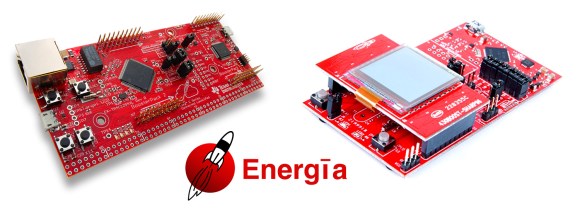
Energia UpdateThere is something to be said about how easy it is to write Arduino code. For those of who you are big fans of the MSP430 and Texas Instrument’s LaunchPad series, an upcoming release of Energia brings Arduino style coding to the two newest member of the LaunchPad family: the TivaC Connected LaunchPad EK-TM4C1294XL and Wolverine FRAM LaunchPad MSP-EXP430FR5969LP.

“Energia is an open-source electronics prototyping platform … with the goal to bring the Wiring and Arduino framework to the Texas Instruments MSP430 based LaunchPad.” The newest release of Energia is exciting for the sole reason that the new TivaC Connected LaunchPad and Wolverine FRAM LaunchPad are supported. The TivaC Connected LaunchPad is a $20 development board for TI’s low-power ARM processors that has Ethernet connectivity. The MSP430 at the heart of the Wolverine FRAM LaunchPad uses up to 250x less power than flash based MCUs at low speeds in addition to many other cool benefits.

Be sure to keep an eye out for the new version of Energia, it should be arriving sometime next week. Now is a better time than ever to try out the Tiva C or the MSP430 MCUs!

Playing Around With MRAM

For the longest time, hardware tinkerers have only been able to play around with two types of memory. RAM, including Static RAM and Dynamic RAM, can be exceedingly fast but is volatile and loses its data when power is removed. Non-volatile memory such as EPROMS, EEPROMS, and Flash memory retains its state after power is removed, but these formats are somewhat slower.

There have always been competing technologies that sought to combine the best traits of these types of memory, but not often have they been available to hobbyists. [Majenko] got his hands on a few MRAM chips – Magneto-Resistive RAM – and decided to see what they could do.

Magneto-Resistive RAM uses tiny pairs of magnetic plates to read and write 1s and 0s. [Majenko] received a sample of four MRAM chips with an SPI bus (it might be this chip, 4 Megabits for $20, although smaller capacity chips are available for about $6). After wiring these chips up on a home-made breakout board, [Majenko] had 16 Megabits of non-volatile memory that was able to run at 40 MHz.

The result was exactly what the datasheet said: very fast write and read times, with the ability to remove power. Unlike EEPROMS that can be destroyed by repeated reading and writing, MRAM has an unlimited number of write cycles.

While MRAM may be a very young technology right now, it’s a wonderful portent of things to come. In 20 (or 30, or 40) years, it’s doubtful any computer from the largest server to the smallest microcontroller will have the artificial separation between disk space and memory. The fact that any hardware hacker is able to play around with this technology today is somewhat amazing, and we look forward to more builds using MRAM in the future.