Solar Powered DIY Plant Watering System

Solar Powered Watering System

It’s great having fresh vegetables just a few steps away from the kitchen, but it takes work to keep those plants healthy. [Pierre] found this out the hard way after returning from vacation to find his tomato plant withering away. He decided to put an end to this problem by building his own solar-powered plant watering system (page in French, Google translation).

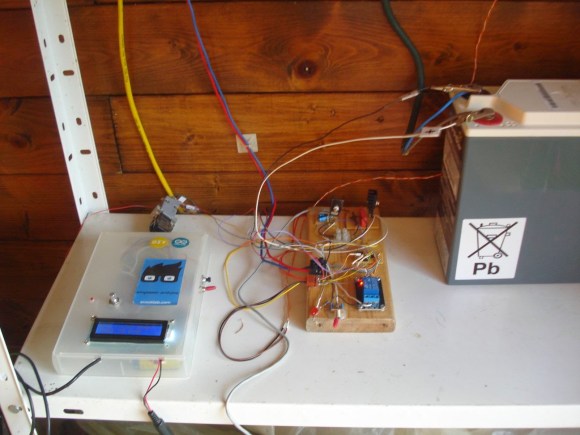
An Arduino serves as the brain of the system. It’s programmed to check a photo resistor every ten minutes. At 8:30PM, the Arduino will decide how much to water the plants based on the amount of sunlight it detected throughout the day. This allows the system to water the plants just the right amount. The watering is performed by triggering a 5V relay, which switches on a swimming pool pump.

[Pierre] obviously wanted a “green” green house, so he is powering the system using sunlight. A 55 watt solar panel recharges a 12V lead acid battery. The power from the battery is stepped down to the appropriate 5V required for the Arduino. Now [Pierre] can power his watering system from the very same energy source that his plants use to grow.

Kumo Connect: From Automated Desktop And Backyard Gardens To Automated Everything

photo hutI ran into a guy at Maker Faire Kansas City who I used to scoop ice cream with twenty years ago. We were slinging frozen dairy at a Baskin Robbins in a dying suburban strip mall that had a one-hour photo booth in the parking lot. It was just far enough away from our doorstep that dotting its backside with the hard-frozen ice cream balls that had been scooped and then not always accidentally dropped into the depths of the freezer was challenging. This guy, [Blake], kept a hockey stick hidden in the back room especially for this purpose. I never could get them to fly that far, but he was pretty good at it.

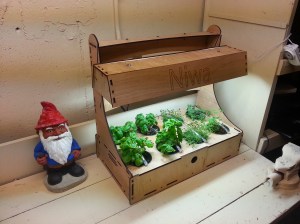
I hadn’t seen him since those days, and there he was manning a booth at Maker Faire. He looked quite professional, showing no hint of the mischief from those days of ice cream hockey. His booth’s main attraction was Niwa, a connected indoor garden. Having spent four years living and working in Japan after college, [Blake] did not choose this name arbitrarily: ‘niwa’ is Japanese for ‘garden’. He loves Hackaday and was more than happy to share his story.

Niwa and gnome

Connecting with Nature

[Blake] is an avid gardener, but his wife does not share this passion. A few years ago, he took a new job that required travel on an almost weekly basis, which meant big trouble for his plants. Unfortunately, he couldn’t find what he wanted to ensure they were taken care of. You know what comes next: he decided he would design his own system. However, he had no experience with electronics.

Continue reading “Kumo Connect: From Automated Desktop And Backyard Gardens To Automated Everything”

DIY Hydroponic System Grows Herbs On The Wall

Wall-Mounted Hydroponic Garden

Everyone knows that you should eat healthy, but it’s not always easy. Fresh and healthy foods are often more expensive than processed foods. When money is tight, sometimes it’s best to just grow your own produce. What if you don’t have room for a garden, though?

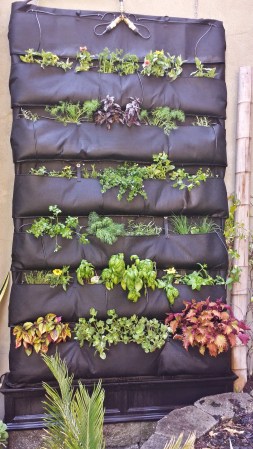
When [Matthew] returned home from the 2014 San Mateo Maker Faire, he found himself in a similar situation to many other faire attendees. He saw something awesome and was inspired to build it himself. In this case, it was a wall-mounted hydroponic garden. [Matthew] started out with some basic requirements for his project. He knew which wall he wanted to cover with plants, so that gave him the maximum possible dimensions. He also knew that they may have to remove the garden temporarily to perform maintenance on the wall in the future. And as for what to grow, [Matthew] loves lots of flavor in his foods. He chose to grow herbs and spices.

[Matthew] purchased most of the main components from Amazon and had them shipped to his doorstep. Everything else was found at the local hardware store. The base of the build is an off-the-shelf planter box. The drainage hole in the bottom was plugged up to prevent water from leaking out. A different hole was drilled in the side of the box to allow a garden hose to be mounted to the box. The hose is connected through a float valve, keeping the water level inside the box just right.

[Matthew] then built a frame out of dimensional lumber. The frame ended up being about 4.33 feet wide by 8 feet tall. The boards were fastened together with metal braces and mounting plates. A full sheet of plywood was then nailed to the front of the frame. Thick plastic sheet was then wrapped around the frame and stapled in place.

[Matthew] purchased giant planter pockets to actually hold the plants. He tried stapling them to the front of the frame, but discovered that staples were not strong enough to hold the weight of the plants, soil, and water. He instead used screws and washers.

Next, a submersible pump was mounted inside the bottom planter box. This pump is used to circulate the water and nutrients up to the plants above. Two hoses were connected to the pump and run up the sides of the upper frame. These hoses evenly distribute the water to the plants.

The final step was to mount the unit in place against the wall. [Matthew] didn’t want to screw into the wall and cause any damage. Instead, he placed a couple of bricks inside of the planter box and rested the bottom of the frame on top of those. The top of the frame is essentially hung from a railing up above with some thin steel wire.

The whole unit looks very slick and takes up little space. With some more ingenuity, one could likely build something similar with even more DIY components to save some more money.

Arduino Astronomic Clock Automates Lights

ardAst

[Paulo’s] garden lights are probably a bit more accurately automated than anyone else’s on the block, because they use latitude and longitude clock to decide when to flip the switch. [Ed Note from the far future: this page no longer exists, but you can still read it on the Wayback Machine. The TimeLord library has also been superceded, so you’ll have some porting to do.]

Most commercial options (and hobbiest creations) rely on mechanical on/off timers that click on an off every day at the same time, or they use a photosensitive element to decide it’s dark enough. Neither is very accurate. One misplaced leaf obscuring your light-dependent resistor can turn things on unnecessarily, and considering the actual time of sunset fluctuates over the year, mechanical switches require constant adjustment.

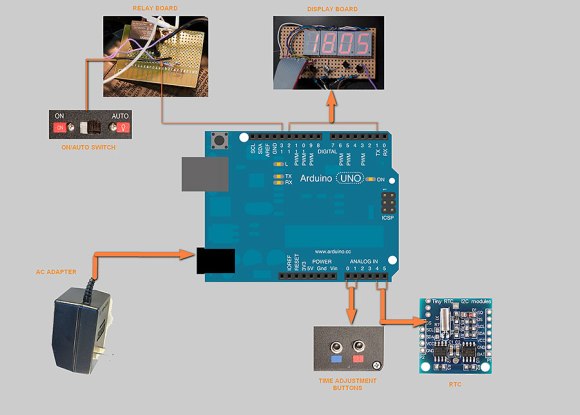
[Paulo’s] solution addresses all of these problems by instead relying on an algorithm to calculate both sunrise and sunset times, explained here, combined with swiftek’s Timelord library for the Arduino. The build features 4 7-segment displays that cycle through indicating the current time, time of sunset and of sunrise. Inside is a RTC (real time clock) with battery backup for timekeeping along with an Omron 5V relay to drive the garden lamps themselves. This particular relay comes with a switch that can force the lights on, just in case.

Check out [Paulo’s] project blog for the full write-up, links to code and more details, then take a look at some other home automation projects, like the SMS-based heater controller or occupancy-controlled room lighting.

Fully Automated Watering Robot Takes A Big Leap Forward Toward Greenhouse Automation

aquarius_robot

Greenhouse owners might find [David Dorhout]’s latest invention a groundbreaking green revolution! [David]’s Aquarius robot automates the laborious process of precision watering 90,000 square feet of potted plants. Imagine a recliner sized Roomba with a 30 gallon water tank autonomously roaming around your greenhouse performing 24×7 watering chores with absolute perfection. The Aquarius robot can do it all with three easy setups; add lines up and down the aisles on the floor for the robot to follow, set its dial to the size of your pots and maybe add a few soil moisture sensors if you want the perfect amount of water dispensed in each pot. The options include adding soil moisture sensors only between different sized plants letting Aquarius repeat the dispensing level required by the first plant’s moisture sensor for a given series.

After also digging through a pair of forum posts we learned that the bot is controlled by two Parallax propeller chips and has enough autonomous coding to open and close doors, find charging stations, fill its 30 gal water tank when low, and remember exactly where it left off between pit stops. We think dialing in the pot size could easily be eliminated using RFID pot identification tags similar in fashion to the Science Fair Sorting Project. Adjusting for plant and pot size as well as location might easily be automated using a vision system such as the featured Pixy a few weeks back. Finally, here are some featured hardware hacks for soil moisture sensing that could be incorporated into Aquarius to help remotely monitor and attend to just the plants that need attention: [Andy’s] Garden sensors, [Clover’s] Moisture control for a DIY greenhouse, [Ken_S’s] GardenMon(itoring project)

[David Dorhout] has 14 years experience in the agriculture and biotech industry. He has a unique talent applying his mad scientist technology to save the future of mankind as seen with his earlier Prospero robot farmer. You can learn more about Aquarius’s features on Dorhout R&D website or watch the video embedded below.

Continue reading “Fully Automated Watering Robot Takes A Big Leap Forward Toward Greenhouse Automation”

Update: Grow Controller Rebuilt To Last

new-grow-controller

[The Cheap Vegetable Gardener] assembled his first grow controller about three and a half years ago. He’s been very happy with it and knows that he’ll be using it for years, maybe even decades to come. He just finished overhauling the grow controller design to help make sure he doesn’t burn down his garage one day. You have to admit, without knowing anything about the project this rendition does look safer than his original offering.

Pictured above is the weather-proof enclosure he used to house four mains-rated solid state relays. This box is isolated from the control hardware, providing heavy-duty utility plugs to interface with the heater, lights, fan, and water pump.  He mounted the Arduino board which controls the relays to the outside of the box, using the Ethernet wire to switch the SSRs. It uses a manufactured shield he designed which will help ease the pain of fixing the system if parts ever go bad.

Later on in the build he shows the grow light and heaters used in his operation. The heaters simply screw into light sockets; something we’ve never come across before.

Warming Seeds In An Outdoor Garden

resistor-string

Spring is almost here and with that the green thumbs out there are preparing for their summer gardens. It’s usually a good idea to get a jump on all your gardening activities by starting seeds indoors, but with this comes the problem of making sure juvenile plants get enough sunlight. Putting a few seeds on a window sill will keep seeds warm enough to start germinating, but that will drastically reduce the amount of sunlight available for any given day. The best solution is to make sure the seeds are kept warm outside, but for wont of a properly placed clothes dryer vent [Tim] decided to make a solar soil heater using junk he had lying around.

[Tim] constructed a simple heater cartridge using a few 5 and 10 Ω resistors. These were sealed inside a piece of copper pipe with heat shrink tubing and silicone. The solution to powering this heater cartridge, though, is an impressive display of thinking outside the box.

The cartridge is powered by a solar lantern – the same kind you’d find illuminating a garden path at night and recharging during the day. After inserting the cartridge in a hill of seeds, the heater provides a little bit of warmth to get the seeds through the night. During the day, the battery in the solar lantern recharges, providing just enough power to cycle through another night.

It works for [Tim] in his native New England, so we’re betting it’s good enough for just about any growing region.