Talk Of The Town: Hacker Channel Tomorrow

Get in touch with Hackers everywhere. Take part in the Collabatorium tomorrow, live!

request-to-join-hacker-channelThings get started on Wednesday, July 1st at 6:30pm PDT (UTC-7). Hundreds of hackers will be on hand discussing what they’re building, all the stuff happening in the hacker-sphere these days, and joining forces for that next great hack!

All are invited to take part. Head on over the Hackaday Prize Hacker Channel right now and click on the left sidebar link that says “Request to join this project”.

We highly recommend adding a custom avatar (if you haven’t already) so that others in the Collabatorium will be able to put a picture to your personality. The interface is ready for chat, links, images, code and much more so bring your questions and share your knowledge.

Now that you’ve clicked for an invite, while away the hours until it begins by heading over to VOTE in this week’s Astronaut or Not. And soon after you run through your 50 votes we’re sure you’ll also figure out you don’t have to wait for us to get the conversation started in the Hacker Channel ;-)

Astronaut Or Astronot: Amazingly Engineered

The latest round of community voting in The Hackaday Prize asked a simple question: which project is most likely to save the planet? The results will be posted on Monday.

Now it’s time to see if we’re giving away a $1000 gift card to the Hackaday Store, or just some prizes to people who have voted. The rules here are simple: I’m randomly selecting one person on Hackaday.io. if and only if that person has voted in the latest round of community voting, they get a thousand dollar gift card to the Hackaday store. If the randomly selected person did not vote, I select three people who have voted in the latest round of community voting. For the last few weeks, we’ve been giving out t-shirts. To sweeten the deal, we’re giving away a SmartMatrix, A Simon Says kit, and an Analog Stepper gauge to three people, just because they’ve voted.

Here’s the video:

https://www.youtube.com/watch?v=etBVxy9SvmY

Drat, the Hacker number randomly selected for the $1000 gift card hadn’t voted! Oh what could have been. Don’t let this happen to you next week, VOTE!

To soften the bitterness of defeat we dole out a few awesome prizes to those who had. [xanatos333] gets the Simon Says kit, [sylph.ds] gets an Analog Stepper Gauge, and [dougmsbbs] gets a Smartmatrix. Thanks to those who voted, and be sure to vote in the next round:

NEW ROUND OF VOTING

We’ll have to do some math and run a few scripts to figure out which projects the Hackaday.io community deemed most likely to save the planet. Until we put that data together, it’s time to start a new round of voting. This week, we’re looking for projects that are Amazingly Engineered.

Next Friday we’ll select a random person on Hackaday.io, and if they have voted, they get a $1000 gift card! For the apathetic non-voters… nada.

Hacklet 53 – Quick Tool Hacks

They say necessity is the mother of invention. Have you ever been right in the middle of a project, when you realize that you could hack up a simple tool which would make your current task easier? Maybe it’s a coil winder, or a device to hold .100 headers straight in their holes. Faster than you can say “Arabian Nights”, you’re working on a project within a project. It might not be pretty, but it gets the job done. This week’s Hacklet is all about quick tool hacks – little projects that help out around the shop or hackerspace.

lampieWe start with [theonetruestickman] and Magnificent Magnifier LED Coversion. [theonetruestickman] picked up an articulated magnifier lamp at Goodwill for $4. These lamps are a staple of benches everywhere. The only problem was the switch and fluorescent tube were both failing. [theonetruestickman] didn’t feel bad for the lamp though. He pulled out the tube, ballast, and starter, replacing them with LEDs. He used 12 V 3 watt LED modules to replace the tube. Three modules provided plenty of light. An old wall wart donated its transformer to the effort. Since these LED modules are happy running on AC, no bridge rectifier was necessary. The modernized lamp is now happily serving on [theonetruestickman’s] workbench.

toolNext up is [Kwisatz] with Pick Up tool hack. [Kwisatz] is a person of few words. This whole project consists of just two words. Specifically, “syringe” and “spring”. Thankfully [Kwisatz] has provided several pictures to show us exactly what they’ve created. If you’ve ever used one of those cheap pickup tools from China, you know [Kwisatz’s] pain. The tiny piece of surgical tube inside the tool creates a feeble vacuum. These tools only hold parts for a few seconds before the vacuum decays enough to drop the part. [Kwisatz] kept the tip of the tool, but replaced the body with a syringe. A spring is used to create just the right amount of vacuum to hold parts on while they are being placed.

fume[Dylan Bleier] made his shop air a bit safer to breathe with a simple fume extractor for $20. Solder and flux create some nasty smoke when heated. Generally that smoke wafts directly into the face of the hacker peeking at the 0402 resistor they are trying to solder. A bit of smoke once in a while might not be so bad, but over the years, the effects add up. [Dylan] used two 120V AC bathroom fans, some metal ducting, plywood, and a bit of time to make this fume extractor. [Dylan] is the first to say it’s not UL, CE, or ROHS compliant, but it does get the job done. He even added a screen to keep bugs from flying in from the outdoor exhaust port.

helix[ftregan] needed to wind a helical coil for an antenna, so he built Helix Winder. Helices are essentially springs, so that should be easy, right? Turns out that making a nice uniform helix is not the easiest thing in the world. The helix winder is a jig which makes winding these special coils much easier. Holes are drilled at a specific angle in a wooden block. The wire is fed through that block and rolled onto an aluminum tube. Rotating the block on the tube forces the wire into the helix shape. The only downside is that each winder is only good for once dimension of helix.

I’ve noticed that some of these quick hacks don’t get as much love as they deserve over on hackaday.io. So if you notice a cool hack like this, drop a comment and give the project a skull. If you want to see more of these hacks, check out our new quick tool hacks list! See a project I might have missed? Don’t be shy, just drop me a message on Hackaday.io. That’s it for this week’s Hacklet, As always, see you next week. Same hack time, same hack channel, bringing you the best of Hackaday.io!

An Electronic Woodwind With An Onboard Synthesizer

About a year ago, we saw a project on Hackaday.io for a MIDI wind controller. Keyboard MIDI controllers are a dime a dozen, but if you want something that actually sounds like a brass or woodwind instrument, you need something that’s controlled by a breath sensor. Since then, this project has been updated with an onboard synthesizer. It sounds great, and thanks to some interesting components, the part count is actually really low.

The synthesizer used for this project is just a single chip – the DSP-G1 from [Jan Ostman]. This isn’t a custom ASIC or anything fancy; it’s just an 8-pin ARM microcontroller in DIP format, the LPC810.

The rest of the instrument is just a series of pressure sensors along the body, and a breath sensor. The plan is to stuff all the electronics – a microcontroller to read the touch and breath sensors, the DSP-G1 chip, and the battery  – inside the body of the instrument. That’s something that would be incredibly cool, and much more capable than the wind controllers that are available today.

You can see a few videos of the wind controller below.

Continue reading “An Electronic Woodwind With An Onboard Synthesizer”

Astronaut Or Astronot: Round 1 Over, Round 2 Begins

For the last two weeks, we’ve been asking everyone over on hackaday.io to participate in the current round of community voting. We were asking everyone to choose the projects that were Most Likely To Be Widely Used. We just turned off voting for this round, and it’s time for round two: Which project is most likely to save the planet?

Before we get to that, I need to pick a random person on hackaday.io, figure out if they have voted, and if so, send off a $1000 gift card to the Hackaday store. Vidya time:

https://www.youtube.com/watch?v=W5cHeCntgL8

No one won a $1000 gift card for the Hackaday store this week. In lieu of that, we’re arming the t-shirt cannon and aiming it at three random people who did vote. They are, in order of appearance, [Nick], [dbcarp], and [Eugene].

If you’re wondering about the results of this current round of voting and which projects the Hackaday community think are most likely to be widely used, hold tight. There are a lot of votes, and all that needs to be tabulated and computed and presented in a friendly graphical format. Also, it’s Friday afternoon. The winners of the first round of voting will be announced on Monday.

Round Two…. Most Likely To Save The Planet

It’s time for a new round of voting! This time, the theme is, Most Likely To Save The Planet. Voting is easy, just go over to the community voting page. You will be presented with two projects entered in the Hackaday Prize. One of these projects will invariably be more likely to save the planet. It is your task to decide which one. Vote for the project that is more likely to save the planet, and you’re in the running for t-shirts or Hackaday store gift cards in the drawing next week.

Here’s a video showing you how to vote:

https://www.youtube.com/watch?v=DeEf_VLKUl4

That’s all you have to do to vote in the Hackaday Prize community voting. Here’s a link to go do thatWe’ll do the same thing next Friday afternoon – choose a random person on Hackaday.io, and if they have voted, they get a $1000 gift card for the Hackaday store. The only losing move is not to play, so go vote.


The 2015 Hackaday Prize is sponsored by:

Hacklet 52 – Breakout Board Projects

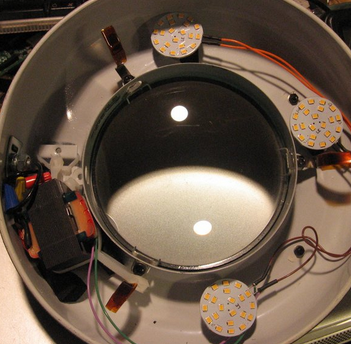
Starting a design with a new part can be hard. What power supply voltage(s) does it need? Are there any support component requirements? What is the footprint? What about the I/O voltage levels? Breakout boards are designed to answer all those questions for you. Breakouts help when you’re designing with a new part – be it a microcontroller, a sensor, a motor driver, or anything else. They also are a huge help when you’re trying to knock out a quick hack, and just need to get something working quick. Fast to integrate, often breadboard friendly, breakouts just make things easier! This week’s Hacklet is about some of the best breakout board projects on Hackaday.io!

32f4We start with [Christoph] and STM32F030F4P6 breakout board. Inspired by the Teensy 3.0, [Christoph] set out to build a simple, easy to use, and small breakout board for an ARM processor. The STM32F030F4P6 is a great starting point. At only 20 pins, it’s one of the smallest ARM based chips around. He added the basic things needed to bring this chip up: decoupling caps, a reset button, headers for ST’s software debugger, and of course an LED for a blinky hello world program. The resulting board is physically tiny, but this lilliputian ARM board packs Coretex M0 powered punch!

drv
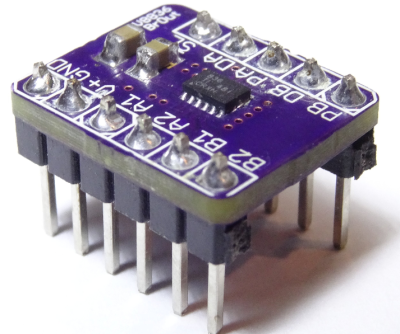
Next up is [al1] and DRV8836 Breakout. Sooner or later, everyone wants to drive a motor in one of their projects. It’s a rite of passage, just like blinking an LED. Motors pull a lot of current though, so external transistors or driver chips are almost always necessary. TI’s DRV8836 chip packs two full H-bridges into one package. That’s enough to drive two DC motors or one stepper. Handling 1.5 amps of current per driver in a tiny package means that thermal coupling is important. The DRV8836 has a large thermal pad which has to be soldered to keep the magic smoke in. [al1] dropped the chip, along with the correct thermal footprint and decoupling capacitors onto a simple breakout. The result is easy to use motor drivers for the masses.

esp
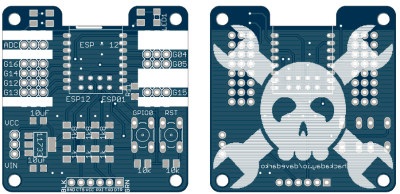
Hackaday.io power user [davedarko] took cues from his favorite designs to create Ignore this ESP8266 board. In [Dave’s] own words, “I stole from every one. The huzza from Adafruit, [Matt’s] breakout board, [Al1s] board, NodeMCUs DevKit.” Hey [Dave] there’s no stealing in open source hardware! There is  only design reuse with attribution, which is exactly what you’re doing. [Dave’s] breakout can use both popular ESP8266 footprints: the ESP-01 and ESP-12. He’s added power, reset/programming buttons, and the all important serial header to talk to the module. Going serial allows dave to keep costs down by not including an expensive serial to USB chip in the BOM. Most of us have FTDI cables (or clones) bouncing hanging around anyway. We definitely like the logo on this one!

bbb
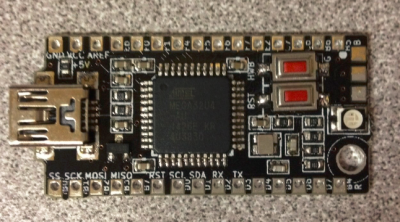
Finally we have [The Big One] with uBBB 32u4. uBBB 32u4 is a bigger brother of µbbb, a Hackaday.io project [Warren] and [The Big One] worked on. µbbb uses an Atmel ATmega32u2 processor. [The Big One] has expanded the faimly to include an ATmega32u4. If you’re wondering, uBBB stands for “Micro Bare Bones Board” At 1.65″ x 0.8″, this is a micro board. It still manages to  include everything you need to get the processor up and running fast. Crystal, buttons, decoupling caps, and LEDs – everything is here. A mini USB connector makes communicating with the ATmega a snap!

If you want to see more breakout boards, check out our new breakout board list! If I’ve forgotten to add you to the list, just drop me a message on Hackaday.io. That’s it for this week’s Hacklet, As always, see you next week. Same hack time, same hack channel, bringing you the best of Hackaday.io!

Walk Your Pet Robot

Anyone who’s ever tried to build a bipedal robot will quickly start pulling their own hair out. There are usually a lot of servos involved, and controlling them all in a cohesive way is frustrating to say the least. [Mark] had this problem while trying to get his robot to dance, and to solve it he built a control system for a simple bipedal robot that helps solve this problem.

[Mark]’s robot has six servo motors per leg, for a total of 12 degrees of freedom. Commands are sent to the robot with an RC radio, and the control board that he built, called the Smart Servo Controller, receives the signals and controls the servos appropriately. There are 14 outputs for servos, operating at 12 bits and 50 Hz each, as well as 8 input channels. The servo controller can be programmed on a computer with user-selectable curves for various behaviors for each of the servos on the project. This eliminates the need to write cumbersome programs for simple robot movements, and it looks like it does a pretty good job!

Full disclosure: [Mark] currently has this project up on Kickstarter, but it is a unique take on complex robot control that could help out in a lot of different ways. Since you don’t need to code anything, it could lower the entry barrier for this type of project, possibly opening it up to kids or school projects. Beyond that, even veterans of these types of projects could benefit by not having to do as much brute-force work to get their creations up and moving around!

Continue reading “Walk Your Pet Robot”