Controlling RGB LEDs With The Pi Zero

The Pi Zero is a great piece of hardware, even if you’re not designing another USB hub for it. [Marcel] wanted to control a few RGB LED strips from his phone, and while there are a lot of fancy ways you can do this, all it really takes is a Pi Zero and a few parts that are probably already banging around your parts drawers.

This isn’t a project to control individually addressable RGB LEDs such as NeoPixels, WS2812s, or APA102 LEDs. This is just a project to control RGB LEDs with five four connectors: red, green, blue, power, and or ground. These are the simplest RGB LEDs you can get, and sometimes they’re good enough and cheap enough to be the perfect solution to multi-colored blinkies in a project.

Because these RGB LEDs are simple, that means controlling them is very easy. [Marcel] is just connecting a transistor to three of the PWM pins on the Pi and using a TIP122 transistor to drive the red, green, and blue LEDs. You’ve got to love those TIPs package parts!

Control of the LEDs is accomplished through lighttpd. This does mean a USB WiFi dongle is required to control the LEDs over the Internet, but it is so far the simplest way we’ve seen to add multicolor blinkies to the web.


Raspberry_Pi_LogoSmall

The Raspberry Pi Zero contest is presented by Hackaday and Adafruit. Prizes include Raspberry Pi Zeros from Adafruit and gift cards to The Hackaday Store!
See All the Entries || Enter Your Project Now!


Super Sizing The Printrbot Metal Simple

The Printrbot Simple Metal is a good 3D printer, with a few qualifications. More accurately, the Printrbot Simple Metal is a good first 3D printer. It’s robust, takes a beating, can produce high-quality prints, and is a great introduction to 3D printing for just $600. There are limitations to the Printbot Simple Metal, the most important is the relatively small 150mm cubed build volume.

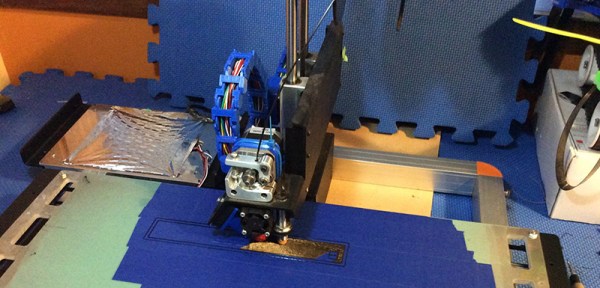
[ken.do] wanted to print large parts, specifically scale aircraft wings and panels. While the Printrbot can’t handle these things normally, the design of the printer does lend itself to increasing the size of the build volume to 500mm long and 500mm high.

Increasing the build height on the Printrbot is as simple as adding two longer smooth rods and a single threaded rod to the Z axis. Increasing the X axis is a bit trickier: it requires a very flat sheet that doesn’t warp or bend over 500 mm, even when it’s being supported in different places. [ken.do] is engineering stiffness into a build plate here. The solution to a huge bed is a two kilogram aluminum bed supported by heavier rails and riding on a massive printed bushing block. Does it work? Sure does.

If you want to print tall objects, the current crop of 3D printers has you covered: just get a delta, and you’re limited only by the length of the extrusion used in the body. Creating big objects in all three dimensions is a marginally solved problem – just get a big printer. Big printers have drawbacks, notably the incredible power requirements for a huge heated build plate.

The ability to print long objects is a problem that’s usually not addressed with either commercial 3D printers or RepRaps. We’re glad to see someone has finally realized the limitations of the current crop of 3D printers and has come up with a way to turn a very good first printer into something that solves a problem not covered by other 3D printers.

Building The World’s Smallest RGB LED Cube

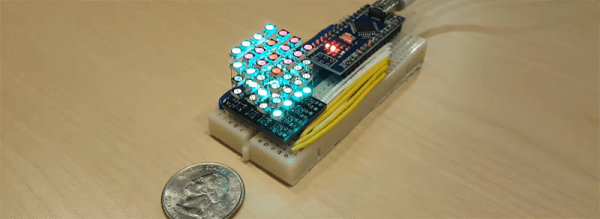
What’s the smallest RGB LED cube? A 1x1x1 cube is easy, but it’s a stupid joke and we’ve heard it before. No, to build the smallest LED cube, you’ll have to stuff 64 RGB LEDs into a cubic inch, like [Hari] did with his miniscule LED cube.

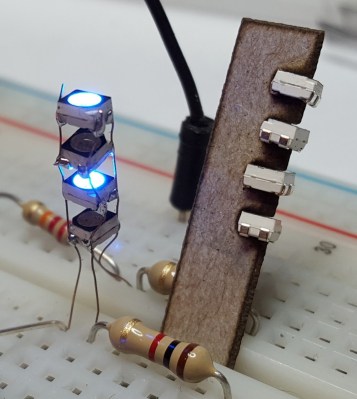
A single column of Charlieplexed LEDs. Note the resistor for scale.

One might think that individually addressable RGB LEDs are the way to go with an LED cube this small. Anything else would hide the LEDs behind a mess of wires. This isn’t the case with [Hari]’s LED cube – he’s using standard surface mount RGB LEDs for this build. But how is he connecting the things?

The entire build was inspired by the a much earlier project, the Charliecube. This LED cube, like [Hari]’s uses Charlieplexing to condense all the connections for a column of LEDs to only four wires. Repeat that sixteen times, and [Hari] built himself a tiny, one-inch cube of glowey goodness.

The cube itself was built with a PCB backplane designed in Eagle and fabbed at OSHPark. The LEDs are driven by an Arduino Nano. If you’d like to build your own, or you’re a masochist for dead bug soldering, you can grab all the design files over on [Hari]’s hackaday.io project page.

Continue reading “Building The World’s Smallest RGB LED Cube”

Link Trucker Is A Tiny Networking Giant

If you’re a networking professional, there are professional tools for verifying that everything’s as it should be on the business end of an Ethernet cable. These professional tools often come along with a professional pricetag. If you’re just trying to wire up a single office, the pro gear can be overkill. Unless you make it yourself on the cheap! And now you can.

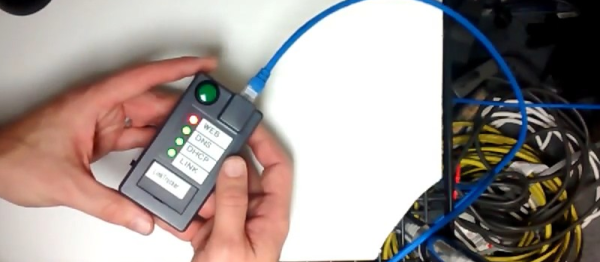
[Kristopher Marciniak] designed and built an inexpensive device that verifies the basics:

  • Is the link up? Is this cable connected?
  • Can it get a DHCP address?
  • Can it perform a DNS lookup?
  • Can it open a webpage?

What’s going on under the hood? A Raspberry Pi, you’d think. A BeagleBoard? Our hearts were warmed to see a throwback to a more civilized age: an ENC28J60 breakout board and an Arduino Uno. That’s right, [Kristopher] replicated a couple-hundred dollar network tester for the price of a few lattes. And by using a pre-made housing, [Kristopher]’s version looks great too. Watch it work in the video just below the break.

Building an embedded network device used to be a lot more work, but it could be done. One of our favorites is still [Ian Lesnet’s] webserver on a business card from way back in 2008 which also used the ENC28J60 Ethernet chip.
Continue reading “Link Trucker Is A Tiny Networking Giant”

The Best Projects That Fit In A Square Inch

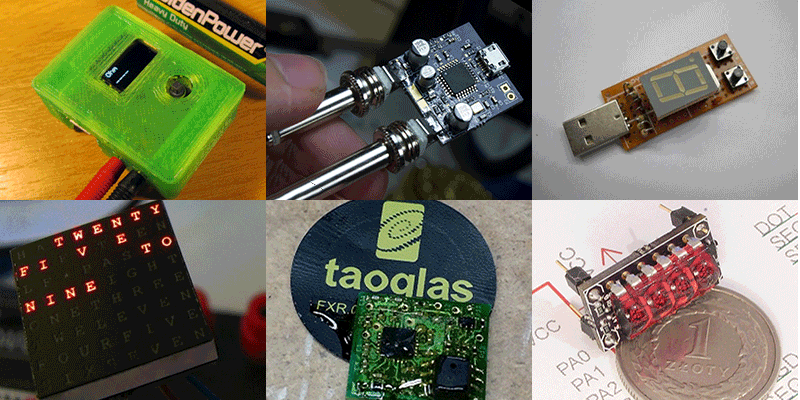
A few years ago, we started Hackaday.io as a project hosting site for The People Who Actually Make Stuff™, and since then we’ve been amazed by what the community can put together. We have well over 100,000 hackers on board in an awesome community. Sometime around September, a few members of the Hackaday.io community decided to follow in the footsteps of the very successful contests we’ve had on Hackaday.io. This led to the Square Inch Contest, a challenge to put the coolest electronics inside a square inch PCB. An inch the distance light travels in 1/11802852665.12644 of a second for those of you without freedom units.

quad
The winner, Quadcopter In One Inch

With almost eighty entries, the judges had a very difficult task ahead of them. In the end, only one project would be the best. The winner of Hackaday.io’s first user-created contest is Quadcopter In One Inch from [jeff]. This wins the grand prize of a $100 credit for the Hackaday Store and a $50 gift certificate to OSHPark.

There are six other prizes, each receiving a $50 credit to the Hackaday Store and $25 for OSHPark:

Winners

The judges for the Square Inch Project would like to give an honorable mention to Twiz and the blinktronicator. The judges would also like to express amazement in how much work actually goes into judging a contest on Hackaday.io. Spending a few weeks working on the judging for a contest with eighty entries imbues a sort of respect for people who can judge a contest with one thousand entries in three days, as the Hackaday crew has done with two Hackaday Prizes so far. While they were doing that, I was sitting back and cracking jokes about Fleiss’ Kappa.

This was the first community-created contest on Hackaday.io, but it is surely not the last. We don’t know what the next contest will be – that will be up to someone on Hackaday.io – but there will be one, and like the Square Inch Project, it will be awesome.

This Project Will Be Stolen Again

The Travelling Hacker Box is the physical implementation of the hackaday.io community. While most of what happens on hackaday.io happens online, sometimes the activities leak out to the real world. One such activity is a box, filled with random electronics stuff, shipped around to different members of the hackaday.io community.

hackerboxIt’s a great idea in theory. In practice, people are bastards. The first Travelling Hacker Box was stolen by a member of the hackaday.io community. After travelling 14,167 miles through Philadelphia, San Francisco, Boston, Seattle, New York, Boston again, and the middle of Texas, the first travelling Hacker Box met its fate along the Georgia border, two hours outside of Atlanta. Who is responsible? We’re not going to talk about him. He knows who he is and what he did.

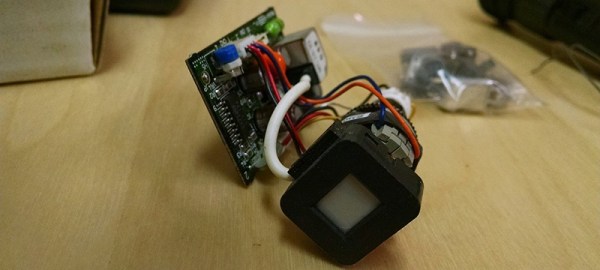
All is not lost, even though hundreds of dollars in electronic doo dads are. There’s a new Travelling Hacker Box already on its way around the US. It’s slowly being filled up with goodies, and has already visited Wyoming and upstate New York, and is currently somewhere around Anchorage, AK. The latest update shows this box is filled with goodies including a mini CRT assembly from an old camcorder, stepper motor drivers, and other weird electronics paraphernalia.

The travels of the current Travelling Hacker Box

The current plan for the Travelling Hacker Box is the same as the old box: put 25,000 miles on the odometer while taking advantage of the economics of a USPS flat-rate box. From there, it will go further afield, travelling the circumference of the Earth a second time, hitting stops in Europe, Africa, Asia, India, Australia, and South America. If you’re a subcontractor for Raytheon, part of the NY Air National Guard, or are otherwise able to receive mail in Antarctica, you are encouraged to email me.

Feel like you’re up for adding a few hundred miles to the Travelling Hacker Box? There’s no set process to get on the list; destinations are chosen by distance from the current node, trustworthiness, and distance to the next node, if planned. The best way to get on the list is to click the ‘Request to join this project’ link on the Travelling Hacker Box project. Then, hang out in the Hacker Box chatroom, and you might have a chance at receiving a magical box of random electronics.

The Hackaday 2015 Omnibus: A Puzzle So Dense, Even We Don’t Know The Answer

Print is dead, so we put a skull on it. That’s the philosophy behind the 2015 Hackaday Omnibus, the printed collection of the best Hackaday has to offer.

We have a few ideas of where we would like to take the print edition of Hackaday. Mad magazine-style fold-ins are on the list, specifically a fold-in style schematic that does two completely different things. Remember when records were included as a magazine insert? Those are called flexi-discs, and there’s exactly one company that still does it. All of these and more are plans for the future, and for the 2015 Hackaday Omnibus, we chose to include something we’re all very familiar with: a puzzle. This is no ordinary puzzle – even we don’t know what the solution is.

EOT ACK BS
The first clue on the front cover of the 2015 Omnibus

Continue reading “The Hackaday 2015 Omnibus: A Puzzle So Dense, Even We Don’t Know The Answer”