Restoration Of A Thinkpad 701C

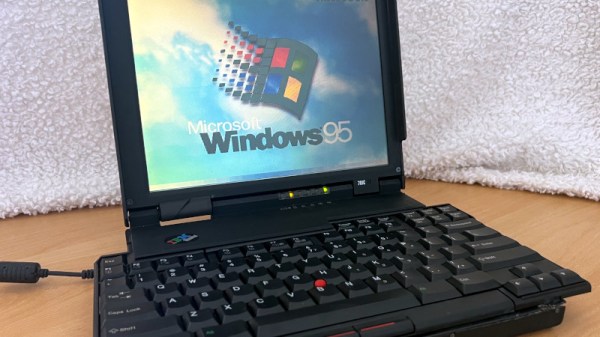
This is like ASMR for Hackers: restoration specialist [Polymatt] has put together a video of his work restoring a 1995 IBM Thinkpad 701c, the famous butterfly keyboard laptop. It’s an incredible bit of restoration, with a complete teardown and rebuild, even including remaking the decals and rubber feet.

[Polymatt] runs Project Butterfly, an excellent site for those who love these iconic laptops, offering advice and spare parts for restoring them. In this video, he does a complete teardown, taking the restored laptop completely apart, cleaning it out, and replacing parts that are beyond salvaging, like the battery, and replacing them. Finally, he puts the whole thing back together again and watches it boot up. It’s a great video that we’ve put below the break and is well worth watching if you wonder about how much work this sort of thing involves: the entire process took him over two years.

We’ve covered some of his work in the past, including the surprisingly complicated business of analyzing and replacing the Ni-Cad battery that the original laptop used. Continue reading “Restoration Of A Thinkpad 701C”

Bus Sniffing The Model 5150 For Better Emulation

At the risk of stating the obvious, a PC is more than just its processor. And if you want to accurately emulate what’s going on inside the CPU, you’d do well to pay attention to the rest of the machine, as [GloriousCow] shows us by bus-sniffing the original IBM Model 5150.

A little background is perhaps in order. Earlier this year, [GloriousCow] revealed MartyPC, the cycle-accurate 8088 emulator written entirely in Rust. A cycle-accurate emulation of the original IBM PC is perhaps a bit overkill, unless of course you need to run something like Area 5150, a demo that stretches what’s possible with the original PC architecture but is notoriously finicky about what hardware it runs on.

Getting Area 5150 running on an emulator wasn’t enough for [GloriousCow], though, so a deep dive into exactly what’s happening on the bus of an original IBM Model 5150 was in order. After toying with and wisely dismissing several homebrew logic analyzer solutions, a DSLogic U3Pro32 logic analyzer was drafted into the project.

Fitting the probes for the 32-channel instrument could have been a problem except for the rarely populated socket for the 8087 floating-point coprocessor on the motherboard. A custom adapter gave access to most of the interesting lines, including address and data buses, while a few more signals, like the CGA sync lines, were tapped directly off the video card.

Capturing one second of operation yielded a whopping 1.48 GB CSV file, but a little massaging with Python trimmed the file considerably. That’s when the real fun began, strangely enough in Excel, which [GloriousCow] used as an ad hoc but quite effective visualization tool, thanks to the clever use of custom formatting. We especially like the column that shows low-to-high transitions as a square wave — going down the column, sure, but still really useful.

The whole thing is a powerful toolkit for exploring the action on the bus during the execution of Area 5150, only part of which [GloriousCow] has undertaken as yet. We’ll be eagerly awaiting the next steps on this one — maybe it’ll even help get the demo running as well as 8088MPH on a modded Book8088.

FPGA Runs IBM 5151 MDA Display

When it comes to driving a display, you can do all kinds of fancy tricks with microcontrollers to get an image up. Really, though, FPGAs are the weapon of choice for playing with these kinds of signals. [Ted Fried] put one to great work driving an ancient IBM 5151 MDA display, and shared his results on Hackaday.io.

The build relies on a Digilent Arty Z7-20 SOC FPGA development board, which has a beefy 600 MHz ARM processor on board. It also packs 500 MB of DRAM—more than enough for storing pixel data for an ancient display.

To drive the old display, [Ted] whipped up a state machine on the FPGA. It’s tasked with fetching display data from RAM and creating the appropriate timings for the MDA display interface. The images are stored directly in an array in C code running on the ARM core. From there, they are copied into the FPGA’s RAM for trucking out to the display. The 720×350 images are stored as 1 bit per pixel, and are created by converting the original JPEGs into single-bit bitmaps in GIMP, before final conversion into a C code array via utility of [Ted’s] own design.

If you’ve ever wanted to display your images in resplendent amber or green, then this could be the project for you. It’s also just a great way to learn about using FPGAs and interfacing with alternative display technologies. If you’ve been whipping up your own retro display hacks, don’t hesitate to drop us a line.

Retrotechtacular: The Computer Center Of 1973

You might expect Bell Labs would have state-of-the-art computers, and they did. But it is jarring to realize just how little that was in 1973, fifty years ago. If you started work at Bell’s Holmdel Computing Center back then, you might have watched one of the orientation videos below. Your first clue about how far things have come might be the reference to the IBM 370/165, which had “3 million bytes of core, 2 million of which are available for programmer use.” Even our laptops today have at least 8 gigabytes of RAM. There were at least two other smaller IBM 370s, too. Plenty of 029 card punches are visible.

If you were trying to run something between 8:00 AM and 5:30 PM, you had to limit your job run time to three minutes, 4,000 lines of output, and no more than 1,000 cards in and 5,000 cards out. Oh, and don’t use more than 384 kB of that core memory, either. If you fell within those limits, you could hand your card deck over at the express counter and get your results in only five or ten minutes. If you were not in the express line but still rated “premium” service, you could expect to wait a half hour.

Continue reading “Retrotechtacular: The Computer Center Of 1973”

Selectric Typewriter Goes From Trash Can To Linux Terminal

If there’s only lesson to be learned from [alnwlsn]’s conversion of an IBM Selectric typewriter into a serial terminal for Linux, it’s that we’ve been hanging around the wrong garbage cans. Because that’s where he found the donor machine for this project, and it wasn’t even the first one he’s come across in the trash. The best we’ve ever done is a nasty old microwave.

For being a dumpster find, the Selectric II was actually in pretty decent shape. The first couple of minutes of the video after the break show not only the minimal repairs needed to get the typewriter back on its feet, but also a whirlwind tour of the remarkably complex mechanisms that turn keypresses into characters on the page. As it turns out, knowing how the mechanical linkages work is the secret behind converting the Selectric into a teletype, entirely within the original enclosure and with as few modifications to the existing mechanism as possible.

Keypresses are mimicked with a mere thirteen solenoids — six for the “latch interposers” that interface with the famous whiffletree mechanism that converts binary input to a specific character on the typeball, and six more that control thinks like the cycle bail and control keys. The thirteenth solenoid controls an added bell, because every good teletype needs a bell. For sensing the keypresses — this is to be a duplex terminal, after all — [alnwlsn] pulled a page from the Soviet Cold War fieldcraft manual and used opto-interrupters to monitor the positions of the latch interposers as keys are pressed, plus more for the control keys.

The electronics are pretty straightforward — a bunch of MOSFETs to drive the solenoids, plus an AVR microcontroller. The terminal speaks RS-232, as one would expect, and within the limitations of keyboard and character set differences over the 50-odd years since the Selectric was introduced, it works fantastic as a Linux terminal. The back half of the video is loaded with demos, some of which aptly demonstrate why a lot of Unix commands look the way they do, but also some neat hybrid stuff, like a ChatGPT client.

Hats off to [alnwlsn] for tackling a difficult project while maintaining the integrity of the original hardware.

Continue reading “Selectric Typewriter Goes From Trash Can To Linux Terminal”

Probably The World’s Most Expensive Bar Bot

Bar bots, or robotized bartenders, are a fun feature of events in our community, because there’s nothing like a cocktail untouched by human hand. Usually they have a row of bottles and a slide on which you put the glass, but [SecurityWriter] relates a tale of an altogether much grander affair. Given a weekend with a group of friends and an enterprise-grade IBM tape library robot, they did what any sensible engineer would do. They turned it into a bar bot.

Most readers probably won’t have seen a consumer grade data tape for decades, but in the enterprise space they’re very much the most cost effective backup solution. Large corporations have vast numbers of them, and IBM sells robots which retrieve them automatically from huge storage racks. When a group of young techs were given the tedious task of cataloging the whole thing and found themselves stuck in an empty data center for a weekend, of course they produced what was probably the world’s most expensive automated drinking game. Stocking the shelving system with booze and using the command line control for the robot they were able to have it deliver their beverages, and shockingly they managed to do so without the whole thing breaking.

It’s a hack, even if it’s one of which by necessity no evidence remains. Sadly Hackaday doesn’t have a tape library, or you can bet we’d be tempted to give it a try ourselves. Never mind, we can continue to sample more conventional bar bots from time to time.

Bringing Up An Old Motherboard Is A Delicate Process

If you were around for the early days of the personal computer revolution, you’ll no doubt recall the excitement every time IBM announced a new version of its beige boxes. For a lot of us, the excitement was purely vicarious, for despite the “personal” moniker, mere mortals could rarely afford a branded IBM machine. But it was still cool to keep track of the latest releases, and dream of the days when cheap clones would make it possible to play.

[Anders Nielsen]’s recent find of an original IBM Model 5160 motherboard sort of echoes that long-ago excitement, but in a different way. This board, from a PC XT built in 1984, was in unknown condition upon arrival, so [Anders] set about a careful process to try to bring the board back to life. A quick visual inspection leaves one with a sense of both how much things have changed, and how much they’ve stayed the same. Aside from the big 40-pin DIP 8088 CPU and the BIOS ROMs, the board is almost completely populated with discrete logic chips, but at the same time, the basic footprint of a motherboard has changed very little.

The bring-up process in the video below includes checks of all the power rails for shorts, which ended up being a good call — drat those tantalums. After fixing that issue, [Anders] had a bit of trouble getting the board to POST, and eventually resorted to dumping the BIOS ROMs and inspecting the contents. One of the chips had picked up a case of the scramblies at some point, which was easy enough to fix thanks to images of the 5160 ROMs available online. We thought the trick of using a 64k ROM and just writing the BIOS image twice was pretty clever.

In the end, the board came up, although without video or keyboard — that’s for another day. Can’t find your own PC XT motherboard to play with? Then maybe you can just build one.

Continue reading “Bringing Up An Old Motherboard Is A Delicate Process”