Few Things Are Cheaper Than This Antenna

As far as hobbies go, ham radio tends to be on the more expensive side. A dual-band mobile radio can easily run $600, and a high-end HF base station with the capability of more than 100 watts will easily be in the thousands of dollars. But, like most things, there’s an aspect to the hobby that can be incredibly inexpensive and accessible to newcomers. Crystal radios, for example, can be built largely from stuff most of us would have in our parts drawers, CW QRP radios don’t need much more than that, and sometimes even the highest-performing antennas are little more than two lengths of wire.

For this specific antenna, [W3CT] is putting together an inverted-V which is a type of dipole antenna. Rather than each of the dipole’s legs being straight, the center is suspended at some point relatively high above ground with the two ends closer to the earth. Dipoles, including inverted-Vs, are resonant antennas, meaning that they don’t need any tuning between them and the radio so the only thing needed to match the antenna to the feed line is a coax-to-banana adapter. From there it’s as simple as attaching the two measured lengths of wire for the target band and hoisting the center of the antenna up somehow. In [W3CT]’s case he’s using a mast which would break the $8 budget, but a tree or building will do just as well.

The video on the construction of this antenna goes into great detail, so if you haven’t built a dipole yet or you’re just getting started on your ham radio journey, it’s a great place to get started. From there we’d recommend checking out an off-center-fed dipole which lets a dipole operate efficiently on multiple bands instead of just one, and for more general ham radio advice without breaking the bank we’d always recommend the $50 Ham series.

Continue reading “Few Things Are Cheaper Than This Antenna”

APRS Implemented At Low Cost And Small Size

Before smartphones and Internet of Things devices were widely distributed, the Automatic Packet Reporting System (APRS) was the way to send digital information out wirelessly from remote locations. In use since the 80s, it now has an almost hipster “wireless data before it was cool” vibe, complete with plenty of people who use it because it’s interesting, and plenty of others who still need the unique functionality it offers even when compared to more modern wireless data transmission methods. One of those is [Tyler] who shows us how to build an APRS system for a minimum of cost and size.

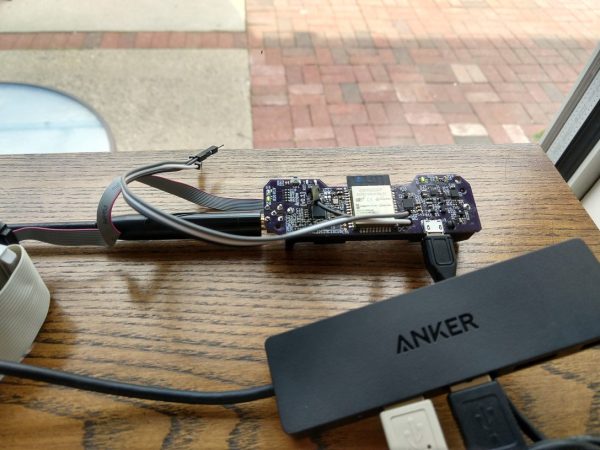
[Tyler]’s build is called Arrow and operates on the popular 2 metre ham radio band. It’s a Terminal Node Controller (TNC), a sort of ham radio modem, built around an ESP32. The ESP32 handles both the signal processing for the data and also uses its Bluetooth capability to pair to an Android app called APRSDroid. The entire module is only slightly larger than the 18650 battery that powers it, and it can be paired with a computer to send and receive any digital data that you wish using this module as a plug-and-play transceiver.

While the build is still has a few limitations that [Tyler] notes, he hopes that the project will be a way to modernize the APRS protocol using methods for radio transmission that have been improved upon since APRS was first implemented. It should be able to interface easily into any existing ham radio setup, although even small balloon-lofted radio stations can make excellent use of APRS without any extra equipment. Don’t forget that you need a license to operate these in most places, though!

Telepresence Robot Navigates Upgrades

As time marches on and a good percentage of us are still isolating from society at large, the progress of technology isn’t kept as stagnant. Earlier this year we featured a project about a much-needed small telepresence robot with an exceptionally low barrier for entry, and with the progress of time it has received several upgrades and some crowdfunding, all while preserving its original intent of a simple and easily-operated way of keeping in contact with others.

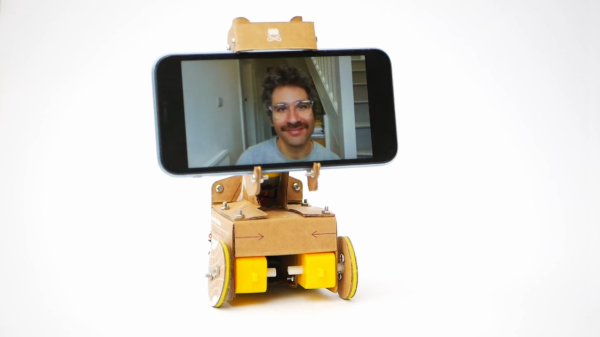
The new robot is still based on the cardboard design that holds a smartphone and drives it around using a microcontroller platform, but thanks to its small size and low power requirement this seems to suit it nicely. Improvements over the original design include a more robust one-size-fits-all phone mount and a more refined cardboard body. Also, since the small size is a little bit of a downside when navigating anywhere that isn’t a desk or counter, the new version makes it easier to make modifications such as adding a pedestal which can elevate the phone and improve the experience of the remote driver. A number of other optional modifications are possible as well, including a grabbing arm.

While telepresence robots unfortunately are needed now more than ever, we are happy to see people like [Ross] take on projects like this which will hopefully help improve our shared situation by allowing us to have a more involved level of contact with people we would otherwise prefer to see in person. If you’d like to build your own without waiting on the crowdfunding, be sure to check out the original project we featured back in April.

Get Back Out There, Robotically

When interacting with reality at a distance is the best course of action, we turn to robots. Whether that’s exploring the surface of Venus, the depths of the ocean, or (for the time being) society at large, it’s often better to put a robot out there than an actual human being. We can’t all send robots to other planets, but we can easily get them in various other places with telepresence robots.

This tiny telepresence robot comes to us from [Ross] at [Crafty Robot] who is using their small Smartibot platform as a basis for this tiny robot. The smartibot drives an easily-created cardboard platform, complete with wheels, and trucks around a smartphone of some sort which handles the video and network capabilities. The robot can be viewed and controlled from any other computer using a suite of web applications that can be found on the project page.

The Smartibot platform is an inexpensive platform that we’ve seen do other things like drive an airship, and the creators are hoping that as many people as possible can get some use out of this quick-and-easy telepresence robot if they really need something like this right now. The kit seems like it would be useful for a lot of other fun projects as well.

Continue reading “Get Back Out There, Robotically”

LIDAR Built On Familiar Platform

Moore’s law may have reached its physical limit for transistor density, but plenty of other technologies are still on that familiar path of getting smaller and smaller as time passes. It looks like LIDAR is no exception to this trend either. This project from [Owen] shows a fully-functional LIDAR system for about $20 and built almost entirely on top of an ESP32.

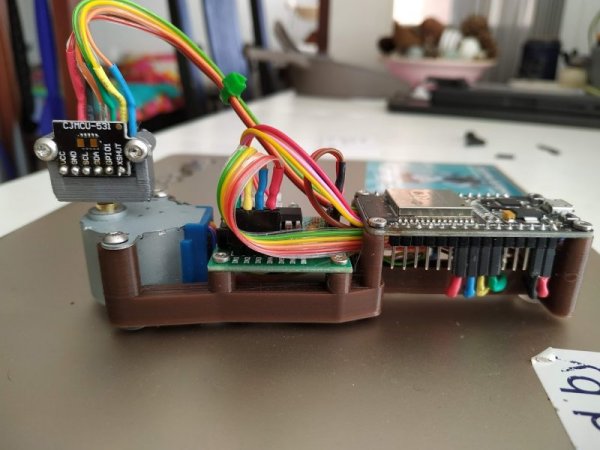
The build uses a Time-Of-Flight IR laser range sensor controlled by the ESP32, and the sensor is much smaller than even the ESP32’s footprint so it takes up very little extra space. To get it to function as a LIDAR system instead of just a simple rangefinder it does need a motor in order to rotate itself to see its entire space. Besides its small form factor and low cost, it also has a handy user interface that can run anywhere an HTML5 browser can run, making the use of the system easy and straightforward as well. All of the code is available on the project’s GitHub page.

We wouldn’t expect a system like this to be driving an autonomous car anytime soon, it’s update rate is far too slow, but its intent for small robots and even as an educational demo for learning LIDAR is second to none. If you do need a little more power in a LIDAR system but still don’t want to break the bank, we featured this impressive setup a few weeks ago.

3D Printing Pen And CNC Machine Yields Cheap 3D Printer

3D printers are ubiquitous now, but they’re still prohibitively expensive for some people. Some printers cost thousands, but even more inexpensive options aren’t exactly cheap. [Daniel] decided that this was unacceptable, and set out to make a basic 3D printer for under $100 by including only the bare essentials needed for creating anything out of melted plastic.

3D printers are essentially four parts: a bed, filament, and a hot end and extruder. In a previous project, [Daniel] used parts from old CD drives to create a three-axis CNC machine which he uses for the bed. To take care of the hot end and extruder, he is using a 3D printing pen which he mounts to the CNC machine and voila: a 3D printer!

It’s not quite as simple as just strapping a 3D printing pen to a CNC machine, though. The pen and the CNC machine have to communicate with each other so that the pen knows when to place filament and the CNC machine knows when to move. For that, [Daniel] went with a trusty Arduino in order to switch the pen on and off. Once it’s working, it’s time to start printing!

[Daniel] does note that this is a design that’s relatively limited in terms of print size and resolution, but for the price it can’t be beat. If you’re interested in getting started with 3D printing, a setup like this would be perfect. 3D pens are a pretty new idea too, and it’s interesting to see them used in different ways like this.

Adjustable Desk

An Adjustable Sit/Stand Desk For Under $100

[Cornel Masson] is a 46-year-old computer programmer. He’s been working on his computer for the last 30 years. Computer work can be good for the wallet but it can be bad for our health, particularly the neck and back. You can purchase adjustable desks to allow you to change positions from sitting to standing, but unfortunately these desks are often expensive. [Cornel] took matters into his own hands and build his own adjustable riser for under $100.

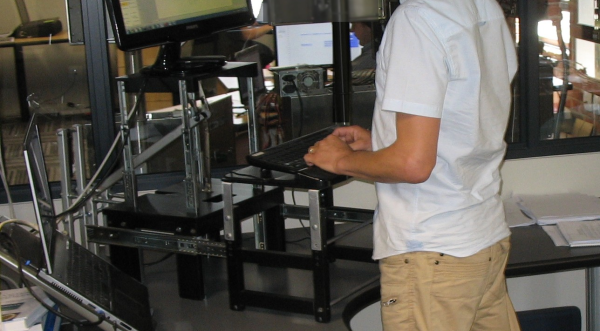
To start, [Cornel] used a typical computer desk. He didn’t want to build the entire thing from scratch. Instead he focused on building a riser that sits on top of the desk, allowing him to change the height of both the monitor and keyboard. His design used mostly wood, aluminum stock, threaded rods, and drawer slides.

The main component is the monitor stand and riser. The riser is able to slide up and down thanks to four drawer slides mounted vertically. [Cornel] wanted his monitor to move up and down with ease, which meant he needed some kind of counter weight. He ended up using a gas strut from the trunk of a Nissan, which acts as a sort of spring. The way in which it is mounted makes for a very close approximation of his monitor’s weight. The result is a monitor that can be raised or lowered very easily. The stand also includes a locking mechanism to keep it secured in the top position.

The keyboard stand is also mounted to drawer slides, only these are in the horizontal position. When the monitor is lowered for sitting, the keyboard tray is removed from the keyboard stand. The stand can then be pushed backwards, overlapping the monitor stand and taking up much less space. The keyboard stand has small rollers underneath to help with the sliding. The video below contains a slideshow of images that do a great job explaining how it all works.

Of course if replacing the entire desk is an option go nuts.

Continue reading “An Adjustable Sit/Stand Desk For Under $100”