GB Interceptor Enables Live Screen Capture From Game Boy

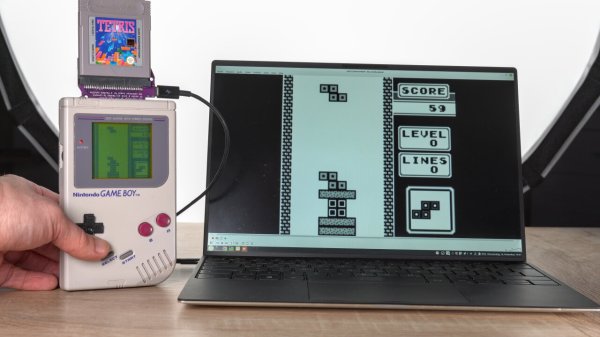
[Sebastian] had a tricky problem to solve. Competitors in a Tetris tournament needed to stream video of their Game Boy screens, but no solution readily existed. For reasons of fairness, emulators were right out, and no modifications could be made to the Game Boys, either. Thus, [Sebastian] created the GB Interceptor, a Game Boy capture cartridge.

Thanks to the design of the Game Boy, there’s plenty of access to useful signals via the cartridge port itself. [Sebastian] realized that a non-invasive capture device could be built to sit in-between the Game Boy and a cart, and send video to a computer. Unfortunately, there’s no direct access to the video RAM via this port, but [Sebastian] figured out a nifty workaround.

The build uses a Raspberry Pi Pico. The chip’s two cores emulate the Game Boy’s CPU and Picture Processing Unit, respectively. Doing this, while having the chips keep up with what’s going on in the Game Boy, required overclocking the Pico to 225 MHz. The system works by capturing data from the cartridge’s memory bus, and follows along with the instructions being run by the Game Boy. By doing this, the Pico is able to populate its own copy of the video RAM. It then spits this out over USB, where it can be displayed and streamed online as desired.

There are some edge-case limitations, but for its intended purpose, the system works great. Currently, the hardware is usable on Linux and Windows, though it does require some fiddling in the latter case. Files are on Github for those eager to build their own. If you simply want to dump carts rather than stream from your Game Boy, we can help there, too. Video after the break.

Continue reading “GB Interceptor Enables Live Screen Capture From Game Boy”

Your Own Santa? Thermal Camera Roundup

With Christmas and other end-of-year celebrations, there are gifts. The problem is that your loved ones don’t really know what to get you. Who can blame them? Do you want an Arduino, a Raspberry Pi, or a Blue Pill? Is that 3D printer on sale better than the one you have? Do you even want a second printer? They don’t know. In the best case, they’ll give you gift cards. But sometimes you just have to buy yourself something nice. [Wired] has a suggestion: a phone-based thermal camera. Which one? They have four suggestions ranging from about $150 to $200.

Different people have different reasons for wanting a thermal camera. You can see hot spots in electronics, for example. Or pick out hot water pipes behind walls. The resolution is limited. The highest in the [Wired] review is only 206×136. For the digital camera buffs, that’s 0.028 megapixels! Some cameras have even less resolution. For example, one of the cameras has an 80×60 resolution but uses an optical camera to give the illusion of a higher resolution.

Continue reading “Your Own Santa? Thermal Camera Roundup”

You Can Make Ferrofluid On The Cheap With VHS Tapes

Ferrofluid is a wonderous substance. It’s a liquid goop that responds to magnetic fields in exciting and interesting ways. It’s actually possible to make it yourself, and it’s cheap, too! The key is to get yourself some old VHS tapes.

The only fitting end for a copy of Speed II. 

The trick is to separate the ferric oxide from the plastic tape inside the VHS cassette. Step one is naturally to smash open a cassette, and pull out the plastic tape from inside. The tape can then be dunked in acetone to dissolve the plastic, leaving behind the ferric oxide that once stored your cherished copy of Heat. A magnet is an easy way to collect the ferric oxide, which should then be left to dry. The powdery substance can then be blended in a ratio of 1 mL of ferric oxide to 0.333 mL of cooking oil. Poor mixing can be improved by adding a droplet of water mixed with dish detergent. You should end up with a brownish sludge that acts as a rudimentary ferrofluid.

It’s a neat bit of home science. As with most such activities, it bears noting the safety risks. Don’t leave your acetone uncovered to form a nasty flammable vapor, and keep yourself keenly aware of any fire or ignition risks. Overall though, it’s a fairly straightforward process. While the resulting material isn’t necessarily lab grade, you could potentially use it to build your own ferrofluid display!

Old Robotic Vacuum Gets A New RC Lease On Life

To our way of thinking, the whole purpose behind robotic vacuum cleaners is their autonomy. They’re not particularly good at vacuuming, but they are persistent about it, and eventually get the job done with as little human intervention as possible. So why in the world would you want to convert a robotic vacuum to radio control?

For [Lucas], the answer was simple: it was a $20 yard sale find, so why not? Plus, he’s got some secret evil plan to repurpose the suckbot for autonomous room mapping, which sounds like a cool project that would benefit from a thorough knowledge of this little fellow’s anatomy and physiology. The bot in question is a Hoover Quest. Like [Lucas] we didn’t know that Hoover made robotic vacuums (Narrator: they probably don’t) but despite generally negative online reviews by users, he found it to be a sturdily built and very modular and repairable unit.

After an initial valiant attempt at reverse engineering the bot’s main board — a project we encourage [Lucas] to return to eventually — he settled for just characterizing the bot’s motors and sensors and building his own controller. The Raspberry Pi Zero he chose may seem like overkill, but he already had it set up to talk to a PS4 game controller, so it made sense — right up until he released the Magic Smoke within it. A backup Pi took the sting out of that, and as the brief video below shows, he was finally able to get the bot under his command.

[Lucas] has more plans for his new little buddy, including integrating the original sensors and adding new ones. Given its intended mission, we’d say a lidar sensor would be a good addition, but that’s just a guess. Whatever he’s got in store for this, we’re keen to hear what happens.

Continue reading “Old Robotic Vacuum Gets A New RC Lease On Life”

2022 FPV Contest: A Poor Man’s Journey Into FPV

FPV can be a daunting hobby to get into. Screens, cameras, and other equipment can be expensive, and there’s a huge range of hardware to choose from. [JP Gleyzes] has been involved with RC vehicles for many years, and decided to leverage that experience to do FPV on a budget.

Early experiments involved building a headset on the cheap by using a smartphone combined with a set of simple headset magnifiers. With some simple modifications to off-the-shelf hardware, [JP] was able to build a serviceable headset with  a smartphone serving as the display. Further work relied upon 3D printed blinds added on to a augmented-reality setup for even better results. [JP] also developed methods to use a joystick to fly a real RC aircraft. This was achieved by using an Android phone or ESP32 to interface with a joystick, and then spit out data to a board that produces PPM signals for broadcast by regular RC hardware.

[JP] put the rig to good use, using it to pilot a Parrot Disco flying wing drone. The result is a cheap method of flying FPV with added realism. The first-person view and realistic controls create a more authentic feeling of being “inside” the RC aircraft.

It goes to show that FPV rigs don’t have to break the bank if you’re willing to get creative. We’ve seen some great FPV cockpit builds before, too.

Continue reading “2022 FPV Contest: A Poor Man’s Journey Into FPV”

Arduboy Mini Is A Fresh Take On An 8-bit Favorite

We’ve always been big fans of the Arduboy here at Hackaday. When creator Kevin Bates showed us the original prototype back in 2014, the idea was to use his unique method of mounting components inside routed holes in the PCB to produce an electronic business card that was just 1.6 mm thick. But the Internet quickly took notice of the demos he posted online, and what started as a one-off project led to a wildly successful Kickstarter for a sleek handheld gaming system that used modern components and manufacturing techniques to pay homage to the 8-bit retro systems that came before it.

The original Arduboy prototype in 2014

It’s the sort of hacker success story that we live for around here, but it didn’t end there. After the Kickstarter, the Arduboy community continued to grow, thanks in no small part to Kevin never forgetting the open source principles the product was built on.

He took an active role in the growing community, and when some Arduboy owners started tinkering with adding external storage to their systems so they could hold hundreds of games at a time, he didn’t chastise them for exploring. Instead, he collaborated with them to produce not only a fantastic add-on modification for the original Arduboy, but a new version of the Arduboy that had the community-inspired modifications built in.

Now Kevin is back with the Arduboy Mini, which not only retains everything that made the original a success, but offers some exciting new possibilities. There’s little doubt that he’s got another success on his hands as well as the community’s backing — at the time of this writing, the Kickstarter campaign for the $29 USD Mini has nearly quadrupled its funding goal.

But even still, Kevin offered us a chance to go hands-on with a prototype of the Arduboy Mini so that anyone on the fence can get a third party’s view on the new system. So without further ado, let’s take a look at how this micro machine stacks up to its full-sized counterparts.

Continue reading “Arduboy Mini Is A Fresh Take On An 8-bit Favorite”

Another Magnetron Teardown

[Electronoobs] has a healthy respect for the voltages and ceramics inside a microwave oven. But he still found the courage to tear one apart and show us the insides and characterize some of the components. You can see the video of the teardown below.

The danger of the voltage is obvious. However, there is also a ceramic insulator inside. Some of them are made from aluminum oxide, but others are made with beryllium oxide. You probably don’t want to inhale either one, but beryllium oxide, if powdered, can cause serious health problems. Obviously, you need to be careful if you decide to rip your oven open.  Of course, the other danger is if you put the oven back together and try to use it. You need to ensure all the shielding is back in the proper place.

The video shows the operation of several of the components using test equipment and, in some cases, some surrogate components. The animation of an LC oscillator is very easy to understand. However, when he actually cuts into the magnetron with a rotary tool, you can really see how the device works. Some animations make it even clearer.

We haven’t seen a magnetron teardown for a few years. You can do many things with a magnetron from radar to vacuum deposition of films.

Continue reading “Another Magnetron Teardown”