Kerfmeter Measures Laser Cutter Kerf Allowances On The Fly

Nothing beats a laser cutter and a sheet of Baltic birch plywood or MDF when it comes to making quick, attractive enclosures. Burning out all the pieces and fitting them together with finger joints is super satisfying — right up until you realize that you didn’t quite get the kerf allowance right, and your pieces don’t fit together very nicely. If only there was a way to automate kerf measurement.

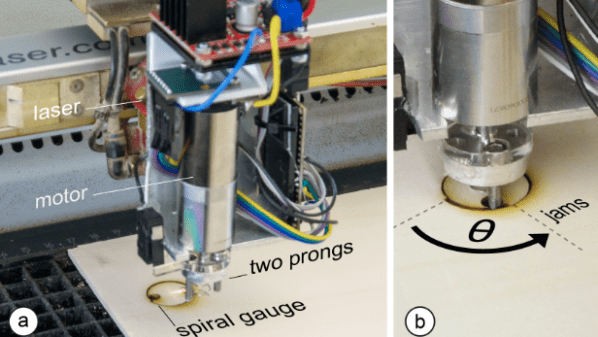
There is, in the form of Kerfmeter. It comes to us by way of the lab of [Patrick Baudisch] at the University of Potsdam, where they’ve come up with a clever way to measure the kerf of a laser cutter right during the cutting session. With the Kerfmeter mounted directly to the laser cutter head, a small test artifact based on an Archimedean spiral is cut into a corner of the workpiece. Pins on a small motor engage with the object and turn it until it jams in its hole; the wider the kerf, the greater the angle. Once the kerf is calculated, the rest of the design can be dilated by the proper amount to achieve a perfect fit. The video below shows it better than words can explain it.

What we like about this is its simplicity — all it involves is a motor and a microcontroller, plus a little software. It seems much faster than using a traditional kerf gauge, not to mention more precise. And while it does use up a little bit of material, the test pattern is really pretty small, all things considered. Seems like a reasonable trade-off to us. Still, if you want to figure out your kerfs the old-fashioned way, we’ve got you covered.

Continue reading “Kerfmeter Measures Laser Cutter Kerf Allowances On The Fly”

Better Laser Cuts: Know Your Kerf

The recent crop of laser cutters are nothing short of miraculous. For a few hundred dollars you can get a machine that can easily engrave and — subject to materials — cut well, too. [Nate] has been taking advantage of a laser to make boxes that join together using finger joinery. The problem is, the pieces have to fit exactly to get a good box. While setting dimensions in software is fine, you need to account for how much material the laser removes — something traditional woodworkers and machinists know as kerf.

You can, of course, employ trial and error to get good results. But that’s wasteful and potentially time-consuming. [Nate] built a “tolerance fence” that is quick to cut out and allows accurate measurement of kerf. You can quickly use the tolerance fence to make measurements and increase your chances of nailing your boxes on the first cut.

You have to customize the fence based on the thickness of your material. [Nate] uses Lightburn, which probably has a kerf offset already set by default in your layers. If not, you’ll need to turn it on and set an estimate of your kerf size. Then you are ready to cut the fence pieces and see how they fit together.

If the fit is too loose, you want to raise the kerf setting and try again. If it is too tight, you lower the kerf setting. As [Nate] says, “Lower equals looser.”

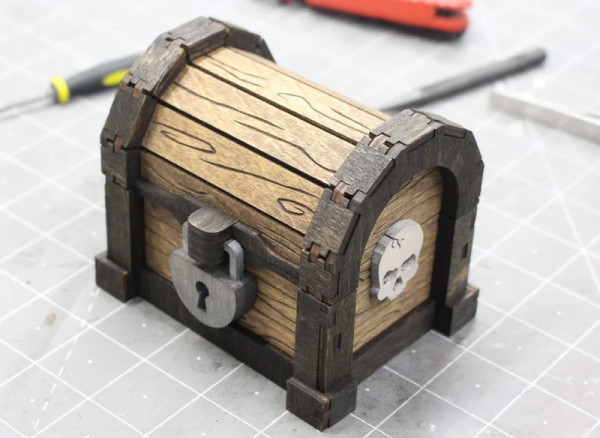
The results speak for themselves, as you can see in the treasure chest image [Nate] provided. Well worth the effort to get this parameter right. We do enjoy laser cutting and engraving things. If you are cutting and don’t have air assist, you really need to hack up something.

Hackaday Links: September 7, 2012

MakerSlide, European edition

We’re all familiar with the MakerSlide, right? The linear bearing system that has been turned into everything from motorized camera mounts to 3D printers is apparently very hard to source in Europe. A few folks from the ShapeOko forum have teamed up to produce the MakerSlide in the UK. They’re running a crowdsourced project on Ulule, and the prices for the rewards seem very reasonable; €65/£73 for enough extrusion, v-wheels, and spacers to make an awesome CNC router.

Kerf bending and math

A few days ago, I made an offhand remark asking for an engineering analysis of kerf bending. [Patrick Fenner] of the Liverpool hackerspace DoES already had a blog post covering this, and goes over the theory, equations, and practical examples of bending acrylic with a laser cutter. Thanks for finding this [Adrian].

276 hours well spent

[Dave Langkamp] got his hands on a Makerbot Replicator, one thing led to another, and now he has a 1/6 scale model electric car made nearly entirely out of 3D printed parts. No, the batteries don’t hold a charge, and the motor doesn’t have any metal in it, but we’ve got to admire the dedication that went in to this project.

It was thiiiiiiis big

If you’ve ever tried to demonstrate the size of an object with a photograph, you’ve probably placed a coin of other standard object in the frame. Here’s something a little more useful created by [Phil]. His International Object Sizing Tool is the size of a credit card, has inch and cm markings, as well as pictures of a US quarter, a British pound coin, and a one Euro coin. If you want to print one-off for yourself, here’s the PDF.

Want some documentation on your TV tuner SDR?

The full documentation for the E4000/RTL2832U chipset found in those USB TV tuner dongles is up on reddit. Even though these chips are now out of production (if you haven’t bought a proper tuner dongle yet, you might want to…), maybe a someone looking to replicate this really cool device will find it useful.

Playing Around With Kerf Bending

With laser cutters popping up in hackerspaces and maker’s tool sheds like weeds, it’s no surprise we’re seeing an explosion in manufacturing techniques that would be nearly impossible without a laser cutter. One of these techniques is kerf bending, a method of bending plywood simply by burning patterns along the desired bend. [Martin] just put up a great tutorial on kerf bending with a laser cutter, and even came up with a few very interesting patterns that can be used to build your own case with rounded corners.

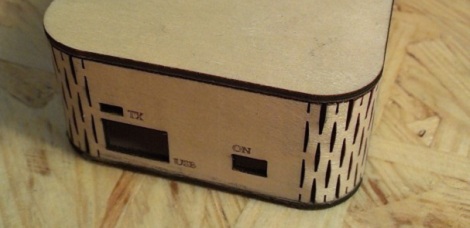
[Martin]’s adventures into kerf bending began with a small radio transmitter case he built. This case used the very common ‘vertical slit’ method, but in the first version of the case, the slits were placed too far apart. By moving the slits closer together, [Martin] was left with a very easy to bend and very strong wooden case.

There are also a few other patterns [Martin] tried out. A herringbone pattern made for a wooden case nearly as bendable (and a little stronger) as the traditional vertical slit method. From there, [Martin] branched out into more esoteric patterns such as a medieval cross and Space Invader pattern, both ideal for your next highly stylized enclosure.

In the end, [Martin] says just about any pattern will work for kerf bending, so long as the design isn’t diagonal to the bend. We’d love to see some proper engineering analysis for kerf bending, so if you can figure out the optimal pattern for high strength, low machine time bends, send it in on the tip line.

Portable Radio Station Gets A Beautiful Case

[Martin] put together a simple portable radio unit to take some MP3s with him while he’s out and around. The build was simple; just a no-name Chinese MP3 player, a battery, and an FM radio transmitter. To give his project a little more pizzazz, he came up with a very handsome laser cut wooden case to turn what would be a bunch of wires and components into an attractive build.

[Martin]’s case makes wonderful use of the kerf bending technique. By cutting small staggered lines in a piece of plywood, [Martin] was able to bend his laser cut enclosure into a surprisingly tight radius. With the help of a pair of laser cut forms and a bit of hot water and glue, he was able to make the shape of his case permanent.

The top and bottom of his case are also laser cut plywood, but [Martin] included a translucent plexiglas logo on the top. When his radio unit is activated a LED inside his project box lights up, illuminating his personal logo.

Kerf bending is something we’ve seen before, and we’re looking forward to seeing more project boxes use it in the future, hopefully with the application of a veneer to cover the diamond-shaped holes.

Accounting For Material Loss When Laser Cutting


When you cut something out, you lose a bit of material in the process. Think of a table saw and the sawdust it produces, that’s the waste material lost in an area the width of the blade. It’s really easy to measure that, just measure the blade. But [James] started wondering about a good way to measure material loss from a laser cutter.

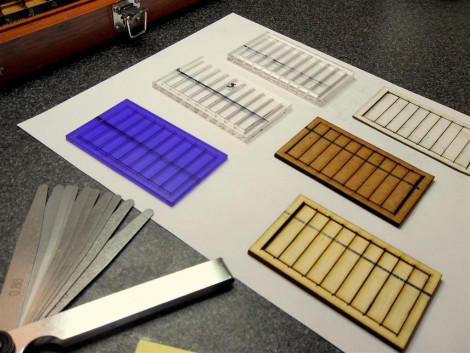
Why does it matter? If you’ve designed pieces that should fit together with each other, loss of material can lead to joints that aren’t tight. [James] figured out that the loss could be measured by making several cuts within a rectangular frame. You can see his test pieces above, with ten strips cut out of each frame. After the laser is done doing it’s work just slide all the pieces together and measure the opening created at one end. It helps to have an enhanced caliper to make the measurement easy to read. Now divide that distance by the number of laser passes and account for that dimension next time you design parts for the cutter.