Workshop Computer Floats Above Bench And Is Nearly Wireless

all-in-one-workshop-computer

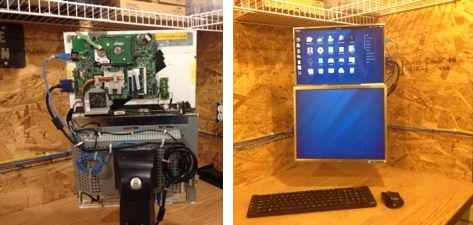
[Ezra] used the parts he had lying around to build a self-contained dual screen shop computer. What might one name such a project? Obviously you’d call it the Dr. FrankenComputer.

The lower monitor is a dell desktop flat screen. During prototyping [Ezra] used the stand to support everything. But to keep his work space clear the final version has been mounted to the wall in the corner of his lab. The upper display is the LCD from a Compaq laptop which he wasn’t using. The laptop still works and we believe that’s what is driving the Fedora system. A bracket mounted to the desktop screen’s inner skeleton supports the laptop screen and motherboard. One power supply feeds everything and connects to an outlet in the wall behind the monitors. The keyboard and mouse are wireless, as is the computer’s connection to the network.

The only thing we would worry about in our own shop is sawdust filling the heat sinks and other components of the motherboard. Perhaps his lab is electronic projects only or he has a dust cover that he uses when the system isn’t in use.

Raspberry Pi Laptop Is Just A Little Too Big For A Pocket

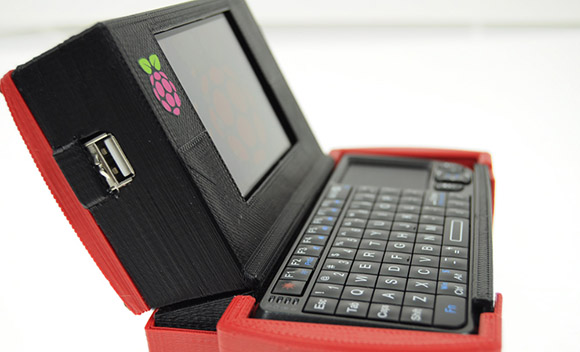
Over on the Parts People blog, [Nathan] created his own Raspberry Pi laptop. It’s got all the bells and whistles, including a keyboard, trackpad, battery, and even a 3D printed case.

Of course [Nathan]’s laptop contains a Raspi, but the other included parts are where this palmtop computer is turned into something useful. For powering the Pi and 3.5″ composite LCD, [Nathan] took apart the battery pack from an old Dell laptop. By throwing out the bits of plastic surrounding these rechargeable cells and reusing the battery connector, [Nathan] was able to power the Pi, and all the peripherals for 10 hours.

Also included in [Nathan]’s Raspi palmtop is a 64 GB SSD connected to the powered USB hub. This, along with the 4 GB boot SD card, provides more than enough storage for listening to a music library, or even watching a few TV shows on the 3.5″ screen,


Hacked Together NAS In A Box

hacked-together-nas-in-a-box

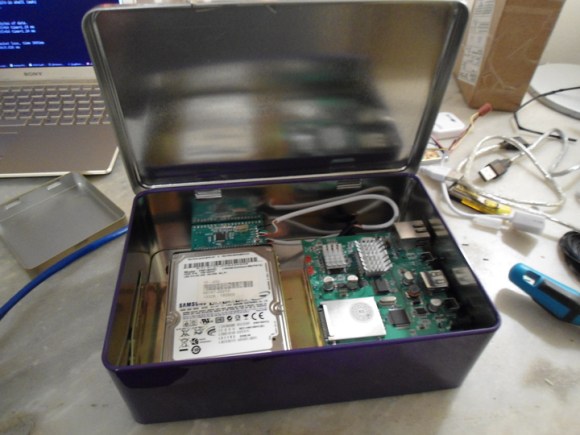
[David] is serving up files on his home network thanks to this Frankenstein’s monster of a Network Attached Storage device. It looks like he raided all the good bits from his parts bin to bring it all together.

The case is a tin box which may have been for a card/board game or some holiday treats. The hardware started with an NS-K330 server which he picked up from Deal Extreme. It has a NIC and a couple of USB ports but it tends to run really hot so he added a heat sinks to the board’s main chips. The hard drives are both 2.5″ form factor from old laptops. He uses some 2.5″ to 3.5″ mounting adapters to attach them to the tin box. A pair of USB to IDE adapters shed their cases and were solder directly to the wires which make a connection with the server’s USB ports.

There is a Linux distro specifically for this hardware but [David] wasn’t impressed with it. He ended up compiling OpenWRT for it and is satisfied with the functionality that provides.

Click to embiggen

[Bunnie] Builds A Laptop For Himself, Hopefully Us


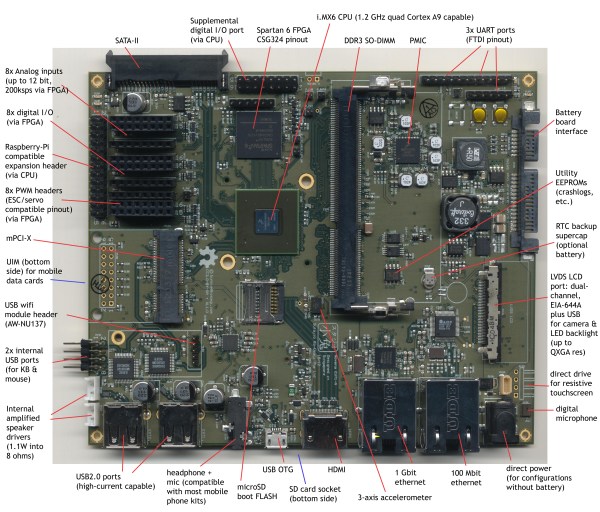
[Bunnie Huang], creator of the Chumby and artisan of chips and electrons, is building his own completely open source laptop. It’s called the Novena, and is powered by a quad-core ARM CPU, it’s got enough bells and whistles to make any hacker happy including an on-board FPGA, dual Ethernet ports, and enough GPIO pins to do some crazy, crazy stuff.

[Bunnie]’s laptop is an attempt to create a completely open-source laptop capable of some light code development, and web browsing. Every single chip on [Bunnie]’s laptop has a datasheet available (without requiring an NDA, unlike the Raspberry Pi), meaning this laptop might be the beginning of a completely open source laptop.

Officially, this laptop is a one-off project made just for [Bunnie]. He’ll be spending the next few months validating all features on the board and making a proper case. [Bunnie] says a few people may be interested in their own Novena (smart one, that guy), so he might consider a Kickstarter campaign in a few months. Don’t expect it to be cheap, but if you’d like to try your hand at making your own, all the files are up on the Novena wiki.


Internet Radio Occupies An 80-year-old Radio Case

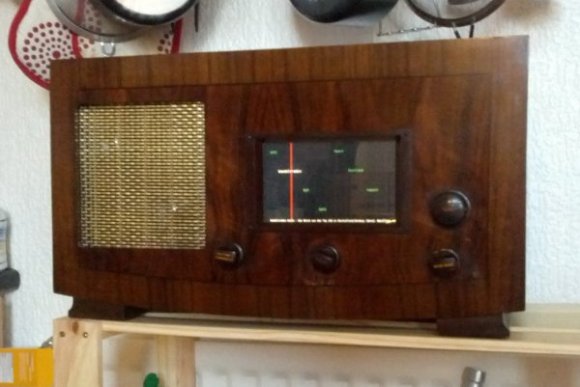
[Florian Amrhein] made use of some old hardware to build his own internet radio in a 1930’s radio case.

The original hardware is a tube-amplified radio which he picked up on eBay. There’s tons of room in there once he removed the original electronics and that’s a good thing because he crammed a lot of new parts into the build. The main one being an old laptop he had on hand. It’s got a 10″ screen which is too large for the opening, but that ended up being okay. He coded an interface with C and SDL which give him a visual representation of his favorite online streams. The knob to the right moves the red line when turned and causes the Debian box to change to the new stream using the Music Player Daemon. Two potentiometers control the tuning and volume, and there is also a rotary encoder which is not yet in use. All three are connected to the laptop via an Arduino.

Check out the finished product in the video after the break. It sounds quite good thanks to the small automotive speaker and amplifier also crammed into the old case.

If you don’t have a laptop lying around to use in a project like this consider a microcontroller and character LCD based system.

Continue reading “Internet Radio Occupies An 80-year-old Radio Case”

Laptop Motherboard Reborn As A Low-wattage Server

[Darknezz] sent us a set of photos and some details about his damaged laptop motherboard turned into a server. A client brought him a Dell 1525 on which nothing was showing up on the LCD screen. The HDMI and VGA still worked, and he traced the problem to no signal coming out of the motherboard. He swapped the board out to get the laptop working again, but he client said he could keep the damaged one.

It has a dual-core CPU which meets his needs and since it’s meant to run off of a battery it’s as energy-efficient as possible. [Darknezz] dug through his parts bin and found a PSU that could supply the needed 19.5V at 3.5A. The connector didn’t match but it didn’t take him too long to patch into it using a spare Molex connector. He also needed a power button and ended up soldering a momentary push switch to a couple of pads which he traced out form the original connector. The only thing he actually ended up purchasing were the memory modules. Check out the photos he took of the alterations in the gallery after the break.

Continue reading “Laptop Motherboard Reborn As A Low-wattage Server”

Laptop LCD Resurrection Gets Some Clean Packaging

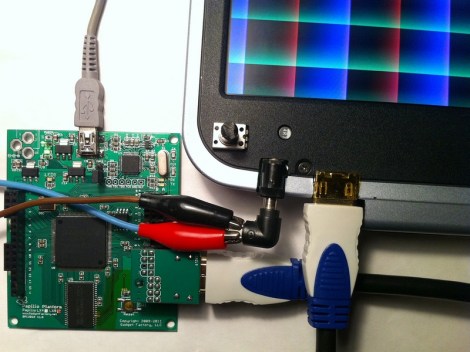
We love to see derivative works that take a great hack and make it even better. This LCD Laptop resurrection project is an excellent example. [Alex] took the work seen on this other FPGA LCD driver and delivered a leap forward on the final hardware packaging.

The link at the top drops you into the second page of [Alex’s] project thread. But if you go back to the beginning you’ll see the protoboard and spaghetti wiring which started off the process. Obviously if he plans to use this for a length of time it needs to be fortified or he’ll be cracking it open and grabbing a soldering iron again before long. But rather than just tidying up he ended up spinning his own circuit boards that make the screen look like it was manufactured to be used in this way.

He was able to mount the add-on board inside the LCD bezel, cutting out a space for the HDMI connector, barrel jack, trimpot, and the head of the inductor which was just a bit too large to fit inside. The trimpot allows him to adjust the LCD brightness. As far as we can tell the HDMI connector is just an easy way for him to deliver the drive signals from the Papilio board (FPGA) to the screen.