Fail Of The Week: Transparent Circuit Design Is Clearly A Challenge

[Frank Zhao] wanted to try his hand at making a transparent circuit board. His plan was to etch the paths with a laser cutter and fill in the troughs with conductive ink. The grooves are ~0.1mm deep x ~0.8mm wide.

He used nickel ink, which is slightly cheaper than silver ink. The ink was among the least of his problems, though. At a measured resistance of several hundred ohms per inch, it was already a deal breaker since his circuit can’t function with a voltage drop above 0.3V. To make matters worse, the valleys are rough due to the motion of the laser cutter and don’t play well with the push-to-dispense nature of the pen’s tip. This caused some overflow that he couldn’t deal with elegantly since the ink also happens to melt acrylic.

[Frank] is going to have another go at it with copper foil and wider tracks. Do you think he would have fared better with silver ink and a different delivery method, like a transfer pipette? How about deeper grooves?


2013-09-05-Hackaday-Fail-tips-tileFail of the Week is a Hackaday column which runs every Thursday. Help keep the fun rolling by writing about your past failures and sending us a link to the story — or sending in links to fail write ups you find in your Internet travels.

A Folding Laser Cutter

Want a laser cutter, but don’t have the space for one? How about a portable machine to engrave and cut wood and plastics? A folding laser cutter solves these problems, and that’s exactly what Red Ant Lasers was showing off last weekend at Maker Faire.

Inside the team’s Origami laser cutter is a 40 Watt CO2 tube, shooting its beam along an entirely enclosed beam path. The beam travels through the body of the machine, out into the folding arm of the machine, and down to whatever material you’ve placed the Origami on. It’s a 40 Watt laser so it will cut plywood and plastics, and as shown in the video above, does a fine job at engraving plywood.

This is a Class 4 laser device operating without any safety glass, but from the short time I spent with the Red Ant team, this is a reasonably safe device. You will need safety glasses if you’re within five feet, but after that, everything (according to OSHA, I think) is safe and not dangerous. Either way, it’s a tool just like a table saw. You don’t see commentors on the Internet complaining about how a spinning metal blade is dangerous all the time, do you?

The Red Ant guys are currently running a Kickstarter for their project, with a complete unit going for $4200. It’s pricier than a lot of other lasers, but not being constrained by the size of a laser cutters enclosure does open up a few interesting possibilities. You could conceivably cut a 4×8 sheet of plywood with this thing, and exceptionally large engravings start looking easy when you have a portable laser cutter.

A Laser Cut Word Clock

DIY laser cut word clock.

What is a word clock? A word clock is a clock that displays the time typographically that is also an interactive piece of art. Rather than buy one for $1500, [Buckeyeguy89] decided to build one as a present for his older brother. A very nice present indeed!

There are many different things that come into play when designing a word clock. The front panel is made from a laser cut piece of birch using the service from Ponoko. Additionally, white translucent pieces of acrylic were needed to keep each word’s light from bleeding into the neighboring letters. The hardware uses two Arduinos to control the LEDs and a DS3231 RTC for keeping accurate time. The results are very impressive, but it would sure make assembly easier if a custom PCB was used in the final version. For a one-off project, this makes a great birthday present.

The craftsmanship of this word clock is great, making it well suited for any home. What projects have you built that involve more than just electronics? Sometimes, quality aesthetics make all the difference.

Fold-out Laser Cutter Prototype Promises Portability (But Maybe Not Safety)


fold out laser cutter

Often times it’s tricky to make space for a full size laser cutter… so a group of friends over at Pittsburgh TechShop have been working on designing a fold-out version for easy storage. It’s still a prototype/proof of concept, so we’ll overlook the obvious safety concerns for now.

It’s built predominately out of aluminum extrusion and a few custom machined parts. A 40W CO2 laser tube sits in the back with optics reflecting it out to the laser head. The X-axis pivots on a heavy duty hinge mechanism and then locks in place for use. Unfortunately there are no videos of it in action, but the whole arm-linkage is apparently quite rigid and robust.

Like we said, this is one of their first prototypes or proofs of concept — as they continue to enhance the design they are considering taking it to Kickstarter down the road. They plan on enclosing the beam path in order to make it safe, and we’ll certainly be interested to see how that works out!

For more info on the project, there’s a thread on Reddit going strong.

[Thanks Ollie!]

Laser Cut Miter Joints

polyhedraEvery project deserves its own laser cut enclosure, of course, but the most common method of joinery – an overabundance of mortises and tenons, and if you’re lucky, a bit of kerf bending – is a little unsightly. Until tastes in industrial design change to accommodate this simple but primitive method of joining two laser cut panels together at an angle takes hold, the search will continue for a better way to cut acrylic and plywood on a laser cutter. The folks at Just Add Sharks might have a solution to this problem, though: miter joints with a laser cutter.

Instead of the slots and tabs of the usual method of constructing laser cut enclosures, miter joints produce a nearly seamless method of joining two perpendicular panels. The key, of course, is cutting a 45° bevel at the joint and gluing or fastening the pieces together. Just Add Sharks is doing this with a laser cut jig that holds a plywood or acrylic piece at a 45° angle to the laser beam. Yes, it’s only one cut per pass, but after adjusting the depth of cut to 1.4 times the thickness of the material, miter joints are easy.

Using a laser for miter joints isn’t limited to 45°, either. There are a few examples of an octahedron and icosahedron. Of course fastening these mitered panels together will be a challenge, but that’s what clamps and glue are for.

Better Lasing With Pulses

laser

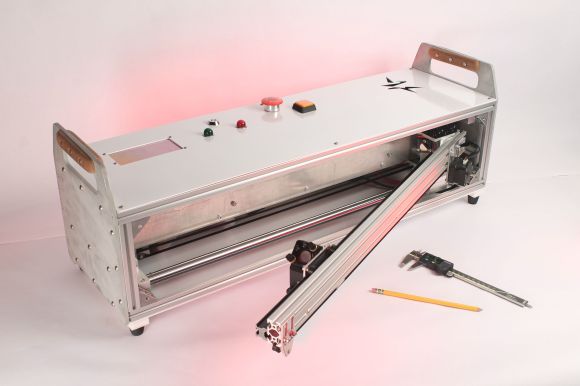
The folks at the Lansing, Michigan hackerspace built themselves a 40 Watt laser cutter. It’s an awesome machine capable of cutting plywood and acrylic, and is even powered by a RAMPS board, something normally found in 3D printers. They wanted a little more power out of their 40 Watt tube, though, and found pulsing the laser was the best way to do that.

Unlike the fancy Epilog and Full Spectrum Laser machines, the Buildlog.net 2.x laser cutter found in the Lansing Hackerspace didn’t use Pulse-Per-Inch (PPI) control until very recently. When a laser tube is turned on, the output power of the laser is much higher – nearly double the set value – for a few milliseconds. By pulsing the laser in 2-3 ms bursts, it’s possible to have a higher effective output from a laser, and has the nice added benefit of keeping the laser cooler. The only problem, then, is figuring out how to pulse the laser as a function of the distance traveled.

To do this, the laser cutter must accurately know the position of the laser head at all times. This could be done with encoders, which would require a new solution for each controller board. Since laser cutters are usually driven by stepper motors controlled with step and direction signals, a much better solution would be to count these signals coming from the CNC computer before it goes to the RAMPS driver, and turn the laser on and off as it moves around the bed.

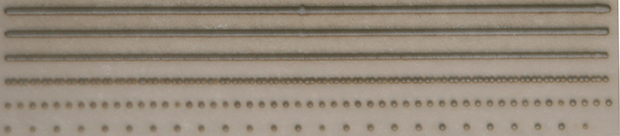
A few tests were done using various PPI settings, each one inch long, shown in the pic above. At 200 PPI, the laser creates a continuous line, and at higher PPI settings, the lines are smoother, but get progressively wider. The difference between PPI settings and having the laser constantly on is subtle, but it’s there; it’s not quite the difference between an axe and a scalpel, but it is a bit like the difference between a scalpel and a steak knife.

It’s an impressive build for sure, and something that brings what is essentially a homebrew laser cutter a lot closer to the quality of cutters costing thousands of dollars. Awesome work.


Customized IPad LCD Screen Clips Onto Macbook As A Slick Second Screen

Macbook with iPad second screen

Last year, [Ben] found a good deal on iPad 3 LCD screens. He couldn’t resist buying a couple to play around with. It didn’t take him long to figure out that it’s actually quite simple to use these LCD screens with any computer. This is because the LCD panels have built-in Apple Display port interfaces. This means that you can add your own Display Port connector to the end of the LCD’s ribbon connector and just plug it into a computer. You’ll also need to hook up a back light driver, which [Ben] was able to find pre-made for around $35.

The hack doesn’t stop there, though. [Ben] wanted to have a nice, finished product. He laser cut an acrylic bezel for the LCD screen that was a perfect fit. He then milled out a space for the LCD to fit into. The acrylic was thick enough to accommodate the screen and all of the cables. To cover up the back, [Ben] chose to use the side panel of a PowerMac G5 computer case. He chose this mainly for aesthetics. He just couldn’t resist the nice brushed aluminum look with the giant Apple logo. It would be a perfect match to his Macbook.

Once the LCD panel was looking nice, [Ben] still needed a way to securely fasten it in the right place. He knew he’d want it next to his Macbook, so why not attach it directly to the Macbook? [Ben] got to work with his 3D printer and printed up some small plastic clips. The clips are glued to the iPad screen’s acrylic bezel and can be easily clipped on and off of the Macbook screen in seconds. This way his laptop is still portable, but he has the extra screen real estate when he needs it. [Ben] also printed up a plastic clip that turns the iPad’s USB power connector and the Display Port connector into one single connector. While this is obviously not required, it does effectively turn two separate plugs into one and makes the whole project that much more slick.